Is your ice maker acting up, or do you need to do some repairs? One of the first steps is to turn off the water line to your ice maker.
But how exactly do you do that without causing a mess or flooding your kitchen? If you’re unsure or worried about making a mistake, don’t worry—you’re in the right place. You’ll learn simple, clear steps to safely and quickly turn off your ice maker’s water supply.
Keep reading to save time, avoid water damage, and get your ice maker back on track with ease.

Credit: www.amazon.com
Locate The Water Supply Valve
Find the water supply valve behind the refrigerator or under the sink. This valve controls water to the ice maker. Turn it off to stop water flow safely.
To safely turn off the water line to your ice maker, locate the water supply valve. This task can seem daunting but becomes manageable with the right guidance. Knowing where to find the valve is crucial for maintenance or emergency situations.Check Behind The Refrigerator
Start by inspecting behind your refrigerator. Often, the water supply valve is located in this area. Pull the refrigerator away from the wall gently. Look for a small, round valve connected to a hose. This is typically the water supply valve. Be cautious while moving the fridge to avoid damaging the floor.Identify The Valve Type
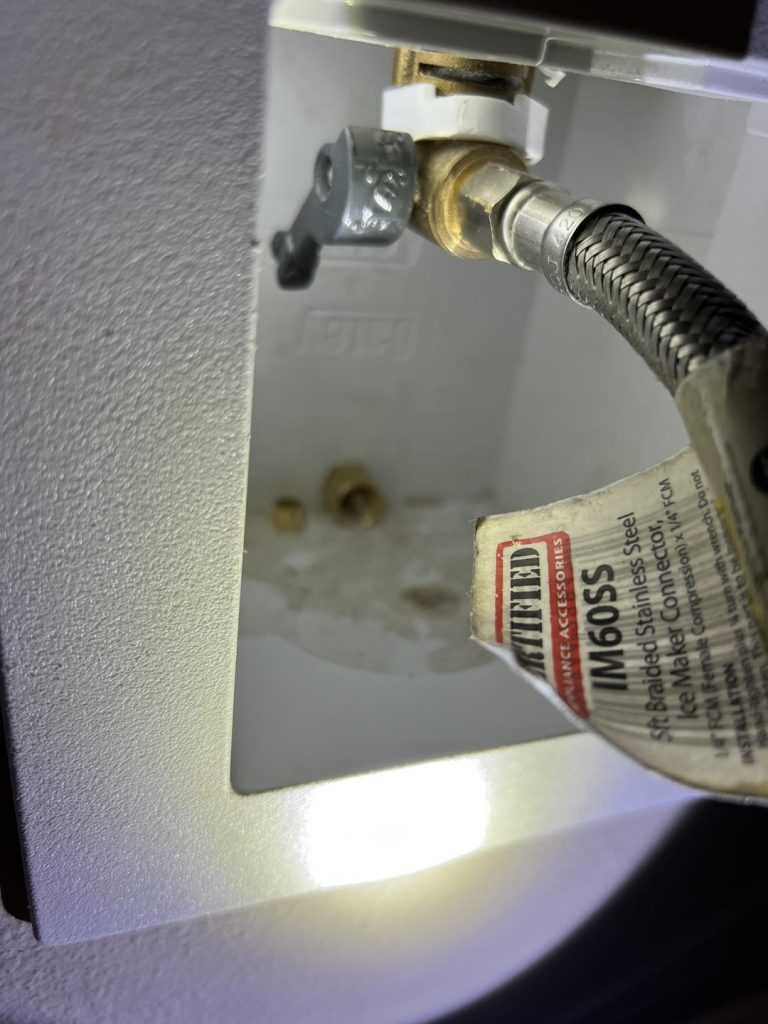
Once located, identify the type of valve. There are usually two types: saddle valves and standard shut-off valves. Saddle valves are small and clamp directly onto the pipe. They often have a small handle or lever. Standard shut-off valves resemble a faucet handle and are easier to turn. Recognizing the valve type helps in safely turning off the water supply.Shut Off The Water Supply
Shutting off the water supply to your ice maker is a crucial step before doing any repairs or maintenance. It prevents leaks and water damage in your kitchen. Knowing exactly how to stop the water flow safely helps you avoid unnecessary hassle and keeps your appliance in good condition.
Turn The Valve Clockwise
Locate the water supply valve behind your refrigerator or under the sink. This valve usually controls the water line feeding your ice maker. Turn the valve handle clockwise gently but firmly until it stops.
You don’t need to force it hard; a smooth turn is enough to close the valve. If you feel resistance, stop turning to avoid damaging the valve. Have you noticed how sometimes these valves can be stuck? Using a little WD-40 can help loosen them up without breaking.
Confirm Water Flow Stops
After turning off the valve, check if the water flow has completely stopped. You can do this by running the ice maker or lifting the water line from the valve briefly. If no water comes out, you’re all set.
Another quick test is to use a bucket or towel to catch any residual drips. If water continues to flow, the valve might not be fully closed or could be faulty. Have you ever faced a stubborn valve that just won’t stop the water? In that case, it’s best to call a plumber to avoid flooding your kitchen.
Disconnect The Water Line
Disconnecting the water line is a key step in turning off the water supply to your ice maker. This process stops water flow and prevents leaks during maintenance or replacement. It requires careful handling to avoid damage to the tubing and fittings. Follow these tips to disconnect the water line safely and efficiently.
Use A Wrench Or Pliers
Find the connection point where the water line attaches to the ice maker. Use an adjustable wrench or pliers to loosen the fitting. Turn the tool gently but firmly to avoid stripping the nut. Hold the fitting steady while turning to prevent twisting the water line. Once loose, carefully unscrew the fitting by hand. Keep a towel nearby to catch any water drips.
Handle The Water Line Carefully
The water line is often made of plastic or copper tubing. Avoid bending or kinking the tube during removal. A kink can block water flow or cause leaks later. Support the line close to the fitting as you disconnect it. Place the line in a safe spot to prevent damage. Check the tubing for cracks or wear before reconnecting or replacing it.
Empty The Ice Maker
Emptying the ice maker is an essential step before turning off the water line. It ensures that no ice remains trapped inside, which can melt and cause unwanted water messes. Clearing out the ice also makes your ice maker ready for maintenance or repairs without any hassle.
Remove Existing Ice Cubes
Start by opening the ice maker’s compartment carefully. Use a plastic scoop or your hands to take out all the ice cubes—avoid using metal tools to prevent damage.
If some cubes are stuck, gently twist the ice tray or give it a slight shake to loosen them. Don’t forget to check for any ice stuck in the chute or dispenser area, as these can block the mechanism later on.
Prevent Water Spills
Before you disconnect the water line, place a towel or shallow container under the ice maker to catch any drips. Ice makers often hold a small amount of water that can leak when you turn off the water supply.
Slowly shut off the water valve and watch for any unexpected spills. It’s better to take it slow than to deal with a sudden flood inside your kitchen.
Troubleshoot Common Issues
Troubleshooting common issues helps you control the water line to your ice maker. Problems like a stuck valve or leaks can cause water flow troubles. Knowing how to spot and fix these issues saves time and prevents damage.
Valve Not Turning Off
The water shut-off valve may become stuck due to mineral buildup or rust. This stops you from turning off the water line easily. Try these steps:
- Use a wrench carefully to apply gentle pressure on the valve handle.
- Apply penetrating oil to loosen the valve if it feels stiff.
- Turn the valve slowly to avoid breaking it.
- If the valve still won’t move, consider replacing it to avoid leaks.
Water Line Leaks
Leaks can occur at connections or along the water line tubing. Watch for wet spots or dripping water near the ice maker. To fix leaks:
- Check all connections and tighten any loose fittings.
- Inspect the tubing for cracks or holes and replace damaged sections.
- Use plumber’s tape on threaded connections to improve the seal.
- Replace worn or brittle tubing to prevent future leaks.

Credit: www.reddit.com
Restarting The Ice Maker
Restarting the ice maker is a simple task that brings your ice supply back quickly. After turning off the water line, the ice maker will stop making ice. To get it working again, you must restore water flow and reset the machine.
Turn The Valve Back On
Locate the water shut-off valve near your refrigerator or under the sink. Turn the valve counterclockwise to open it. This allows water to flow back into the ice maker. Listen for water running sounds. It shows the water line is active again.
Ensure the valve is fully open to avoid slow water flow. A partially open valve can cause ice production issues. Check for leaks around the valve and connections. Tighten any loose fittings carefully.
Reset The Ice Maker
Most ice makers have a reset button or switch. Find it on the ice maker unit or inside the freezer. Press and hold the reset button for about 10 seconds. This restarts the ice maker’s cycle.
If no reset button exists, unplug the refrigerator for 5 minutes. Plug it back in to reset the system. Wait for the ice maker to start making ice again. It may take a few hours for the first batch of ice cubes.

Credit: www.amazon.com
Frequently Asked Questions
How Do I Locate The Water Shutoff Valve For Ice Makers?
The water shutoff valve is usually behind the refrigerator or under the sink. It controls the water supply to the ice maker. Locate and turn it clockwise to stop the water flow. This prevents leaks and allows safe maintenance or repairs.
Can I Turn Off The Ice Maker Water Line Without Tools?
Yes, some ice makers have a valve that can be turned by hand. If not, you’ll need an adjustable wrench to turn the valve. Always ensure the water supply is completely off before disconnecting any lines to avoid spills.
Why Should I Turn Off The Ice Maker Water Line?
Turning off the water line prevents leaks during maintenance or replacement. It also stops ice buildup when the ice maker is not in use. This simple step helps avoid water damage and ensures the ice maker works efficiently.
How Do I Know If The Ice Maker Water Line Is Fully Off?
Check for water flow by running the ice maker or inspecting the valve. No water should flow when the valve is fully closed. If water still runs, tighten the valve further or check for valve damage.
Conclusion
Turning off the water line to your ice maker is simple and quick. Always locate the shut-off valve first. Close it fully to stop water flow. This helps prevent leaks and water damage. Check the connection to ensure no water runs.
Knowing this skill saves you time and hassle. Keep these steps in mind for future needs. Easy maintenance protects your appliance and home. You can handle this task with confidence and care.