Are you tired of spongy brakes or that unsettling feeling when your car doesn’t stop as smoothly as it should? You’re not alone.
Many drivers face this issue, and the solution might be simpler than you think. Bleeding your brakes with a vacuum pump is a straightforward process that can restore your car’s braking efficiency and give you peace of mind on the road.
In this guide, we’ll walk you through the step-by-step process to ensure your brakes are in top condition. Imagine driving with confidence, knowing your vehicle will stop precisely when you need it. Stick with us, and by the end of this article, you’ll be equipped with the know-how to tackle this essential maintenance task like a pro.

Credit: www.amazon.ca
Tools Needed
Bleeding brakes with a vacuum requires specific tools to make the process smooth and effective. Having the right equipment not only saves time but also ensures your brake system is free of air bubbles that can compromise safety. Before you begin, check that you have all these essentials ready.
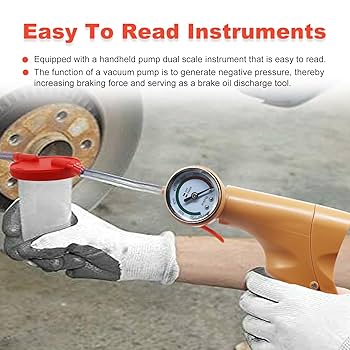
Vacuum Pump
A vacuum pump is the heart of this method. It creates suction to draw brake fluid and air bubbles out of the brake lines. Choose a pump that fits your brake system’s bleeder valves, and make sure it has a clear gauge so you can monitor pressure.
Brake Fluid
Using the correct brake fluid is critical. Refer to your vehicle’s manual to pick the right type, such as DOT 3, DOT 4, or DOT 5.1. Always have extra brake fluid on hand because you’ll need to keep the reservoir topped up during the bleeding process.
Wrench And Tubing
You’ll need a wrench that fits the bleeder screws on your brakes—usually a 8mm or 10mm. Attach clear plastic tubing to the bleeder valve to direct the fluid into a container. This setup helps you see when the fluid runs clear and air bubbles are gone.
Safety Gear
Brake fluid is corrosive, so protect your eyes with safety goggles. Wear gloves to keep your skin safe from irritation. Also, work in a well-ventilated area to avoid inhaling any fumes or dust from brake components.

Credit: www.amazon.ca
Preparing Your Vehicle
Preparing your vehicle is crucial before bleeding brakes with a vacuum. Proper preparation ensures safety and efficiency during the process. Take time to understand each step clearly.
Locate Brake Bleeder Valves
Find the brake bleeder valves on each wheel cylinder or caliper. These small valves allow air and old fluid to escape. Use a flashlight to see them clearly. They usually have a rubber cap to protect them from dirt.
Check Brake Fluid Level
Open the brake fluid reservoir under the hood. Check the fluid level against the marks on the reservoir. Fill it up if the level is low, but do not overfill. Use the correct type of brake fluid for your vehicle.
Lift And Secure Vehicle
Raise the vehicle using a jack to access the wheels easily. Place jack stands under the frame for support. Never rely on the jack alone to hold the car. Ensure the car is stable before starting work.
Vacuum Bleeding Steps
Vacuum bleeding brakes is a simple and effective way to remove air from the brake lines. It uses suction to pull brake fluid through the system. This method reduces the chance of air bubbles and helps maintain brake performance. Follow these clear steps to do it right.
Attach Vacuum Pump To Bleeder Valve
Locate the bleeder valve on the brake caliper or wheel cylinder. Clean the valve area to avoid dirt entering the system. Attach the vacuum pump hose securely to the bleeder valve. Ensure a tight fit to prevent air leaks during bleeding.
Create Vacuum And Open Valve
Start the vacuum pump to create suction in the hose. Slowly open the bleeder valve with a wrench. The vacuum will pull brake fluid and air from the brake line. Keep the pump running to maintain steady suction.
Monitor Fluid Flow
Watch the brake fluid flowing through the hose. Look for air bubbles moving out with the fluid. Continue pumping until the fluid runs clear and free of bubbles. This shows the air is fully removed from the system.
Close Valve And Release Vacuum
Close the bleeder valve tightly to stop fluid flow. Turn off the vacuum pump and remove the hose carefully. Check the brake fluid reservoir and add fluid if needed. Test the brake pedal to ensure firm pressure.
Bleeding Sequence
Bleeding brakes with a vacuum requires following the correct bleeding sequence. This sequence ensures all air is removed from the brake lines. Air in the brakes can cause a soft or spongy pedal. Proper order helps maintain brake performance and safety. The process starts with the wheel farthest from the master cylinder.
Start With Furthest Wheel
Begin bleeding the brake at the wheel farthest from the master cylinder. This is usually the rear passenger side wheel. Using a vacuum pump, attach the hose to the bleeder valve. Pump the vacuum and open the valve to remove air and old fluid. Close the valve before releasing the vacuum. Repeat until clear brake fluid flows without bubbles.
Move To Closer Wheels
After the furthest wheel, move to the next closest wheel. Typically, this is the rear driver side wheel. Follow the same vacuum bleeding steps as before. Then continue to the front passenger side wheel. Finish with the front driver side wheel, which is closest to the master cylinder. This order ensures all air is pushed out systematically.
Tips For Effective Bleeding
Effective brake bleeding with a vacuum pump ensures safe and responsive brakes. Following key tips improves the process and prevents common issues. Proper technique helps remove all air from brake lines for better performance.
Keep Fluid Reservoir Full
Always check the brake fluid reservoir before and during bleeding. Keep it full to stop air from entering the system. Running low causes air pockets, which reduce brake efficiency. Use the recommended brake fluid type for your vehicle.
Avoid Air Bubbles
Air bubbles block fluid flow and weaken braking power. Use clear tubing to watch for bubbles during bleeding. Stop and refill fluid if bubbles appear in the reservoir. Gently tap brake lines to release trapped air if needed.
Check Brake Pedal Feel
Test the brake pedal after bleeding each wheel. The pedal should feel firm and stable, not spongy or soft. A soft pedal means air remains in the lines. Repeat bleeding steps until the pedal feels solid and safe to press.

Credit: www.amazon.ca
Common Issues And Fixes
Bleeding brakes with a vacuum can sometimes present challenges. Common issues may slow down the process or cause ineffective results. Understanding these problems helps to fix them quickly and safely.
Many problems arise from blocked fluid flow, trapped air, or damaged parts. Each issue requires a simple but specific solution. This section explains common problems and how to resolve them for smooth brake bleeding.
No Fluid Flow
No fluid flow usually means a blockage in the brake line or vacuum hose. Check the vacuum pump and hoses for kinks or cracks. Make sure the bleeder valve opens fully and is not clogged with dirt or rust.
Flush the brake fluid reservoir if it looks dirty. Replace any damaged hoses or fittings. Ensure the vacuum source is strong enough to pull fluid through the system.
Air Still In Lines
Air in brake lines causes spongy brakes and poor performance. To remove air, keep the reservoir topped with fresh brake fluid. Work slowly to avoid drawing air back into the system.
Open the bleeder valve slightly and maintain steady vacuum pressure. Pump the brake pedal gently if needed to push trapped air out. Repeat the process until no bubbles appear in the fluid.
Leaking Valves
Leaking bleeder valves reduce vacuum pressure and allow air inside. Tighten the valve with the correct tool but avoid over-tightening. Replace worn or damaged valve seals to stop leaks.
Inspect the valve threads for damage. Use new washers or replace the valve if leaks persist. Proper sealing ensures effective vacuum pressure during bleeding.
Frequently Asked Questions
How Does Vacuum Brake Bleeding Work?
Vacuum brake bleeding uses suction to draw air and fluid from the brake lines. This removes trapped air efficiently. It helps maintain firm brake pedal feel and proper brake function. The vacuum pump creates negative pressure, pulling fluid through the system quickly.
What Tools Do I Need For Vacuum Brake Bleeding?
You need a vacuum pump, a brake bleeder kit, clear tubing, and a wrench. The pump creates suction, tubing directs fluid flow, and the wrench opens brake bleeder valves. These tools ensure a clean and effective brake bleeding process.
How Long Does It Take To Bleed Brakes With Vacuum?
Vacuum brake bleeding usually takes 15 to 30 minutes. The process is faster than manual bleeding. It depends on brake system condition and skill level. Proper bleeding ensures no air remains in the brake lines.
Can I Bleed Brakes With Vacuum Alone?
Yes, vacuum bleeding can be done alone. It is simpler than traditional methods. You control the vacuum pump and open valves yourself. However, safety precautions and proper technique are essential to avoid mistakes.
Conclusion
Bleeding brakes with a vacuum pump saves time and effort. The process removes air from brake lines, making brakes work well again. Always check brake fluid levels during the job. Keep the system clean to avoid damage. Follow safety steps to protect yourself and your car.
Practice helps you get better and faster each time. A well-bleeded brake system improves driving safety and control. Simple tools and care make this task easier for everyone. Try it slowly, and you will see good results.