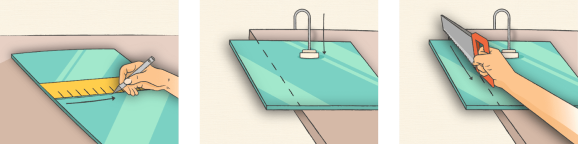
Cutting an acrylic board might seem tricky at first, but with the right steps, you can do it cleanly and easily. Whether you’re working on a DIY project or need precise cuts for your craft, knowing how to handle acrylic will save you time and frustration.
In this guide, you’ll discover simple techniques and helpful tips that make cutting acrylic boards safer and more accurate. Keep reading, and you’ll gain the confidence to tackle your next project like a pro.
Choosing The Right Acrylic
Selecting the right acrylic board is important for a clean cut and good results.
Different types and qualities of acrylic suit different projects.
Types Of Acrylic Sheets
Acrylic sheets come mainly in cast and extruded forms. Cast acrylic is stronger and cuts cleaner. Extruded acrylic is cheaper but may melt or chip more easily.
- Cast Acrylic: durable and clear
- Extruded Acrylic: cost-effective but softer
- Impact Modified Acrylic: more resistant to cracks
- Colored Acrylic: available in many colors for design
Thickness And Size Considerations
Choose thickness based on the project’s strength and flexibility needs. Thin sheets cut easily but are fragile. Thick sheets hold shape but need more effort to cut.
| Thickness | Best Use |
|---|---|
| 1-3 mm | Light crafts and displays |
| 4-6 mm | Signs and protective covers |
| 8-12 mm | Structural parts and furniture |
Quality Indicators
Good acrylic boards have clear, smooth surfaces and even thickness. Watch for bubbles, cracks, or warping, which show poor quality.
| Indicator | What to Check |
|---|---|
| Clarity | Look for clear, transparent sheets without cloudiness |
| Surface | Check for scratches or dents on both sides |
| Thickness | Measure to ensure even thickness throughout |
| Edges | Edges should be smooth and free from cracks |

Credit: www.amazon.ca
Essential Tools For Cutting
Cutting acrylic boards needs the right tools. Choosing the correct tools makes your work easier and safer.
This guide explains the main tools for cutting acrylic boards. Learn about hand tools, power tools, blades, bits, and safety gear.
Hand Tools Vs Power Tools
Hand tools are simple and give you control. Power tools work faster and handle thick sheets better. Choose based on your project size and skill.
- Hand Tools:Utility knife, plastic cutter, hand saw
- Power Tools:Jigsaw, circular saw, router
- Hand tools suit thin sheets and small cuts
- Power tools suit thick sheets and long cuts
Recommended Blades And Bits
Choosing the right blade or bit protects your acrylic and gives clean cuts. Use blades made for plastics or acrylic.
| Tool | Blade/Bit Type | Use |
| Jigsaw | Fine-toothed blade (80+ teeth) | Curves and straight cuts |
| Circular Saw | Carbide-tipped blade | Straight, long cuts |
| Router | Spiral or straight bit | Edge finishing and trimming |
| Hand Saw | Fine-toothed saw blade | Small straight cuts |
Safety Gear To Use
Wear safety gear to protect eyes, hands, and lungs from acrylic dust and sharp edges.
- Safety goggles to protect eyes
- Gloves to protect hands from cuts
- Dust mask to avoid breathing acrylic dust
- Long sleeves to protect skin
Preparation Before Cutting
Cutting an acrylic board needs good preparation. This helps you get clean, accurate cuts.
Before cutting, take time to measure, secure, and clean the board. This makes the process safer and easier.
Measuring And Marking Accurately
Use a ruler or measuring tape to find the exact size you want. Mark the lines with a fine-tip marker or pencil.
Double-check your measurements before cutting. Accurate marks help you avoid mistakes and waste.
- Measure twice to be sure
- Use a straight edge for marking lines
- Mark on the protective film if possible
Securing The Acrylic Sheet
Hold the acrylic board firmly to keep it from moving. Use clamps or a non-slip surface to secure it.
Stable boards give better cuts and reduce the chance of accidents. Check the clamps are tight before cutting.
- Place the board on a flat, stable table
- Use clamps on both ends of the cutting line
- Do not over-tighten to avoid cracking
Cleaning The Surface
Clean the acrylic surface before cutting. Remove dust, dirt, and grease with a soft cloth and mild soap.
A clean surface helps you see marks clearly and protects the blade from damage. Avoid harsh chemicals that can scratch.
- Use a lint-free cloth
- Apply gentle soap and water
- Dry the surface completely before cutting
Cutting Techniques
Cutting acrylic board requires care and the right tools to get clean edges. Different methods work best depending on the thickness and use of the board.
Below are common cutting techniques that help you shape acrylic board accurately and safely.
Scoring And Snapping Method
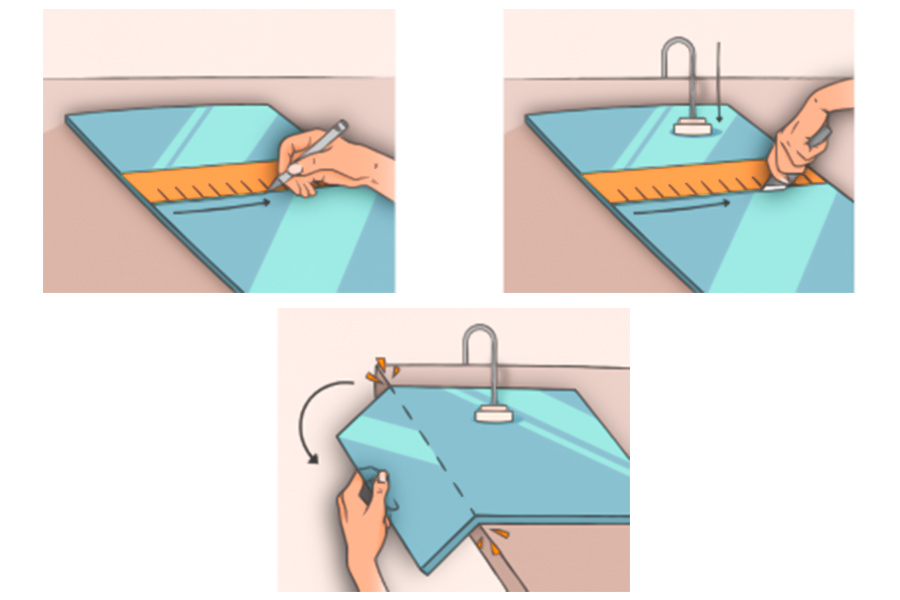
This method works well for thin acrylic sheets. Use a utility knife to score a straight line deeply along a ruler. Then, snap the board along the scored line.
- Place the acrylic on a flat surface with space underneath.
- Align a straightedge where you want to cut.
- Score the surface with a sharp blade multiple times.
- Hold the board firmly and snap it downwards.
- Sand edges if needed for smoothness.
Using A Circular Saw
A circular saw with a fine-toothed blade cuts thicker acrylic sheets cleanly. It reduces chipping and helps create straight lines.
| Blade Type | Teeth per Inch (TPI) | Speed |
| Carbide-tipped | 60-80 | Medium |
| Fine-toothed | 80-100 | Low to Medium |
Wear safety goggles and clamp the acrylic firmly before cutting. Use steady pressure and let the saw do the work.
Laser Cutting Tips
Laser cutting gives precise shapes and smooth edges. It works best for detailed designs and thin to medium acrylic thickness.
- Choose the right power and speed settings for your acrylic thickness.
- Use masking tape to protect the surface from scorch marks.
- Ventilate the area to remove fumes from melting acrylic.
- Test on scrap pieces before final cutting.
- Clean the acrylic after cutting to remove residue.
Finishing Touches
Cutting an acrylic board is just the start. Finishing touches make your work neat and clear. These steps protect the edges and improve the look.
Focus on sanding, polishing, and removing the protective film. Each step helps the acrylic look smooth and shiny.
Sanding Edges Smoothly
Use fine sandpaper to smooth the cut edges. Start with a coarse grit, then move to finer grit paper. This removes roughness and small cracks.
Sand evenly by moving the paper in one direction. Keep the pressure light to avoid scratches or warping.
- Begin with 120-grit sandpaper
- Progress to 320-grit for smoother edges
- Finish with 600-grit for a polished feel
Polishing For Clarity
Polish the acrylic edges to make them clear and shiny. Use a polishing compound or a plastic polish product. Apply with a soft cloth or buffing wheel.
Polishing removes small scratches left from sanding. It gives the acrylic a glass-like finish that looks professional.
- Apply polish in small amounts
- Use circular motions while polishing
- Clean residue with a soft cloth
Removing Protective Film
Acrylic boards come with a protective film to stop scratches. Remove this film after all finishing steps are done. Peel it off slowly to avoid damage.
Check edges for leftover film pieces. Remove them carefully with your fingers or a soft cloth. This keeps your acrylic clean and clear.
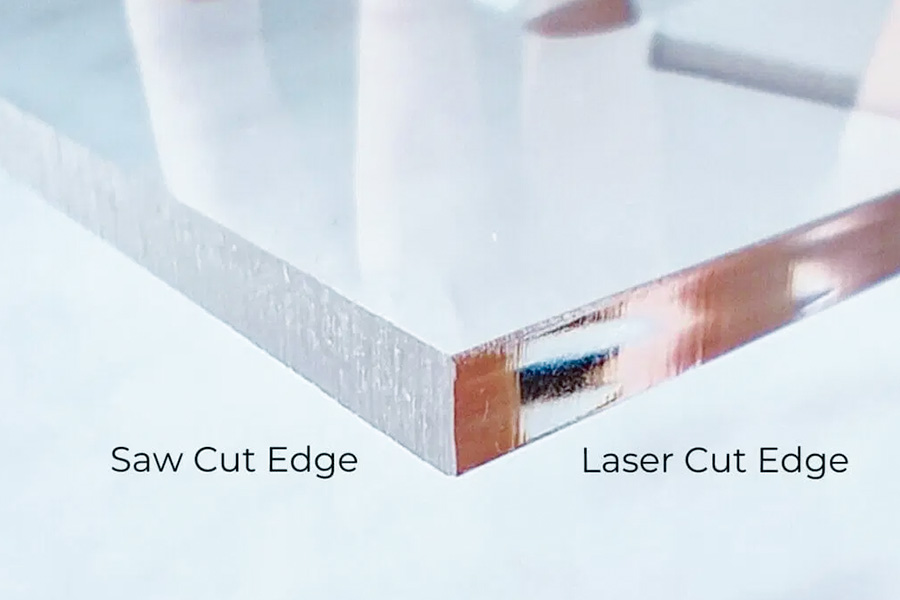
Credit: www.longshengmfg.com
Common Mistakes To Avoid
Cutting acrylic board needs care and the right steps. Avoiding common mistakes helps you get clean cuts.
Knowing what to avoid saves time and material. Here are some key errors to watch out for.
Cracking And Chipping Causes
Cracks and chips happen when the acrylic is weak or cut wrong. Pressure and heat can cause damage.
Using too much force or a dull blade often leads to cracks. Also, cutting too fast heats the material.
- Apply gentle, even pressure while cutting
- Use a sharp blade to reduce stress on acrylic
- Cut slowly to avoid heat buildup
- Support the board well to prevent bending
Incorrect Tool Usage
Using the wrong tools can ruin your acrylic board. Not all saws or blades work well with acrylic.
A blade designed for wood or metal may cause rough edges or cracks. Choose tools made for plastic or acrylic.
- Use a fine-toothed blade for smoother cuts
- Avoid tools that create too much heat
- Check tool speed; slower speeds reduce damage
- Keep blades clean and sharp for best results
Poor Measurement Errors
Incorrect measurements cause wrong cuts and waste material. Always measure twice before cutting.
Mark lines clearly and use a straight edge to guide your cuts. This helps keep edges straight and clean.
- Use a reliable ruler or tape measure
- Mark cut lines with a fine marker or pencil
- Double-check measurements before cutting
- Clamp the acrylic to keep it steady when cutting
Credit: www.longshengmfg.com
Frequently Asked Questions
How Do You Cut Acrylic Board At Home?
Cut acrylic boards at home using a utility knife or a scoring tool. First, mark the cut line with a ruler. Score the acrylic several times along the line. Gently snap the board along the scored line. For thicker acrylic, a jigsaw or a circular saw with a fine-tooth blade is recommended.
What Tools Are Needed For Cutting Acrylic?
You’ll need a utility knife, scoring tool, or a jigsaw for cutting acrylic. A circular saw with a fine-tooth blade is also suitable. Always use a ruler for straight cuts. For safety, wear protective gloves and goggles. Ensure your workspace is clean and stable for precise cuts.
Can You Cut Acrylic With A Regular Saw?
Yes, you can cut acrylic with a regular saw. Use a fine-tooth blade to prevent chipping. Ensure the saw is stable and cut slowly for a smooth edge. For best results, a jigsaw or circular saw with a fine-tooth blade is recommended for thicker acrylic sheets.
Is Cutting Acrylic Dangerous?
Cutting acrylic can be dangerous without proper precautions. Always wear protective gloves and goggles to prevent injuries. Acrylic can produce sharp edges and dust particles. Ensure your workspace is well-ventilated and stable. Use the correct tools and techniques to minimize risks and achieve a clean cut.
Conclusion
Cutting acrylic board is simple with the right tools and care. Always measure twice to avoid mistakes. Use a sharp blade or saw for clean edges. Work slowly and follow safety steps to protect yourself. Practice on scrap pieces before starting the final cut.
These tips help you get smooth, precise results every time. Enjoy your project with confidence and ease.