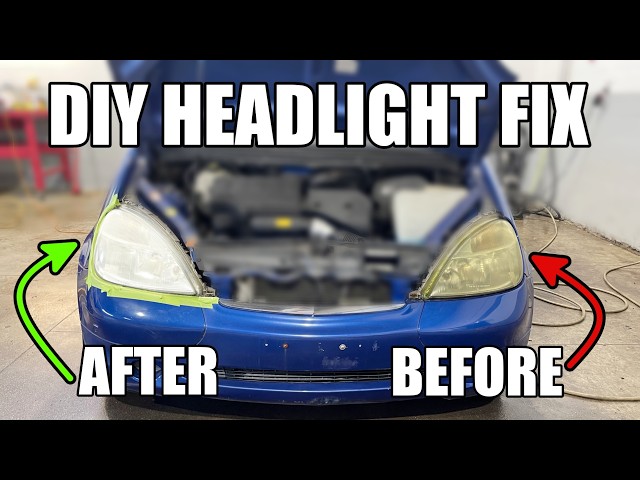
Are your car headlights looking dull or cloudy? This not only makes your car look older but can also reduce your visibility on the road, putting you and others at risk.
You might think replacing them is the only option, but that’s not true. You can make your headlights clear again with simple, effective steps you can do yourself. Keep reading to discover easy tricks that will bring back the shine and improve your safety—without spending a fortune.
Your car deserves to shine, and so do you.

Credit: www.youtube.com
Causes Of Cloudy Headlights
Car headlights can become cloudy over time. This makes lights less bright and reduces safety.
Understanding what causes cloudy headlights helps you fix them better.
Sunlight And Uv Damage
Sunlight has ultraviolet (UV) rays that damage headlight lenses. These rays break down the plastic surface.
The plastic becomes hazy and yellow, making the headlights look cloudy and dull.
Oxidation
Oxidation happens when oxygen reacts with the plastic lens. It forms a cloudy layer on the surface.
This layer blocks light and causes the headlights to look foggy or chalky.
Road Dirt And Debris
Driving can cause dirt, dust, and small rocks to hit the headlights. They scratch and wear down the lens.
Scratches make the plastic rough, which scatters light and makes headlights cloudy.
Moisture Inside Headlights
Water can get inside headlights through cracks or seals. This causes fog or condensation inside the lens.
Moisture blurs the light and can cause damage to bulbs and wiring.
Poor Cleaning And Maintenance
Using harsh chemicals or abrasive tools can damage the headlight surface. This speeds up cloudiness.
Not cleaning headlights regularly allows dirt and grime to build up and cause cloudiness.

Credit: www.youtube.com
Signs Your Headlights Need Cleaning
Clear headlights help you see better at night. Over time, headlights get dirty or cloudy. This reduces how well they work.
It is important to know when your headlights need cleaning. Watch for these signs to keep your driving safe.
Dim Or Faded Light Output
If your headlights look dimmer than before, they may be dirty or cloudy. Dirt and oxidation block the light from shining bright.
Dim headlights make it harder to see the road and other cars at night.
Yellow Or Cloudy Lens Appearance
New headlights are clear and bright. Over time, plastic lenses turn yellow or look foggy. This happens from sun damage and dirt build-up.
A yellow or cloudy lens reduces light output and makes your car look old.
Scratches Or Surface Damage
Small scratches or cracks on headlights cause light to scatter. This lowers how far and clear the light shines.
Look closely for surface damage that can make your headlights less effective.
Increased Glare For Other Drivers
Cloudy or damaged headlights can scatter light in many directions. This may cause glare for oncoming drivers.
If other drivers flash their lights at you often, your headlights might need cleaning.
Moisture Or Condensation Inside Headlights
Water or fog inside your headlights means the seal is broken. Moisture can reduce light brightness and damage the bulb.
Check for water drops or fog when your headlights are off.
Essential Tools And Materials
Cleaning car headlights needs the right tools and materials. Using the correct items helps clear the fog and restore brightness.
This guide lists the basics you need to make your headlights clear again. Having these ready will make the process smooth and effective.
Sandpaper
Sanding removes the outer layer of dirt and oxidation. Use different grits for best results, starting with coarse and finishing with fine.
Polishing Compound
Polishing compound helps to smooth out scratches left by sanding. It also brings back the shine on the headlight surface.
Microfiber Cloths
Use soft microfiber cloths to apply polish and clean the headlights. They prevent scratches and help achieve a clear finish.
Masking Tape
Masking tape protects the paint around your headlights. It keeps the area safe from sanding and polishing damage.
Water And Spray Bottle
Water helps to keep the headlight surface wet while sanding. A spray bottle makes it easy to apply water evenly.
Essential Tools And Materials List
- Sandpaper (grits 400, 800, 1200, 2000)
- Polishing compound
- Microfiber cloths
- Masking tape
- Spray bottle with water
- Gloves (optional for hand protection)
| Item | Purpose |
| Sandpaper | Remove oxidation and smooth surface |
| Polishing Compound | Restore shine and remove fine scratches |
| Microfiber Cloths | Apply polish and clean without scratching |
| Masking Tape | Protect paint around headlights |
| Spray Bottle | Keep surface wet during sanding |
| Gloves | Protect hands from chemicals and dirt |
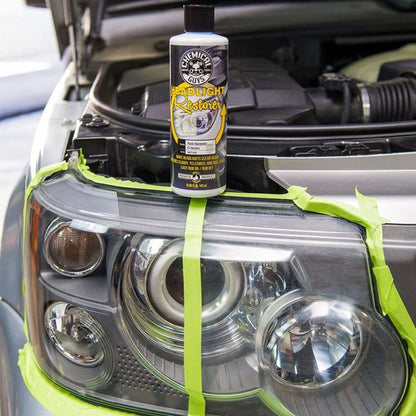
Credit: www.chemicalguys.com
Step-by-step Cleaning Guide
Car headlights can become cloudy and reduce visibility. Cleaning them makes night driving safer. This guide shows easy ways to clear your headlights at home.
Follow each step carefully to restore your headlights’ brightness. Use simple materials you may already have.
Preparation And Safety Measures
Before cleaning, prepare your car and area. Safety is important to avoid damage or injury.
- Park your car in a shaded, well-ventilated space.
- Turn off the engine and remove the keys.
- Wear gloves and eye protection.
- Cover nearby car parts with tape or cloth to protect from scratches.
- Gather all cleaning materials before starting.
Cleaning With Soap And Water
Start with a simple wash to remove dirt and grime. This makes polishing easier.
- Mix car soap or mild dish soap with warm water.
- Use a soft cloth or sponge to clean the headlight surface.
- Rinse with clean water.
- Dry with a microfiber towel to avoid scratches.
Using Toothpaste For Polishing
Toothpaste acts as a mild abrasive to polish headlights. It helps remove cloudiness.
- Apply a small amount of toothpaste on a damp cloth.
- Rub the headlight in circular motions for 5 minutes.
- Rinse off with water.
- Dry with a clean cloth.
Applying Baking Soda Paste
Baking soda can also polish headlights. It is gentle and easy to use.
- Mix baking soda with water to form a thick paste.
- Apply the paste to the headlight using a soft cloth.
- Rub gently in circular motions for several minutes.
- Rinse well with water and dry completely.
Commercial Headlight Restoration Kits
These kits provide all materials needed for deep cleaning and sealing. Follow the kit instructions carefully.
| Kit Feature | Purpose |
|---|---|
| Sandpaper | Removes the outer damaged layer |
| Polishing Compound | Restores smooth surface and shine |
| Sealant or UV Protectant | Protects headlights from future damage |
Maintaining Headlight Clarity
Clear headlights improve your car’s look and safety. Dirt and oxidation can make them cloudy.
Regular care keeps headlights bright and helps you see better at night.
Regular Cleaning Tips
Cleaning your headlights often removes dirt and grime. Use gentle methods to avoid scratches.
- Wash headlights with car soap and water weekly.
- Use a soft cloth or sponge to prevent damage.
- Dry headlights with a clean microfiber towel.
- Remove bugs and tar with a mild cleaner.
- Avoid harsh chemicals that can harm the plastic lens.
Protective Coatings And Sealants
Applying coatings helps protect headlights from UV rays and oxidation. This keeps them clear longer.
| Type | Benefit | How Often to Apply |
| UV Sealant | Blocks sun damage | Every 3 months |
| Wax | Adds shine and protection | Every month |
| Plastic Polish | Removes light scratches | As needed |
When To Consider Professional Help
Car headlights can become cloudy or yellow over time. Sometimes, simple cleaning works. Other times, the damage needs expert care.
Knowing when to get professional help can save time and keep your headlights safe.
Severe Yellowing Or Cloudiness
If your headlights are very yellow or cloudy, home methods might not restore them fully. Professionals have tools to clear tough damage.
Cracks Or Physical Damage
Cracks or broken headlights need expert repair. DIY fixes often do not last and can affect light quality and safety.
Repeated Cloudiness After Cleaning
If your headlights get cloudy again soon after cleaning, the protective layer might be damaged. A professional can apply a new seal.
Safety And Legal Concerns
Dim or unclear headlights reduce visibility. This can be dangerous and may not pass vehicle inspections. Professionals ensure headlights meet safety standards.
- Check if your headlights meet brightness rules in your area
- Consult a professional if unsure about headlight condition
- Get repairs done before safety inspections
Cost And Time Factors
Professional services may cost more but save time. They use special products and techniques for long-lasting results.
| Situation | DIY | Professional Help |
| Mild cloudiness | Good results | Not always needed |
| Severe yellowing | Limited results | Effective restoration |
| Cracks or damage | Not recommended | Proper repair |
| Quick cloudiness return | Temporary fix | Long-lasting seal |
Preventive Measures For Long-lasting Clarity
Clear car headlights help you see better at night. They also make your car look newer. Taking care of headlights prevents cloudiness and yellowing.
Use simple habits to keep headlights bright. These steps protect the surface from damage and dirt buildup.
Regular Cleaning
Clean headlights often using mild soap and water. Avoid harsh chemicals that can wear down the plastic. Dry the lights with a soft cloth to stop water spots.
Use Uv Protection
Headlights get damaged by sunlight. Use a UV sealant or protectant to block harmful rays. This stops yellowing and keeps the plastic strong.
Park In Shade Or Garage
Sunlight and weather cause headlights to fade. Parking in a shaded area or garage reduces exposure to these elements. This keeps headlights clear longer.
Avoid Abrasive Materials
Scratches make headlights cloudy. Use soft cloths or sponges for cleaning. Do not use rough brushes or scrubbers that can cause damage.
Apply Protective Coatings
- Use headlight-specific wax to add a protective layer.
- Apply ceramic coatings to resist dirt and UV rays.
- Reapply coatings every few months for best results.
Inspect Headlights Regularly
| Check For | Why It Matters | Action |
|---|---|---|
| Cracks or Chips | Water can enter and cause fogging | Seal or replace damaged parts |
| Cloudy Surface | Reduces light output and visibility | Clean or polish headlight lens |
| Faded Color | Sign of UV damage | Apply UV protectant |
Frequently Asked Questions
How Can I Restore Cloudy Car Headlights Quickly?
Use toothpaste or a headlight restoration kit to clean the lens. Apply gently with a cloth, rinse, and dry. This method removes oxidation and improves clarity fast and affordably.
What Causes Car Headlights To Become Foggy?
UV rays, road debris, and oxidation damage plastic lenses over time. Exposure to sunlight breaks down the protective coating, leading to yellowing and cloudiness that reduce light output.
Is It Safe To Use Household Products On Headlights?
Yes, items like baking soda or toothpaste are safe. They act as mild abrasives to polish the lens. Avoid harsh chemicals that can damage the plastic surface.
How Often Should I Clean My Car Headlights?
Clean headlights every 3 to 6 months to maintain brightness. Regular maintenance prevents heavy oxidation buildup and prolongs lens clarity and safety during night driving.
Conclusion
Clear headlights improve your safety and car appearance. Regular cleaning keeps them bright and effective. Use simple methods and common household items for best results. A little effort goes a long way in maintaining clarity. Remember, bright lights help you see better at night.
Start today and enjoy safer drives tomorrow. Your car will look newer and more cared for too. Small steps make a big difference in headlight care. Keep your headlights clear for a safer journey ahead.