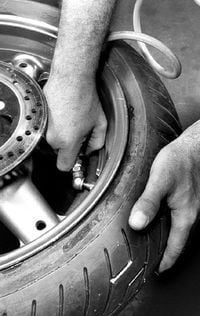
Mounting motorcycle tires might seem tricky at first, but with the right steps, you can do it yourself and save time and money. Whether you want to replace worn-out tires or upgrade for better performance, knowing how to mount them correctly is key to your safety and ride quality.
In this guide, you’ll discover simple, clear instructions that anyone can follow—even if you’re new to motorcycle maintenance. Ready to take control of your bike’s care and get back on the road with confidence? Let’s dive in and make tire mounting easy for you.
Tools Needed
Mounting motorcycle tires requires some special tools. Using the right tools makes the job safer and easier.
This guide will list the tools you need to mount tires correctly and safely.
Essential Equipment
You need basic equipment to remove and mount motorcycle tires. These tools help you handle the tire and wheel safely.
- Tire irons or tire levers to remove and fit the tire
- Bead breaker to loosen the tire from the rim
- Wheel balancer to balance the tire after mounting
- Air compressor or hand pump to inflate the tire
- Valve core remover to take out the valve core when inflating
- Lubricant like soapy water to help seat the tire bead
- Torque wrench to tighten axle nuts correctly
Safety Gear
Safety gear protects you while working with heavy tools and tires. It also prevents injuries from sharp edges and flying parts.
- Sturdy gloves to protect your hands from cuts and pinches
- Safety glasses to shield your eyes from debris
- Closed-toe shoes to protect your feet
- Long sleeves to avoid scratches and skin contact with chemicals

Credit: www.reddit.com
Preparing The Tire And Rim
Mounting motorcycle tires requires careful preparation. Ensure that both the tire and rim are ready for the task. This will make the process smoother and more efficient.
Proper preparation not only makes mounting easier but also ensures safety. Let’s explore the steps involved in preparing your tire and rim.
Cleaning The Rim
A clean rim helps the tire fit securely. Start by gathering necessary cleaning supplies.
- Use a soft cloth or sponge
- Apply a mild detergent or rim cleaner
- Rinse thoroughly with water
- Dry with a lint-free towel
Inspecting The Tire
Before mounting, inspect the tire for any damage. A damaged tire can lead to safety issues.
- Look for cracks or punctures
- Check the tread depth
- Ensure the sidewalls are intact
Once you have thoroughly cleaned the rim and inspected the tire, you are ready to proceed with mounting. A well-prepared tire and rim ensure a safer ride.
Removing The Old Tire
Removing an old motorcycle tire is important before putting on a new one. This process needs care and the right tools.
Follow these steps to safely take off the old tire from the wheel rim.
Deflating The Tire
Start by letting the air out of the tire. This makes it easier and safer to remove.
Locate the valve stem and press the pin inside to release the air. Use a valve core remover for faster deflation.
Using Tire Irons
Tire irons help pry the tire off the rim. Use two or three to work around the wheel evenly.
Insert the first tire iron under the tire bead and lift it over the rim edge. Hold it in place while you insert the next iron.
- Work slowly to avoid damaging the rim or tire.
- Keep the tire irons spaced evenly as you move around.
- Use gentle prying motions to lift the bead.
Removing The Bead
The bead is the edge of the tire that seals against the rim. You must break it loose to remove the tire.
Push the bead down into the center channel of the rim. This gives more space to lift the tire off.
- Use your hands or tire irons to push the bead away from the rim edge.
- Work all around the rim to free the entire bead.
- Once loose, lift the tire off carefully.

Credit: www.dunlopmotorcycletires.com
Mounting The New Tire
Mounting a new motorcycle tire takes care and attention. You must follow each step to ensure a secure fit. This guide helps you mount the tire safely and correctly.
Using the right tools and methods protects the tire and rim. It also makes the process easier and faster. Let’s look at the key steps involved.
Lubricating The Bead
Lubricating the tire bead helps it slide over the rim without damage. Use a proper tire lubricant or soapy water. Avoid oil or grease as they can harm the rubber.
- Apply lubricant evenly around the tire bead.
- Cover the rim edges where the bead will sit.
- Use a brush or cloth for smooth application.
- Check that no dry spots remain.
Positioning The Tire On The Rim
Place the tire carefully on the rim. Align the tire label or directional arrows with the wheel rotation. Start by fitting one side of the tire bead over the rim edge.
Push the tire bead fully inside the rim. Then, work the other side of the tire onto the rim. Use your hands or tire levers gently. Avoid pinching or damaging the tube if you use one.
Seating The Bead
Seating the bead means making sure the tire sits tightly on the rim. This step is important for safety and performance.
| Action | Details |
| Inflate Slowly | Use a low-pressure air source to start inflation. |
| Check Bead Position | Watch the bead rise evenly around the rim. |
| Increase Pressure | Raise pressure to the recommended level gradually. |
| Inspect Tire | Look for gaps or uneven seating on both sides. |
| Adjust if Needed | Deflate slightly and reposition the tire if the bead is not seated. |
Inflating The Tire
Proper inflation is key to motorcycle tire safety and performance. It helps the tire hold its shape and grip the road well.
Use the right tools and follow careful steps to ensure the tire inflates evenly and securely.
Proper Inflation Techniques
Inflate the tire slowly and check pressure often. Avoid overinflating or underinflating to keep the tire safe and effective.
- Attach an air hose to the valve stem tightly.
- Inflate the tire to the recommended pressure on the sidewall.
- Pause to let the tire settle and measure pressure again.
- Adjust the air pressure as needed to reach the exact level.
- Remove the air hose and replace the valve cap securely.
Checking For Leaks
Check for leaks by applying soapy water to the tire valve and bead area. Look for bubbles that show escaping air.
| Leak Location | Action |
|---|---|
| Valve Stem | Tighten or replace if leaking |
| Tire Bead | Re-seat tire or inspect rim damage |
| Puncture Area | Repair or replace tire |
Balancing The Tire
Balancing a motorcycle tire is important for smooth riding. It helps avoid vibrations and uneven tire wear.
Proper balance improves safety and extends tire life. Use the right tools to check and fix the balance.
Using A Balancer
A balancer spins the tire and wheel assembly to find heavy spots. It shows where weight should be added.
Place the tire on the balancer and let it spin freely. The balancer stops at the heavy side, pointing to where you add weight.
- Mount the wheel on the balancer shaft
- Spin the wheel gently
- Wait until the wheel stops moving
- Note the heavy spot at the bottom
Adding Weights
Attach small weights opposite the heavy spot on the wheel. This balances the tire by offsetting the weight difference.
Use clip-on or adhesive weights depending on the rim type. Check the balance again after adding weights and adjust if needed.
- Clean the rim surface before adding weights
- Place weights opposite the heavy spot
- Secure weights firmly to avoid falling off
- Re-spin the wheel on the balancer to confirm balance
Final Checks
After mounting your motorcycle tires, it is important to perform final checks. These checks ensure the tires fit correctly and are safe to use.
Taking the time to inspect and test ride will help avoid problems on the road. Pay close attention to all details before riding.
Inspecting The Fit
Look closely at how the tire sits on the rim. The tire bead should be evenly seated around the wheel.
Check for any gaps, bulges, or uneven spots. Make sure the tire sidewalls line up with the rim edges.
- Verify tire bead is fully seated on the rim
- Look for any damage or cracks on the tire
- Ensure correct tire pressure is applied
- Check that valve stem is secure and undamaged
- Spin the wheel to confirm smooth rotation without wobble
Test Ride Tips
Start with a slow and short ride to test the new tires. Pay attention to how the bike handles and feels.
Listen for unusual noises and watch for vibrations or instability. If anything feels off, stop and check the tires again.
- Ride slowly at first on smooth roads
- Check tire pressure again after test ride
- Watch for signs of tire slipping or uneven wear
- Gradually increase speed if tires feel stable
- Re-inspect tires if you notice any changes in handling

Credit: www.youtube.com
Frequently Asked Questions
How Do I Safely Mount Motorcycle Tires?
Use proper tools like tire irons and a bead breaker. Ensure the tire and rim are clean. Lubricate the bead area for easier mounting. Work slowly to avoid damaging the tire or rim. Always check tire direction and pressure after mounting.
What Tools Are Needed To Mount Motorcycle Tires?
Essential tools include tire irons, a bead breaker, valve core remover, tire lubricant, and an air compressor. These help remove the old tire, fit the new one, and inflate it correctly. Using the right tools makes the process safer and more efficient.
Can I Mount Motorcycle Tires Without Professional Help?
Yes, with the right tools and knowledge, you can mount tires yourself. Follow safety steps carefully to avoid injury or damage. Watching tutorials and practicing helps build confidence. For complex tires or if unsure, consult a professional.
How Do I Check Tire Alignment After Mounting?
Inspect the tire bead seating evenly on the rim. Spin the wheel to observe any wobbling or misalignment. Use a dial indicator if available for precise measurement. Proper alignment ensures better handling and tire longevity.
Conclusion
Mounting motorcycle tires can be simple and safe with the right steps. Take your time and follow each instruction carefully. Using proper tools helps avoid damage and injury. Check tire pressure after mounting for best performance. Regular tire care keeps your ride smooth and secure.
Practice these tips to feel more confident next time. Stay safe and enjoy the road ahead.