Are you tired of juggling your fishing rods every time you hit the water? Imagine having a simple, sturdy stand that keeps your rods organized and ready to use.
Building your own fishing rod stand is easier than you think, and it can save you time, space, and frustration. In this guide, you’ll discover step-by-step instructions to create a stand tailored to your needs. Keep reading, and soon you’ll have a practical solution that makes every fishing trip more enjoyable.
Materials Needed
Building a fishing rod stand requires a few key materials. Choosing the right wood and tools helps create a sturdy and practical stand.
This guide covers the types and sizes of wood, the tools you need, and extra supplies to make the project easier.
Wood Types And Sizes
Select wood that is strong and easy to work with. Cedar and pine are good choices. The size depends on how many rods you want to hold.
- 1×4 inch boards for the base and arms
- 1×2 inch strips for support braces
- Sandpaper for smoothing edges
- Wood screws or nails for assembly
Tools Required
You will need basic woodworking tools. These help measure, cut, and join the wood parts accurately.
| Tool | Purpose |
| Hand saw or circular saw | Cut wood to size |
| Drill with screwdriver bits | Make pilot holes and drive screws |
| Measuring tape | Measure wood lengths |
| Clamps | Hold pieces steady while working |
| Sandpaper or sanding block | Smooth rough edges |
Additional Supplies
Other items help protect and finish your stand. These supplies improve durability and appearance.
- Wood glue for stronger joints
- Wood finish or paint for protection
- Brushes or rags for applying finish
- Protective gloves and eyewear
Choosing The Design
Building a fishing rod stand can be a fun project. The first step is to choose the right design. Your choice depends on how many rods you have and where you will keep the stand.
Consider whether you need a stand for one rod or multiple rods. Also, think about if you want a portable stand or one that stays in one place.
Single Rod Vs Multiple Rod Stands
A single rod stand is simple and takes up less space. It is ideal if you have just one favorite fishing rod.
A multiple rod stand can hold several rods at once. This is useful for families or serious anglers with different rods for different fish.
- Single rod stand for minimalists
- Multiple rod stand for variety
Portable Vs Fixed Stands
A portable stand is lightweight and easy to move. It is great if you travel or need to change locations often.
A fixed stand is sturdy and stays in one place. It is perfect for a garage or storage room where you keep your fishing gear.
- Portable stand for flexibility
- Fixed stand for stability
Cutting The Wood
Cutting the wood is a key part of building a fishing rod stand. This step shapes the pieces you will join together. Accurate cuts make the stand strong and stable.
Use the right tools and take your time. Safe cutting keeps you from getting hurt and helps you cut well.
Measuring And Marking
Measure the wood pieces carefully before cutting. Mark the spots clearly to guide your saw. Double-check each mark to avoid mistakes.
- Use a tape measure for exact lengths.
- Mark lines with a pencil and a square tool.
- Check your marks twice before cutting.
- Label each piece to keep track.
Safe Cutting Techniques
Safety matters most when cutting wood. Follow these techniques to protect yourself and get clean cuts.
| Safety Tip | Details |
| Wear safety glasses | Protect your eyes from wood chips and dust. |
| Use a stable surface | Cut on a flat table or workbench to keep wood steady. |
| Keep fingers clear | Hold wood away from the saw blade path. |
| Use clamps | Secure wood pieces to prevent slipping. |
| Cut slowly | Move the saw with control to avoid mistakes. |

Credit: www.reddit.com
Assembling The Stand
Building a fishing rod stand requires careful assembly. Following clear steps ensures a sturdy and useful stand.
This guide covers joining the base and supports, then securing the rod holders.
Joining The Base And Supports
Start by connecting the base pieces to the vertical supports. Use wood glue and screws for strong joints.
- Lay the base parts flat on a work surface.
- Attach vertical supports at each corner of the base.
- Apply wood glue at the joints to prevent wobbling.
- Secure with screws using a drill for tight fitting.
- Check that all parts are square and level before drying.
Securing The Rod Holders
Attach the rod holders evenly along the top supports. Proper spacing keeps rods safe and organized.
| Holder Type | Material | Spacing | Attachment Method |
|---|---|---|---|
| U-shaped | Wood | 6 inches apart | Screws and glue |
| Clip-on | Plastic | 8 inches apart | Bolts |
| Ring style | Metal | 5 inches apart | Welding or screws |
Finishing Touches
After assembling your fishing rod stand, finishing touches improve its look and strength.
This guide covers sanding and applying a protective coating for a lasting finish.
Sanding And Smoothing
Sanding removes rough edges and splinters from your wood pieces.
- Use medium-grit sandpaper to smooth the surface first.
- Switch to fine-grit sandpaper for a polished feel.
- Sand all edges, corners, and flat surfaces evenly.
- Wipe away dust with a dry cloth before the next step.
Applying Protective Coating
Protective coating shields the wood from water and sun damage.
| Type | Description | Application Tips |
| Wood varnish | Clear finish that adds shine and protection. | Apply with a brush in thin, even coats. |
| Linseed oil | Natural oil that penetrates and protects wood. | Rub in with a cloth; allow to dry fully. |
| Polyurethane | Durable, water-resistant finish. | Use a foam brush; sand lightly between coats. |
Testing And Adjustments
After building your fishing rod stand, it is important to test it carefully. Testing helps you find any problems before using it outdoors. Adjustments improve the stand’s function and safety.
This guide covers how to check the stand’s stability and customize it for different rod sizes. Follow these tips to make sure your stand works well.
Checking Stability
Stability is key for a fishing rod stand. A stand that wobbles can cause your rods to fall or get damaged. Check the stand on a flat surface first. Make sure all legs or supports touch the ground evenly.
- Place the stand on different surfaces like grass, sand, or wood.
- Press gently on the stand to test if it moves or tips over.
- Check all screws and joints to confirm they are tight.
- Ensure the base is wide enough to hold multiple rods without tipping.
- Add rubber feet or grips if the stand slips on smooth surfaces.
Customizing For Different Rod Sizes
Fishing rods come in many sizes. Your stand should hold short and long rods safely. Adjust the holders or slots to fit the rods well. Too tight or too loose fittings can cause damage or falling rods.
| Rod Length | Holder Width | Suggested Adjustment |
| Under 5 feet | 2 inches | Use foam padding to fill gaps |
| 5 to 7 feet | 3 inches | Standard holder size works well |
| Over 7 feet | 4 inches or more | Use adjustable clamps or straps |
Maintenance Tips
Keeping your fishing rod stand in good shape helps it last longer. Regular care stops damage and keeps it safe to use.
This guide shares simple ways to clean and repair your fishing rod stand. Follow these tips to keep it strong.
Regular Cleaning
Clean your fishing rod stand often to remove dirt and salt. This stops rust and keeps the stand looking good.
- Wipe the stand with a damp cloth after each use
- Use mild soap and water for deeper cleaning
- Dry the stand completely to prevent rust
- Apply a light coat of oil on metal parts to protect them
- Store the stand in a dry place when not in use
Repairing Wear And Tear
Fix small problems early to avoid bigger damage. Check the stand for cracks, loose screws, or bent parts.
| Issue | How to Fix |
| Loose screws | Tighten with a screwdriver |
| Cracks in wood | Use wood glue and clamp until dry |
| Bent metal parts | Gently bend back to shape or replace if broken |
| Rust spots | Sand off rust and apply rust-resistant paint |
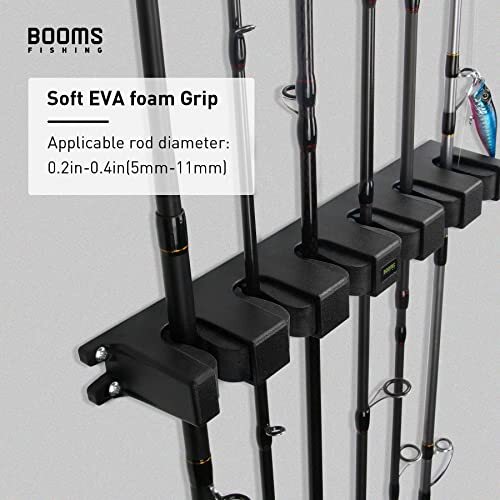
Credit: pursuethewild.com
Credit: www.windycityfishing.com
Frequently Asked Questions
What Materials Do I Need To Build A Fishing Rod Stand?
You need wood or PVC pipes, screws, glue, and a saw. Choose sturdy, weather-resistant materials for durability. Basic tools like a drill and measuring tape help ensure precise construction. Selecting quality materials ensures your stand lasts during fishing trips.
How Long Does It Take To Build A Fishing Rod Stand?
Building a fishing rod stand typically takes 1 to 3 hours. Time depends on your skill level and the design complexity. Simple stands can be assembled quickly, while custom designs may require more time. Planning ahead speeds up the process.
Can I Customize The Fishing Rod Stand Design?
Yes, you can customize the stand’s size, shape, and color. Personalize it to fit your fishing rods and style preferences. Adding extra holders or storage compartments enhances functionality. Custom designs improve convenience and match your fishing setup.
How Do I Maintain My Fishing Rod Stand?
Regularly clean the stand to remove dirt and moisture. Check for loose screws and tighten them as needed. Apply protective coatings to wooden stands to prevent weather damage. Proper maintenance extends the life of your fishing rod stand.
Conclusion
Building a fishing rod stand is simple and rewarding. You save money by making your own stand. It keeps your rods safe and organized. You can customize it to fit your needs. Using basic tools and materials works well. Enjoy more fishing time with less hassle.
Try building one today and see the difference. It makes fishing trips easier and more fun. A good stand helps you stay ready anytime. Start your project now and feel proud.