Are you tired of waking up feeling cold and uncomfortable inside your sleeping bag? A sleeping bag liner might be exactly what you need to stay warm and cozy all night long.
Making your own liner is easier than you think, and it lets you customize it to fit your style and comfort perfectly. In this guide, you’ll discover simple steps to create a sleeping bag liner that will upgrade your camping experience.
Keep reading, and you’ll learn how to make your nights outdoors much more enjoyable.

Credit: alpkit.com
Materials Needed
Making a sleeping bag liner requires some basic materials. Choosing the right fabric and tools helps create a cozy liner. This guide covers the materials you need to get started.
Gather these items before you begin. It will make the sewing process smooth and enjoyable.
Fabric Choices
Selecting the proper fabric is key for comfort and warmth. Choose soft, breathable materials that suit your needs.
- Cotton flannel: soft and warm, perfect for cool nights
- Silk: lightweight and smooth, ideal for warmer weather
- Fleece: thick and insulating, good for cold conditions
- Nylon or polyester: durable and quick-drying, great for backpacking
Essential Sewing Tools
Having the right tools makes sewing easier and more precise. These basic tools will help you complete your liner.
| Tool | Purpose |
| Sewing machine | To stitch fabric pieces together quickly |
| Scissors | To cut fabric accurately |
| Measuring tape | To measure fabric dimensions |
| Pins | To hold fabric pieces in place |
| Thread | To sew fabric edges |
| Seam ripper | To fix mistakes by removing stitches |
Optional Accessories
These extra items can improve your liner’s function or comfort. Use them if you want to add special features.
- Elastic cord: to secure the liner inside the sleeping bag
- Zippers: to make the liner easy to enter and exit
- Bias tape: to finish edges neatly
- Fabric marker: to mark cutting lines on fabric
Measuring And Cutting
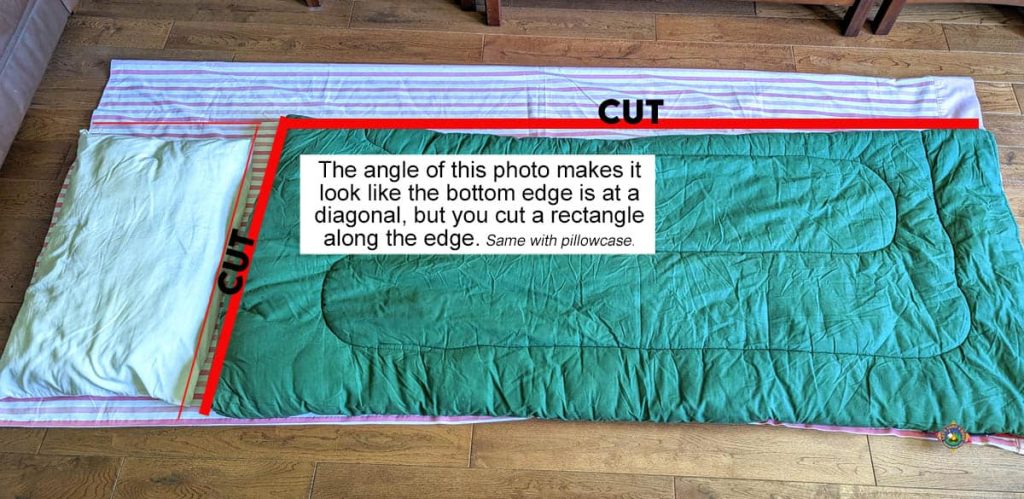
Making a sleeping bag liner starts with measuring and cutting the fabric correctly. Accurate cutting helps the liner fit well and feel comfortable.
Use simple tools like a measuring tape and fabric scissors. Take your time to get the right size before cutting.
Determining The Size
Measure your sleeping bag’s inside length and width. Add a few extra inches for seams and comfort.
Consider the shape of your sleeping bag. Some liners need a rectangular shape, others a mummy shape.
- Measure length from head to foot inside the bag
- Measure width at the widest part inside the bag
- Add 1-2 inches to each measurement for sewing
Marking The Fabric
Lay your fabric flat on a clean surface. Use a fabric chalk or pencil to mark the measurements.
Draw straight lines for cutting. Double-check your marks before cutting to avoid mistakes.
- Use a ruler or measuring tape to keep lines straight
- Mark clearly but lightly to avoid visible marks after sewing
- Mark seam allowances outside the main lines
Cutting Tips
Use sharp fabric scissors for clean cuts. Cut slowly along the marked lines.
Keep the fabric flat to prevent uneven edges. Avoid lifting the fabric while cutting.
- Cut one layer at a time for accuracy
- Keep scissors clean and sharp
- Use weights or pins to hold fabric in place
Sewing The Liner
Sewing a sleeping bag liner requires simple skills and attention. This guide covers basic stitches, seams, and closures. You will make a comfortable liner that fits well.
Use light fabric and strong thread for durability. Follow these steps to sew your liner with neat and lasting results.
Basic Stitching Techniques
Start with straight stitches to join fabric pieces. Use a sewing machine or sew by hand with even stitches. Backstitch at the beginning and end to secure seams.
- Use a medium stitch length for strong seams
- Keep stitches straight and even
- Trim loose threads as you sew
- Press seams flat with an iron
Creating Seams
Pin fabric edges before sewing to keep pieces aligned. Sew with a 1/2 inch seam allowance for strength. Press seams open to reduce bulk and improve comfort.
| Seam Type | Description | Use |
| Plain Seam | Two fabric edges sewn together | Most common for liners |
| French Seam | Seam enclosed for neat finish | Prevents fraying on delicate fabric |
| Flat-Felled Seam | Double stitched and strong | Durable and smooth inside liner |
Adding A Drawstring Or Zipper
A drawstring or zipper helps close the liner and keep warmth inside. Choose based on your preference and skill level. Both require careful sewing along edges.
Drawstring tips:
- Create a casing by folding fabric edge twice and stitching it down.
- Leave an opening to thread the drawstring.
- Use cord or ribbon as the drawstring.
Zipper tips:
- Pin the zipper tape evenly along the edge.
- Sew slowly to keep zipper straight.
- Test zipper operation before finishing seams.

Credit: www.amazon.com
Finishing Touches
Adding the final details to your sleeping bag liner makes it last longer. Pay close attention to edges and stress points. Proper care keeps the liner clean and fresh for every trip.
These finishing touches ensure your liner stays comfortable and strong. Follow simple steps for hemming, reinforcing, and washing to keep it in top shape.
Hemming Edges
Hemming the edges prevents fabric from fraying. Fold the fabric edge twice and sew a straight stitch. Use a sewing machine or sew by hand with small stitches.
- Fold edge ½ inch twice
- Pin the fold in place
- Sew along the folded edge
- Trim any loose threads
Reinforcing Stress Points
Stress points like corners and seams need extra strength. Add patches or extra stitches to these areas. This helps prevent tearing during use.
| Stress Point | Recommended Reinforcement |
| Corner seams | Double stitch and add fabric patches |
| Drawstring openings | Use bar tack stitches |
| Side seams | Serge edges or use zigzag stitch |
Washing And Care
Cleaning your liner carefully keeps the fabric soft and durable. Avoid harsh detergents and high heat drying. Hand washing is best, but gentle machine cycles work too.
- Use mild soap or detergent
- Wash in cold or lukewarm water
- Do not bleach or use fabric softener
- Air dry or tumble dry on low heat
- Store liner dry to prevent mold
Customizing Your Liner
Making a sleeping bag liner lets you add personal touches. You can improve warmth, style, and comfort easily.
Learn ways to add insulation, choose colors, and add features that make your liner cozy and unique.
Adding Insulation
Adding insulation helps keep you warm on cold nights. Use soft materials that add weight and heat without bulk.
- Choose lightweight fleece or wool for warmth.
- Use synthetic batting for extra insulation.
- Layer thin fabrics to trap heat.
- Sew insulation between liner layers carefully.
- Make sure added layers do not reduce liner size too much.
Personalizing With Colors And Patterns
Select colors and patterns that fit your style. Bright colors help find your bag at night.
| Color | Effect |
| Bright Red | Easy to spot outdoors |
| Dark Blue | Hides dirt well |
| Patterned Prints | Adds personality |
| Light Colors | Feels fresh and clean |
Extra Features For Comfort
Adding small features makes your liner more comfortable and practical.
- Attach a small pocket for storing a phone or flashlight.
- Use a drawstring to tighten the liner around your neck.
- Add a soft fleece collar for extra warmth.
- Sew in loops to hang the liner for drying.

Credit: www.amazon.com
Benefits Of Diy Liners
Making your own sleeping bag liner can be a smart choice. It lets you control what goes inside your liner. You can save money and get the comfort you want.
DIY liners fit your needs better than store-bought ones. You can choose the fabric and size. This helps you sleep better on trips.
Cost Savings
Buying materials for your liner costs less than buying a ready-made liner. You can use fabrics you already have. This reduces waste and expenses.
- You only buy what you need.
- Use leftover or recycled fabric.
- Avoid brand markups.
- Fix or change liner easily without buying new.
Material Control
Choosing your own fabric lets you decide how warm or light the liner will be. You can pick soft, breathable, or waterproof materials. This helps match your liner to the weather.
| Material | Benefit | Best Use |
| Cotton | Soft and breathable | Warm, dry weather |
| Silk | Light and smooth | Lightweight and compact |
| Fleece | Warm and cozy | Cold weather |
| Nylon | Water-resistant | Wet or damp conditions |
Enhanced Comfort
DIY liners give you a better fit and feel. You can sew the liner to fit your sleeping bag exactly. This stops cold air from entering and keeps you warmer.
- Use soft fabrics on the inside layer
- Add a drawstring to close the top
- Sew in pockets for hand warmers
- Make the liner slightly larger for extra insulation
Frequently Asked Questions
What Materials Are Best For Making A Sleeping Bag Liner?
Silk, cotton, and fleece are popular liner materials. Silk is lightweight and moisture-wicking. Cotton is breathable and soft but less warm. Fleece adds warmth and comfort. Choose based on climate and personal preference for best results.
How Do I Sew A Simple Sleeping Bag Liner?
Cut fabric to sleeping bag size plus seam allowance. Sew three sides inside out, leaving one side open. Turn it right side out and hem the open edge. This creates a basic, functional liner for added comfort.
Can A Sleeping Bag Liner Increase Warmth Effectively?
Yes, a liner can add 5-15 degrees of warmth. It acts as an extra insulating layer. Especially useful in cold weather or with lightweight sleeping bags. Adding a liner improves overall sleep quality outdoors.
How Do I Clean And Maintain A Sleeping Bag Liner?
Machine wash liners in cold water on gentle cycle. Use mild detergent, avoid fabric softeners. Air dry or tumble dry low. Regular cleaning prevents odors and extends liner life. Proper care keeps it fresh and durable.
Conclusion
Making your own sleeping bag liner saves money and adds comfort. You can choose soft, warm materials that fit your needs. A liner keeps your sleeping bag clean and extends its life. Plus, it’s easy and fun to sew one yourself.
Try different fabrics to find what works best for you. Enjoy warmer nights and cleaner gear on your next trip. Making a liner gives you a personal touch for better sleep outdoors. Give it a try and see the difference it makes.