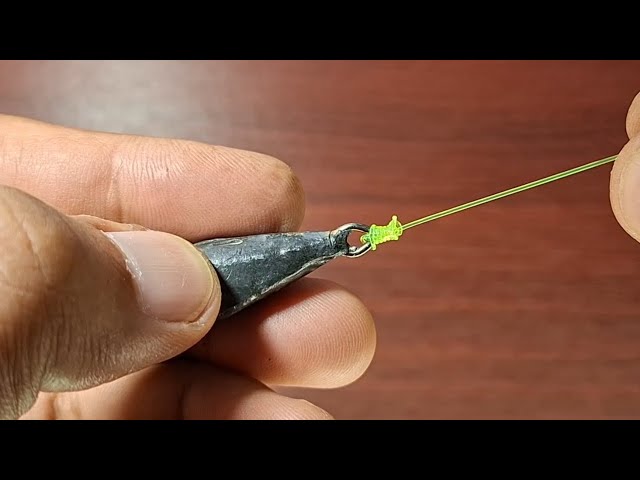
If you want to catch more fish, knowing how to tie a sinker onto your fishing line is a skill you can’t afford to miss. A properly tied sinker helps your bait sink to the right spot, making your fishing trip much more successful.
In this guide, you’ll learn a simple, step-by-step method that anyone can master quickly. Whether you’re a beginner or just looking to improve your technique, this will make your fishing experience smoother and more rewarding. Keep reading, and you’ll be ready to cast your line like a pro in no time.
Choosing The Right Sinker
Choosing the right sinker is important for fishing success. Sinkers help your bait reach the right depth quickly.
Different sinkers suit different fishing spots and water conditions. Knowing types and weights will improve your fishing.
Types Of Sinkers
Sinkers come in many shapes and sizes. Each type works best in certain fishing situations.
- Split Shot:Small, round sinkers you can pinch onto the line easily.
- Egg Sinkers:Oval-shaped with a hole for the line to slide through.
- Bank Sinkers:Heavy and teardrop-shaped, good for strong currents.
- Bullet Sinkers:Pointed shape that moves well through weeds and rocks.
- Pyramid Sinkers:Flat base, good for sandy or muddy bottoms to hold steady.
Selecting Weight For Conditions
Choosing the right weight helps your bait stay in place and reach the right depth fast.
| Condition | Sinker Weight | Reason |
| Calm water | Light (1-3 oz) | Prevents scaring fish and keeps bait natural |
| Strong current | Heavy (3-6 oz) | Keeps bait from drifting away |
| Deep water | Medium to heavy (2-5 oz) | Helps sink faster to bottom |
| Weedy areas | Streamlined shapes, medium weight | Reduces snagging and holds bait steady |

Credit: jimswansonmanofthewoods.wordpress.com
Preparing Your Fishing Line
Before tying a sinker onto your fishing line, you need to prepare the line carefully. This helps ensure your fishing setup works well and lasts longer.
Two important steps in preparing your line are trimming the line and checking its strength. Both steps help make sure your fishing is successful.
Trimming The Line
Trim the fishing line to remove any frayed or damaged ends. This gives you a clean and strong line to tie the sinker securely.
Use sharp scissors or a line clipper to cut the line straight. Avoid jagged cuts because they can weaken the knot.
- Check for any rough or fuzzy parts on the line
- Cut off at least half an inch from the damaged area
- Make a clean, straight cut with sharp scissors
- Keep the line dry while trimming to avoid slipping
Checking Line Strength
Check your fishing line strength before tying the sinker. This helps prevent the line from breaking while fishing.
Hold the line and pull it gently to feel its tension. Look for weak spots or thin areas that might break easily.
- Inspect the line for cuts or abrasions
- Test by pulling gently to check tension
- Replace line if it feels weak or damaged
- Use the right line strength for your fishing type
Popular Knots For Sinkers
Tying a sinker onto a fishing line needs a strong knot. The right knot keeps the sinker secure. It also helps in casting and catching fish.
Here are three popular knots used by anglers to tie sinkers. Each knot has its own strengths and ways to tie it.
Improved Clinch Knot
The Improved Clinch Knot is simple and reliable. It works well with thin fishing lines. Many anglers use it to attach sinkers or hooks.
- Thread the line through the sinker’s eye.
- Wrap the tag end around the standing line 5 times.
- Pass the tag end through the small loop near the sinker.
- Then pass it through the big loop made before.
- Pull tight and trim the extra line.
Palomar Knot
The Palomar Knot is strong and easy to tie. It keeps the sinker from slipping off. This knot works great with braided and monofilament lines.
| Step | Action |
| 1 | Double the line and pass it through the sinker’s eye. |
| 2 | Tie a loose overhand knot with the doubled line. |
| 3 | Pass the sinker through the loop of the knot. |
| 4 | Pull both ends slowly to tighten the knot. |
| 5 | Trim excess tag end. |
Dropper Loop Knot
The Dropper Loop Knot creates a strong loop on the main line. You can tie a sinker on this loop. It lets you add more hooks or sinkers without weakening the main line.
How to tie a Dropper Loop Knot:
- Make a loop in the line where you want the sinker.
- Twist the loop 5 to 7 times.
- Pull the loop open to form a small loop sticking out.
- Tighten the knot by pulling both ends of the line.
- Attach the sinker to the small loop.

Credit: www.youtube.com
Step-by-step Knot Tying
Tying a sinker to your fishing line is easy with the right steps. A strong knot keeps your sinker secure and ready for fishing.
This guide shows how to attach the sinker, secure the knot, and test its strength for a safe fishing trip.
Attaching The Sinker
Start by threading the fishing line through the sinker’s hole. Pull enough line through to make the knot.
- Pass the line through the sinker hole.
- Double back and wrap the line around itself.
- Make five loops around the standing line.
- Thread the tag end through the loops.
- Pull the tag end to tighten the knot.
Securing The Knot
Wet the knot with water or saliva. This reduces friction and helps the knot tighten smoothly.
- Hold the sinker and main line firmly.
- Pull the tag end slowly to snug the knot.
- Check that the wraps lie neatly side by side.
- Trim the excess tag end close to the knot.
Testing The Knot Strength
| Test Method | What to Do | Expected Result |
|---|---|---|
| Pull Test | Pull the line hard near the knot. | Knot stays tight without slipping. |
| Visual Check | Look for loose wraps or frayed line. | Knots look neat and line is intact. |
| Water Test | Wet knot and pull again. | Knot tightens more, no loosening. |
Tips For Better Casting
Tying a sinker onto a fishing line can affect how far and well you cast. Proper technique helps you cast smoothly and accurately.
Good casting means less tangles and better control of your fishing line. Small changes make a big difference.
Line Management
Keep your fishing line neat before casting. Twisted or tangled lines reduce casting distance and cause problems.
Hold the line properly and avoid loose loops. This helps the line flow smoothly through the rod guides.
- Check your line for twists and knots before casting
- Keep the line tight but not too tight in your hand
- Use your fingers to control the line speed during the cast
Adjusting Sinker Placement
Where you tie the sinker on the line affects how the bait moves and how far you can cast. Experiment with placement for better results.
Placing the sinker too close to the hook can reduce casting distance. Moving it slightly up the line can improve balance and flight.
- Start by tying the sinker about 12 inches above the hook
- Move the sinker higher if your cast feels short or heavy
- Adjust placement based on water depth and current strength

Credit: www.youtube.com
Common Mistakes To Avoid
Tying a sinker onto a fishing line seems easy. Many anglers make avoidable mistakes. These errors reduce your chances of catching fish and can cause lost gear.
Learn the common problems and how to fix them. This guide covers loose knots, choosing the wrong sinker size, and weak line issues.
Loose Knots
A loose knot can slip and cause the sinker to fall off. This often happens when the knot is not tightened properly. You need a firm, neat knot to keep the sinker secure.
- Pull the knot tight before trimming the tag end.
- Moisten the knot with water or saliva before tightening.
- Practice common knots like the Palomar or Improved Clinch knot.
- Avoid tying knots with wet or dirty hands.
Incorrect Sinker Size
Using the wrong sinker size affects casting and fishing success. Too heavy sinkers scare fish and damage the line. Too light sinkers do not sink well or stay in place.
| Sinker Weight | Use For | Problem if Wrong |
| 1/8 oz | Light baits, calm water | Too heavy: scares fish |
| 1/2 oz | Moderate current, medium depth | Too light: poor sinking |
| 1 oz or more | Strong currents, deep water | Too heavy: breaks line |
Weak Line Issues
A weak fishing line breaks easily, causing lost sinkers and fish. Old lines lose strength over time. Using the right line strength is key.
Tips to avoid weak line issues:
- Check line for cracks or frays before tying.
- Use line strength that matches sinker weight and target fish.
- Replace line regularly, especially after heavy use.
- Avoid knots that reduce line strength, like simple overhand knots.
Frequently Asked Questions
How Do You Tie A Sinker To Fishing Line?
To tie a sinker, thread the line through the sinker’s eye or hole. Use a clinch knot or improved clinch knot to secure it tightly. Pull the knot firmly and trim excess line for a neat finish.
What Knot Is Best For Attaching A Sinker?
The improved clinch knot is best for attaching a sinker. It provides a strong, reliable hold and is easy to tie. This knot helps keep the sinker secure during casting and fishing.
Can I Use Any Sinker With My Fishing Line?
Most sinkers work with various fishing lines, but match the sinker size to line strength. Heavier sinkers suit thicker lines, while lighter sinkers work with thinner lines. Always ensure compatibility for effective fishing and avoiding line damage.
Why Is Tying A Sinker Correctly Important?
Correctly tying a sinker prevents it from slipping off during fishing. It ensures proper bait presentation and casting distance. A secure knot improves fishing success and avoids losing tackle.
Conclusion
Tying a sinker is simple with practice. Secure your knot tightly for success. Always choose the right sinker for your fishing needs. Experiment with different techniques to find what works best. Stay patient and enjoy the process. Fishing is not just about the catch.
It’s about the experience and learning. Use these steps to improve your skills. Have fun on your next fishing trip. Remember, a well-tied sinker can make a big difference. Happy fishing!