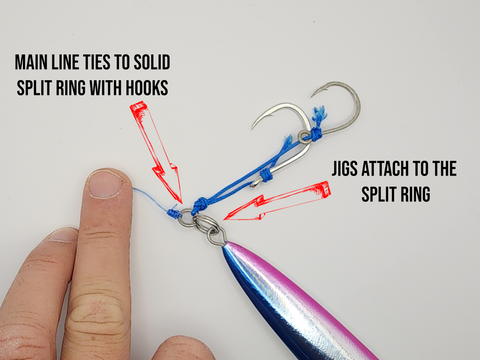
If you love fishing, you know that tying the right knot can make all the difference between a catch and a lost lure. Learning how to tie a jig to your fishing line is a simple skill that can boost your success on the water.
In this guide, you’ll discover an easy, step-by-step method that anyone can master. Whether you’re a beginner or want to improve your technique, by the end of this article, you’ll feel confident tying your jig quickly and securely every time.
Ready to make your next fishing trip more productive? Let’s get started!
Credit: www.youtube.com
Choosing The Right Jig And Line
Tying a jig to your fishing line works best with the right jig and line. Picking the correct ones makes fishing easier and more fun.
This guide explains types of jigs and how to select the proper fishing line for your needs.
Types Of Jigs
Jigs come in many shapes and sizes. Each type suits different fish and water conditions.
- Round Jigs:Good for vertical fishing and deep waters.
- Football Jigs:Best for rocky bottoms and strong currents.
- Swim Jigs:Designed to move naturally in open water.
- Tube Jigs:Ideal for slow presentations near cover.
- Grass Jigs:Made to fish in weedy areas without snagging.
Selecting Fishing Line
Choosing the right fishing line depends on the jig weight and where you fish. Stronger lines work better for heavy cover.
| Line Type | Strength | Best For |
|---|---|---|
| Monofilament | 6-12 lbs | General use, good stretch |
| Fluorocarbon | 8-15 lbs | Clear water, less visible |
| Braid | 15-50 lbs | Heavy cover, strong fish |
Preparing The Line And Jig
Tying a jig to a fishing line starts with careful preparation. Proper setup helps create a strong, reliable knot.
Focus on trimming the line and moistening the knot area before tying. These steps improve knot strength and durability.
Trimming The Line
Trim the fishing line to remove any frayed or damaged ends. A clean cut helps the knot hold firmly.
- Use sharp scissors or clippers for a clean cut
- Cut about 1 to 2 inches from the jig or lure eye
- Remove any rough or worn parts of the line
- Check the line for weak spots before tying
Moistening The Knot Area
Moistening the knot area reduces friction and heat when tightening. This prevents line damage and slipping.
| Why Moistening Helps | How to Moisturize |
| Reduces heat from tightening | Use water or saliva to wet the line |
| Prevents line from weakening | Apply moisture right before pulling the knot tight |
| Improves knot grip | Keep the knot wet until fully tightened |
Step-by-step Knot Techniques
Tying a jig to a fishing line is important for a strong hold. Using the right knot helps keep the jig secure.
This guide shows easy knots you can use. Follow these steps to tie your jig properly every time.
Improved Clinch Knot
The Improved Clinch Knot is a popular choice for tying jigs. It is simple and holds well on most lines.
Start by threading the line through the jig eye. Wrap the tag end around the main line five times. Pass the tag end through the small loop near the eye. Then pass it through the big loop you just made. Pull the knot tight and trim the excess line.
- Thread line through jig eye
- Wrap tag end 5 times around main line
- Pass tag end through small loop
- Pass tag end through big loop
- Tighten and trim excess line
Palomar Knot
The Palomar Knot is very strong and easy to tie. It works well with braided and monofilament lines.
Double about six inches of line and pass it through the jig eye. Tie a loose overhand knot with the doubled line. Pass the jig through the loop. Pull both ends of the line to tighten the knot. Cut the tag end close to the knot.
- Double 6 inches of line
- Pass doubled line through jig eye
- Tie loose overhand knot
- Pass jig through loop
- Tighten knot by pulling ends
- Trim tag end
Loop Knot
The Loop Knot gives your jig more movement in the water. It keeps the jig free to move naturally.
Make a simple overhand knot in the line about 10 inches from the end. Pass the tag end through the jig eye. Then pass the tag end through the overhand knot loop. Wrap the tag end around the main line five times. Pass the tag end back through the overhand knot loop. Pull the knot tight and trim the excess.
- Create overhand knot 10 inches from line end
- Pass tag end through jig eye
- Pass tag end through overhand knot loop
- Wrap tag end 5 times around main line
- Pass tag end back through overhand knot loop
- Tighten and trim excess line

Credit: wholesalejigs.com.au
Tips For Stronger Knots
Tying a jig to a fishing line needs a strong knot. A strong knot keeps your jig secure while fishing. Use these tips to make your knots tighter and last longer.
Good knot-tying improves your catch rate. It also stops line breaks and lost jigs. Let’s look at ways to make your knots stronger.
Avoiding Line Twist
Line twist weakens your fishing line and knots. It happens when the jig spins in the water. Avoid twisting to keep your knot strong.
Use these tips to stop line twist:
- Let the jig sink without forcing it down
- Use a swivel between the jig and line
- Twist the line before tying the knot
- Reel in slowly to reduce spinning
Ensuring Tightness
Tight knots hold better and prevent slippage. Make sure the knot is snug on the jig eye. Wet the line before pulling to avoid friction damage.
Tighten your knot evenly and slowly. This stops the line from weakening or breaking. Avoid yanking the line hard.
- Moisten the line before tightening
- Pull the knot slowly and firmly
- Check the knot for any gaps
- Trim excess line close to the knot
Testing Knot Strength
Check your knot before fishing. Test it by pulling hard on the line and jig. A strong knot will not slip or break.
If the knot slips or loosens, retie it. Testing saves you from losing fish and gear.
- Pull the jig away from the line firmly
- Look for any movement in the knot
- Retie if the knot feels loose
- Practice tying knots to improve skill
Common Mistakes To Avoid
Tying a jig to a fishing line is simple but needs care. Small errors can cause lost fish or broken lines.
Knowing common mistakes helps you tie your jig securely. This guide explains what to watch for.
Using Damaged Line
Using a damaged fishing line weakens the connection. Cuts or frays can cause the line to break under pressure.
Always check the line before tying. Replace or trim any parts that look worn or broken.
- Look for nicks, cuts, or frays on the line
- Test the line by gently pulling on it
- Replace the line if it feels weak or rough
Incorrect Knot Tying
Tying the wrong knot or tying it poorly can cause the jig to slip off. Some knots are better for jigs than others.
Learn and practice a strong knot like the improved clinch knot. Make sure the knot is tight and neat.
- Choose knots known for strength with jigs
- Keep the knot tight without damaging the line
- Trim excess tag ends close to the knot
Skipping Knot Checking
Not checking your knot after tying is a big mistake. Knots can loosen or slip before you start fishing.
Always test your knot by pulling hard on the jig. Re-tie if the knot moves or slips.
- Pull the jig firmly to test the knot’s hold
- Look for any movement or slipping in the knot
- Retie knots that do not hold tightly
Maintaining Your Fishing Gear
Keeping your fishing gear in good shape helps you catch more fish. Regular care prevents damage and extends the life of your equipment.
Learn how to inspect your fishing line and when to replace your jigs. These simple steps keep your gear ready for every trip.
Regular Line Inspection
Check your fishing line before every outing. Look for signs of wear like frays, cuts, or weak spots. Damaged lines can break easily and cause lost fish.
- Run your fingers along the line to feel for rough areas
- Look closely for discoloration or thin spots
- Replace the line if you find any damage
- Check knots to make sure they are tight and secure
Replacing Worn Jigs
Jigs can wear out from frequent use and exposure to water. Replace them to keep your fishing effective and safe. Old jigs may lose their shape or color, making them less attractive to fish.
| Signs Your Jig Needs Replacing | What to Do |
| Rust or corrosion | Discard and use a new jig |
| Bent or broken hooks | Replace immediately to avoid losing fish |
| Faded paint or missing parts | Choose a fresh jig with bright colors |
| Loose or damaged skirts | Swap for a new jig to maintain lure action |

Credit: jimswansonmanofthewoods.wordpress.com
Frequently Asked Questions
What Is The Best Knot For Tying A Jig?
The improved clinch knot is the best for tying jigs. It offers strong and secure attachment. Make sure to moisten the line before tightening. This prevents friction and ensures a tight knot. It’s a favorite among anglers for its reliability.
How Do I Secure A Jig To Fishing Line?
Start by threading the line through the jig eyelet. Use an improved clinch knot for security. Wrap the line around itself five times. Pass the line through the initial loop. Moisten and tighten the knot for a secure hold.
Why Is Knot Strength Important For Fishing?
Knot strength is crucial for preventing line breaks. A strong knot ensures your jig stays attached during a catch. It provides confidence when battling strong fish. Always test your knot’s strength before casting. This ensures a successful and enjoyable fishing experience.
Can I Use Any Line Type For Jigs?
You can use monofilament, fluorocarbon, or braided line for jigs. Each has its benefits. Monofilament is versatile and easy to handle. Fluorocarbon is nearly invisible underwater. Braided line offers excellent strength and sensitivity. Choose based on your fishing conditions and preferences.
Conclusion
Tying a jig to your fishing line is simple and quick. Practice the steps a few times to get comfortable. A strong knot keeps your jig secure and helps catch fish. Try different knots to find what works best for you.
Remember, patience and practice improve your fishing skills. Keep your line tight and check knots often. Enjoy your time fishing with confidence and ease.