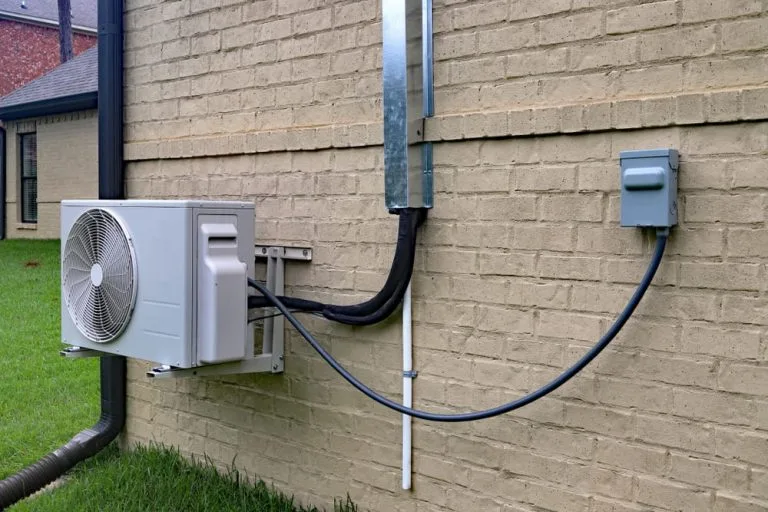
Are you ready to take control of your home’s comfort and save money by installing your own air conditioner condenser? Installing this key part might seem tricky, but with the right steps, you can do it yourself without hassle.
Imagine the cool breeze flowing through your home, knowing you set it up perfectly. In this guide, you’ll learn exactly how to install your air conditioner condenser safely and efficiently. Keep reading, and you’ll discover simple tips that make the process clear and manageable—no confusion, no stress.
Let’s get started on making your home cooler and more comfortable today!

Credit: www.youtube.com
Tools And Materials Needed
Installing an air conditioner condenser needs the right toolsand materials. These help make the job safe and easy. Gather all before starting work.
- Wrench setto tighten bolts and nuts
- Screwdriversfor securing screws
- Pliersfor gripping and twisting wires
- Drillto make holes in walls or frames
- Levelto keep the unit straight
- Electrical tapefor insulating wires
- Condenser mounting bracketsto hold the unit
- Refrigerant tubingto connect the indoor and outdoor parts
- Vacuum pumpto remove air and moisture
- Safety glovesto protect hands
Credit: kayplumbing.com
Choosing The Right Location
Choose a location with good airflowaround the condenser. Proper ventilation helps the unit work efficientlyand last longer.
Avoid placing the condenser where it gets direct sunlight. Sunlight heats the unit, making it work harderand use more energy.
Make sure the condenser is easy to reach for maintenanceand repairs. Clear space around the unit helps technicians access it quickly.
Preparing The Installation Site
Clear the area around the condenser site. Remove any plants, rocks, or debris. This helps with airflow and easy access. A clean space avoids damage and keeps the unit cool.
Set a strong base to support the condenser. Use concrete or a sturdy pad. The base must be firm to stop shaking and noise. It also protects the unit from dirt and water.
Level the surface carefully. Use a spirit level to check the base. A flat surface stops vibration and helps the unit work well. Uneven ground can cause damage over time.
Mounting The Condenser Unit
The condenser unit must be placed on a flat and stable surface. Choose a spot with good airflow and away from direct sunlight. Keep it clear of plants or objects that block air movement.
Use strong mounting brackets designed for your condenser. Check that the brackets align well with the unit’s holes. Secure them tightly to prevent shaking or falling.
Fasten the condenser carefully to the brackets using bolts or screws. Make sure all fasteners are tight to hold the unit firmly. Double-check for any loose parts before finishing.
Connecting Refrigerant Lines
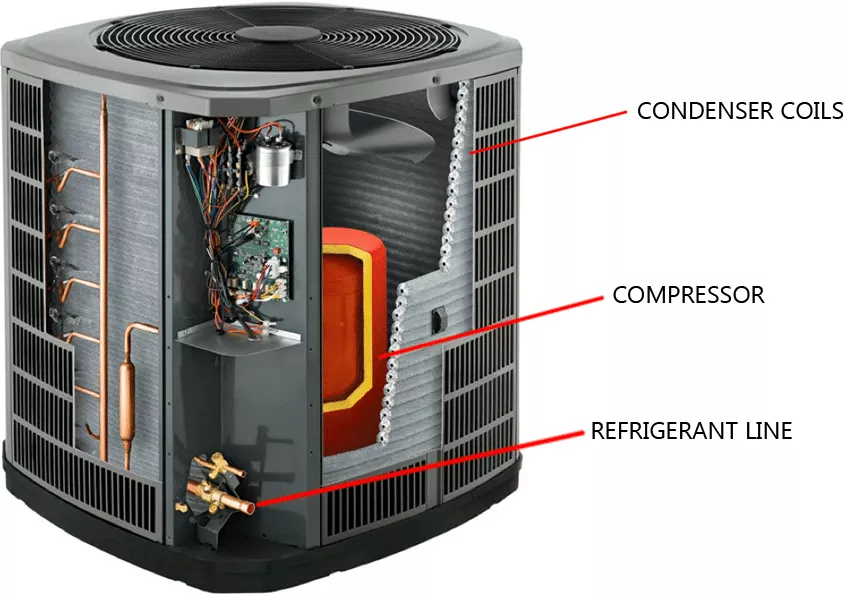
Handle the refrigerant pipes with care to avoid damage. Use a pipe cutter to trim pipes cleanly. Avoid bending the pipes sharply; gentle curves work best. Clean the pipe ends before connecting to prevent leaks.
Attach the refrigerant lines securely to the indoor unit’s ports. Use the correct wrenches to tighten the connections without over-tightening. Ensure the connections are snug to stop any gas from escaping.
Seal the joints with a good quality sealing tape to block air and moisture. Wrap the pipes with insulation foam to keep the cold air inside. This helps the air conditioner work efficiently and stops condensation.
Wiring The Electrical Components
Turn off the powerbefore starting any wiring work. This step keeps you safe from electric shock. Use a circuit tester to confirm the power is off.
Connect the wires carefully. Match the wire colors: black to black, white to white, and green or bare copper to ground. Use wire nuts to secure the connections. Make sure wires are tight and not loose.
Test all connections once wiring is done. Turn the power back on and check if the condenser runs smoothly. If the unit does not start, turn power off and double-check wiring.
Final Checks And Testing
Check all connectionscarefully for any signs of leaks. Use a soapy water solution to spot bubbles, which show leaks clearly. Tighten loose fittings to stop leaks fast.
Run a test cycle by turning the system on. Listen for strange noises and watch for proper fan and compressor operation. The air should cool steadily and flow strongly.
- Adjust thermostatsettings to match room comfort needs.
- Ensure the condenser fan runs smoothly without wobbling.
- Check electrical connections for safety and proper function.
- Verify that the condenser is level to avoid drainage issues.
Maintenance Tips
Cleaning the condenserhelps keep the air conditioner working well. Dirt and leaves can block air flow. Use a soft brush or cloth to clean the fins gently. Avoid bending the fins as they are delicate. Clear away any debris around the unit to ensure good air flow.
Regular inspectionscatch problems early. Check the unit for rust, loose parts, or damaged wires. Listen for strange noises when the unit runs. Look for leaks or ice buildup on the coils. Small issues can turn into big repairs if ignored.
When to call a professionalmatters. Call an expert if the unit does not cool well or turns off often. Strange smells or noises also need expert help. Professionals can check refrigerant levels and fix complex parts safely.

Credit: m.youtube.com
Frequently Asked Questions
How Do I Prepare The Site For Ac Condenser Installation?
Clear the area where the condenser will sit. Ensure it’s flat, level, and stable. Remove debris and vegetation for proper airflow.
What Tools Are Needed To Install An Ac Condenser?
You need a wrench, screwdriver, drill, level, and tubing cutter. Safety gloves and goggles are recommended for protection.
How To Connect Refrigerant Lines To The Condenser?
Attach copper refrigerant lines securely to the condenser’s service ports. Use proper flaring tools to avoid leaks and ensure tight connections.
How Do I Ensure The Condenser Is Level?
Use a carpenter’s level on the condenser base. Adjust the pad or support until the bubble is centered for stability.
Conclusion
Installing an air conditioner condenser can seem tricky. But with patience, it’s doable. Start by gathering all necessary tools and materials. Follow each step carefully, ensuring connections are secure. Always prioritize safety, wearing protective gear when needed. Check the unit’s manual for specific instructions.
Seek help if uncertain about any step. After installation, test the unit to ensure it works properly. Regular maintenance helps keep the system efficient. Keep the condenser area clean and clear of debris. Enjoy the comfort of a well-cooled home.
Remember, practice makes perfect. Happy cooling!