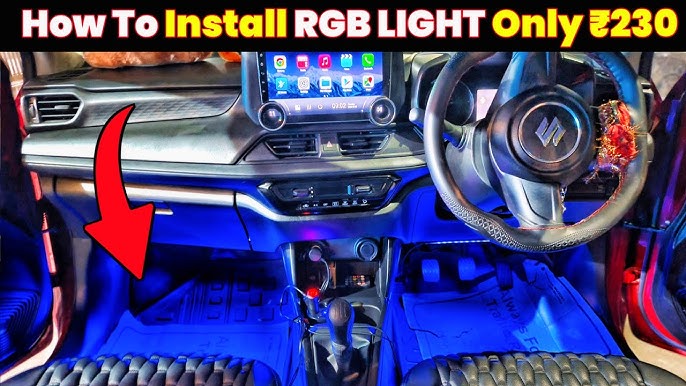
Want to give your car a fresh, cool look that stands out day and night? Installing LED strip lights is one of the easiest and most affordable ways to do just that.
Imagine cruising down the street with vibrant lights glowing inside or under your car, turning heads wherever you go. But how do you get started? In this guide, you’ll learn step-by-step how to install LED strip lights in your car quickly and safely—even if you’ve never done it before.
Keep reading, and you’ll be lighting up your ride like a pro in no time.
Credit: www.jaginfo.org
Choosing The Right Led Strip Lights
Installing LED strip lights in your car can improve its look and visibility. Choosing the right LED strips is important for a good result.
This guide explains how to pick the best LED strips for your car by looking at types, colors, brightness, and waterproof ratings.
Types Of Led Strips
There are different types of LED strips for cars. Each type has unique features for installation and light effects.
Common types include single color strips, RGB strips, and addressable LED strips. Pick the type that fits your style and needs.
- Single Color:Shows one color only, easy to install.
- RGB:Can change colors using a remote or app.
- Addressable:Lights can show different colors in sections.
Color Options
LED strips come in many colors. Pick colors that match your car’s look or your personal taste.
Some strips offer one color, while others let you choose from many colors or change colors anytime.
- Single color strips are simple and bright.
- RGB strips give many color choices.
- Some strips allow color changes with a remote.
Brightness Levels
Brightness affects how well the lights show in the car. Choose strips that are bright enough for your needs.
Look at the LED’s brightness level, usually measured in lumens. Higher lumens mean brighter lights.
- Low brightness works for accent lighting inside the car.
- Medium brightness is good for footwells and dashboards.
- High brightness is best for outside or undercar lights.
Waterproof Ratings
Waterproof ratings show how well LED strips resist water and dust. Choose the right rating for inside or outside use.
Inside the car, waterproofing is less important. For outside, pick strips with strong waterproof ratings.
| Rating | Protection Level |
|---|---|
| IP20 | No water protection, indoor use only |
| IP65 | Protected against water jets, good for outside |
| IP67 | Can be submerged in water briefly |
| IP68 | Can stay underwater for a long time |
Gathering Necessary Tools And Materials
Installing LED strip lights in your car needs the right tools and materials. Getting everything ready makes the job easier and safer.
Before starting, gather all the items to avoid stopping in the middle of the work. This guide helps you find what you need.
Basic Tools Required
You need some simple tools to install LED strip lights in your car. These tools help with cutting, fixing, and connecting the strips.
- Wire cutters or scissors to trim the LED strips
- Screwdriver set for removing panels or screws
- Electrical tape for securing wires
- Multimeter to check electrical connections
- Wire strippers to remove insulation from wires
Additional Accessories
Besides basic tools, some extra items make installation smoother and more reliable. These accessories help with power and mounting.
- LED strip lights with adhesive backing
- 12V power adapter or car battery connector
- Connectors or soldering kit for joining wires
- Zip ties to organize and hold wires in place
- Heat shrink tubing for protecting wire joints
Safety Equipment
Safety is important when working with electricity and tools. Use proper equipment to protect yourself during installation.
- Safety gloves to protect your hands
- Safety glasses to guard your eyes
- Work light to see clearly in dark areas
- Fuse or circuit breaker for electrical safety
Preparing Your Car For Installation
Installing LED strip lights in your car needs careful preparation. This helps the lights fit well and work safely.
Start by preparing the areas where you want to place the lights. Check the power source and plan the layout before you begin.
Cleaning The Installation Area
Clean the surface where you will attach the LED strips. Use a cloth and rubbing alcohol to remove dirt and grease. This step helps the lights stick better.
Planning The Layout
Decide where to place each LED strip before installation. Measure the length and think about wiring paths to avoid damage or loose connections.
- Choose areas with flat surfaces for better adhesion.
- Avoid places near heat sources or moving parts.
- Plan how to hide wires for a clean look.
- Check that the strips will not block vents or controls.
Checking Power Sources
Make sure your car’s power supply can handle the LED strips. Check the voltage and fuse ratings before connecting the lights.
| Power Source | Voltage | Fuse Rating |
| Car Battery | 12V | 10A or higher |
| Accessory Power Outlet | 12V | 15A or higher |
| Fuse Box | Depends on Circuit | Check car manual |
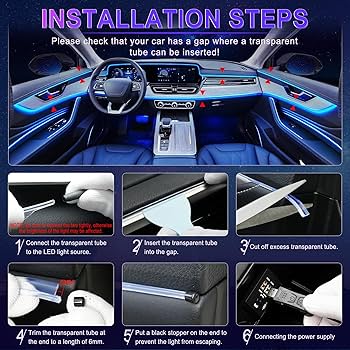
Step-by-step Installation Process
Installing LED strip lights in your car adds style and extra lighting. This guide helps you install them safely and correctly.
Follow these simple steps to measure, connect, secure, and test your LED strips for the best results.
Measuring And Cutting Led Strips
Measure the areas where you want to place the LED strips. Use a tape measure to get accurate lengths.
Cut the strips only at marked cutting points. These points are usually shown by small scissors icons.
- Measure twice before cutting
- Cut only at designated marks
- Keep cut ends clean for wiring
Connecting The Wiring
Connect the LED strips to the power source using the wires provided. Match the positive and negative wires correctly.
Use connectors or solder the wires for a strong connection. Insulate connections with electrical tape or heat shrink tubing.
- Identify positive (+) and negative (-) wires
- Use connectors or solder for connections
- Cover exposed wires to prevent shorts
Securing The Strips In Place
Clean the surface where you will stick the LED strips. Use rubbing alcohol to remove dust and grease.
Peel off the adhesive backing and press the strips firmly onto the surface. Use clips or zip ties for extra support if needed.
- Clean surface before applying strips
- Press strips firmly for good adhesion
- Use clips or ties for extra hold
Testing The Lights
Turn on the power to check if all LED strips light up. Look for any sections that do not glow.
If some lights do not work, check the wiring connections and ensure the strips are not damaged.
- Switch on the car lights or LED switch
- Check every strip for proper lighting
- Fix loose wires or replace faulty strips
Troubleshooting Common Issues
Installing LED strip lights in your car can brighten up your ride. Sometimes, issues happen that stop the lights from working right.
This guide helps you fix common problems with car LED strip lights. Check each section to find easy solutions.
Lights Not Turning On
If your LED strip lights do not turn on, first check the power source. Make sure the car battery or power supply is connected and working.
- Verify the fuse is not blown or damaged.
- Check the on/off switch for proper function.
- Inspect the wiring for cuts or breaks.
- Confirm the LED strip is plugged into the correct power output.
Flickering Or Dim Lights
Flickering or dim LED lights often signal power issues or poor connections. This can reduce visibility and affect the look.
| Cause | Fix |
| Loose wiring | Secure all wire connections tightly |
| Low battery voltage | Charge or replace the car battery |
| Damaged LED strip | Replace the faulty section of the strip |
| Poor grounding | Check and improve ground wire connection |
Loose Connections
Loose connections cause lights to go off or flicker. These spots can create electrical resistance or cuts.
- Wire joints and connectors
- Power supply terminals
- Ground connection points
- LED strip connectors
Tighten or re-solder any loose wires. Use electrical tape or heat shrink tubing to cover exposed wires.
Customizing Your Led Lighting Setup
Installing LED strip lights in your car is just the start. Customizing the setup makes your lighting unique and fun.
You can add controllers, sync lights with music, and create special effects. These options improve your car’s look.
Adding Controllers And Remotes
Controllers let you change light colors and brightness easily. Remotes add convenience to control your LED strips.
Many controllers support multiple zones. This means you can light different parts of your car in different colors.
- Use a remote to switch colors and modes
- Install a controller with a smartphone app
- Choose controllers that fit your LED strip type
- Place the controller where it is easy to reach
Syncing With Music
Syncing LED lights with music makes your car lively. Lights flash and change with the song’s beat.
You need a controller with a sound sensor or an app that listens to music. This setup reacts to bass and rhythm.
- Choose a controller with built-in music sync
- Use a microphone to detect sound inside the car
- Adjust sensitivity to match your music style
- Try different light patterns for each song
Creating Lighting Effects
Lighting effects add style and personality to your car. You can create fading, flashing, and color-changing effects.
Many LED strip kits come with built-in effects. You can also program your own if your controller supports it.
- Use fade to blend colors smoothly
- Try flashing for a bright, quick effect
- Cycle colors for a dynamic look
- Create custom effects with app controls
Maintaining And Caring For Led Strips
Proper care helps your LED strip lights last longer in your car. Regular maintenance keeps them bright and safe to use.
Simple steps can prevent damage and fix small issues early. This saves time and money on repairs.
Cleaning Tips
Keep LED strips free from dust and dirt for better light. Use a soft cloth to clean them gently.
Avoid harsh chemicals that can damage the strips or their coating. Mild soap and water are safe options.
- Turn off the lights before cleaning
- Use a dry or slightly damp soft cloth
- Do not spray liquids directly on strips
- Clean regularly to avoid buildup
Avoiding Damage
Protect LED strips from sharp bends and heavy pressure. This helps avoid cracks and broken circuits.
Keep wires secure and avoid pulling on them. Use clips or tape to hold strips firmly in place.
- Do not bend strips at sharp angles
- Keep strips away from water unless waterproof
- Secure loose wires to prevent pulling
- Avoid exposure to extreme heat
Replacing Parts
Sometimes you may need to replace damaged sections or connectors. Use parts made for your LED strip model.
Disconnect the power before replacing parts to avoid shock. Follow instructions carefully for safe installation.
- Buy replacement strips or connectors matching your setup
- Cut damaged sections only at marked points
- Use waterproof connectors if strips are exposed
- Test new parts before final installation

Credit: www.amazon.com
Credit: www.amazon.ca
Frequently Asked Questions
How Do I Install Led Strip Lights In My Car?
Clean the surface where you want to place the LED strips. Peel off the adhesive backing and stick the strips firmly. Connect the wires to your car’s 12V power source and ground. Test the lights before securing loose wires.
What Tools Are Needed To Install Car Led Strip Lights?
You need LED strip lights, a 12V power source, wire connectors, electrical tape, a fuse tap, and basic tools like wire strippers. A multimeter helps check connections. Clean cloth and rubbing alcohol prepare the surface for adhesion.
Can I Install Led Strip Lights Without Damaging My Car?
Yes, LED strips use adhesive backing that doesn’t harm surfaces. Avoid drilling holes by using existing wiring or fuse taps. Ensure wires are secured and not pinched. Always disconnect the battery before installation to prevent electrical issues.
How To Connect Led Strip Lights To Car’s Power?
Identify the car’s 12V power source, usually the fuse box or accessory wiring. Use a fuse tap for safety. Connect the positive wire to the power source and the negative to a ground point. Secure connections with electrical tape.
Conclusion
Installing LED strip lights in your car is simple and rewarding. It enhances your vehicle’s look and adds personal style. Follow the steps for a successful installation. Ensure wires are secure and connections tight. This prevents future issues. Always choose quality lights for durability and brightness.
Remember, safety first when working with car electronics. Enjoy your new, vibrant car interior. Now, drive with style and confidence. Your car, your way. Bright and beautiful.