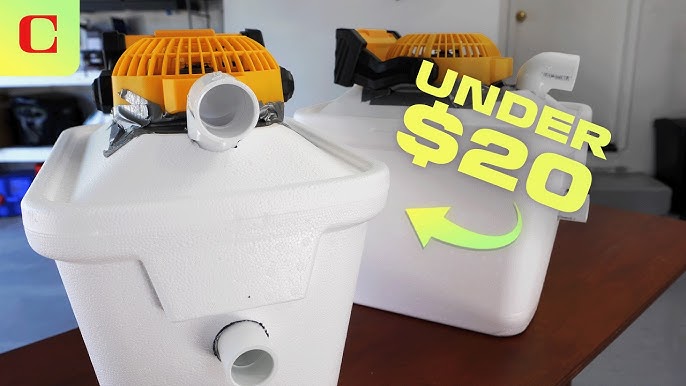
Feeling the heat and wishing you had a cool breeze right at home? What if you could make your own air conditioner without spending a lot of money or calling a repair expert?
You’re about to discover simple steps to create a homemade air conditioner that actually works. This guide will show you how to beat the heat with things you might already have. Ready to stay cool and save money? Keep reading, because your comfort is just a few easy steps away.
Materials Needed
Making an air conditioner at home needs some simple materials. These parts help cool the air effectively.
Gathering the right tools and safety gear also makes the work easier and safer. Let’s look at what you need.
Cooling Components
The main parts that cool the air include a fan and ice or cold water. These help lower the room temperature.
- Small electric fan
- Plastic container or cooler box
- Ice packs or frozen water bottles
- Flexible tubing or PVC pipe
- Cooling coils (optional)
- Insulation material
Tools Required
Using the right tools helps you build the air conditioner faster and with better results.
| Tool | Purpose |
| Screwdriver | Assembling parts |
| Utility knife | Cutting plastic and insulation |
| Drill | Making holes for tubing |
| Measuring tape | Measuring components accurately |
| Hot glue gun | Sealing edges and parts |
Safety Gear
Safety is important when building your air conditioner. Wear protective gear to avoid injuries.
- Safety goggles to protect your eyes
- Work gloves to protect your hands
- Dust mask to avoid inhaling particles
- Closed-toe shoes for foot safety

Credit: www.youtube.com
Choosing The Right Design
Making an air conditioner at home can be simple or complex. Picking the right design helps you save time and money.
Different designs cool your room in different ways. You need to choose one that fits your needs and tools.
Types Of Diy Air Conditioners
There are many DIY air conditioner designs. Some use ice and fans, while others use more parts to cool air.
Common types include ice box coolers, swamp coolers, and fan-and-water designs. Each works differently to lower temperature.
- Ice Box Cooler: Uses ice and a fan to blow cold air.
- Swamp Cooler: Uses water evaporation to cool air.
- Fan and Water Design: Circulates water-cooled air with a fan.
Pros And Cons Of Each Design
Each DIY air conditioner design has good and bad points. Knowing these helps you pick the best one for your home.
| Design | Pros | Cons |
|---|---|---|
| Ice Box Cooler | Easy to build, low cost, no electricity needed beyond fan | Ice melts fast, needs frequent refilling, limited cooling |
| Swamp Cooler | Uses natural evaporation, good for dry climates, low energy use | Not effective in humid areas, needs water supply, regular maintenance |
| Fan and Water Design | Better cooling than ice box, uses simple parts, easy to maintain | Uses more water, needs electricity for fan, can be bulky |
Step-by-step Assembly
Building an air conditioner at home is a simple project. It helps you cool a small room with easy parts.
This guide shows you how to assemble a basic air conditioner. Follow the steps carefully for best results.
Preparing The Base
Start by choosing a sturdy base for your air conditioner. It should hold all parts firmly in place.
A flat wooden board or plastic tray works well. Make sure it fits the space where you want to use it.
- Use a board around 12 inches by 12 inches
- Check that it can hold the weight of all components
- Keep the surface clean and dry
Installing Cooling Elements
Next, add the cooling parts. This includes a fan, ice compartment, and water container.
Place a small fan on one side to blow air. Put ice or frozen water in a container near the fan.
- Attach the fan securely to the base
- Use a shallow box for ice to cool the air
- Place water below the ice to catch drips
Wiring And Power Setup
Finally, connect the fan to a power source. Use safe wiring and a switch to control it.
Make sure the wires are insulated and away from water. Test the fan to see if it works well.
- Use a low voltage adapter for safety
- Connect wires to the fan terminals
- Add a switch to turn the fan on and off
- Keep wires dry and organized

Credit: www.youtube.com
Testing And Adjustments
After building your homemade air conditioner, testing is very important. This step ensures it works well and cools the air as expected.
You will also need to make adjustments to improve performance and fix small problems.
Initial Power On
Turn on your air conditioner for the first time in a safe area. Check if the fan and cooling parts start running smoothly.
Listen for any strange sounds or smells. If you notice anything unusual, turn it off and check the wiring and parts.
Temperature Checks
Use a thermometer to measure the air temperature near the cooler. Compare this to the room temperature.
The air coming out should be cooler by several degrees. If not, check the ice or cooling source inside the unit.
- Place thermometer at air outlet
- Record room temperature
- Note the cooled air temperature
- Look for at least 5-10 degrees difference
Troubleshooting Common Issues
If the air conditioner does not cool well, check for blocked airflow or melting ice. Make sure the fan is spinning fast enough.
Look for water leaks or loose parts. Tighten any screws and replace damaged materials to fix problems.
- Check if fan blades move freely
- Ensure ice or cold packs are frozen
- Clear any air blockages
- Tighten loose wires or screws
- Replace broken parts if needed
Maintenance Tips
Keeping your homemade air conditioner in good shape helps it work well. Regular care stops problems early.
Follow simple steps to clean, replace parts, and save energy. This makes your unit last longer.
Cleaning The Unit
Dust and dirt can block air flow and reduce cooling. Clean the outside and inside parts often.
- Turn off and unplug the unit before cleaning.
- Wipe the exterior with a damp cloth.
- Remove dust from the fan blades using a soft brush.
- Clean or replace the air filter every two weeks.
- Check the water tank and empty it if needed.
Replacing Parts
Some parts wear out and need to be swapped for new ones. This keeps your air conditioner running smoothly.
| Part | When to Replace | Signs |
| Air Filter | Every 1-2 months | Dust buildup, less airflow |
| Fan Motor | Every 2-3 years | Strange noises, weak fan |
| Water Pump | When leaking or noisy | Water leaks, no water movement |
Ensuring Efficiency
Check your air conditioner’s performance. Fix small issues to save power and cool better.
- Keep windows and doors closed while running the unit.
- Use fans to help air circulation in the room.
- Place the unit in a shaded spot to avoid heat from the sun.
- Check for leaks in the cooling system and seal them.
- Run the unit only when needed to save electricity.

Credit: www.youtube.com
Energy Efficiency
Making an air conditioner at home can save energy if done right. Using less power helps the environment and lowers bills.
Focus on simple ways to keep cooling effective without wasting energy. Small changes can make a big difference.
Optimizing Usage
Use your homemade air conditioner only when needed. Turn it off in cooler hours or when rooms are empty.
- Place the unit in a shaded spot to reduce heat exposure
- Keep windows and doors closed while running the cooler
- Use fans to spread cool air faster
- Clean filters and parts regularly to keep airflow smooth
- Check for leaks or gaps that let warm air in
Cost-effective Cooling
Building an air conditioner at home can be cheap and energy-saving. Use materials that cool well but cost little.
| Material | Cost | Energy Use |
| Ice Packs | Low | Low |
| Fan | Medium | Medium |
| Cardboard Box | Very Low | None |
| PVC Pipes | Low | Low |
| Water Pump | Medium | Medium |
Safety Precautions
Making an air conditioner at home needs care and attention. Safety is very important to avoid accidents.
This guide covers key safety tips to keep you safe during the project.
Electrical Safety
Electric parts can cause shocks or fires if handled wrong. Always turn off power before working.
Use insulated tools and wear rubber gloves to protect yourself from electric shock.
- Check wires for damage before use
- Keep water away from electrical parts
- Do not overload power outlets
- Use a circuit breaker for safety
Handling Cooling Fluids
Cooling fluids can be harmful if spilled or inhaled. Work in a well-ventilated area.
Wear gloves and goggles to protect your skin and eyes from contact with fluids.
- Store fluids in sealed containers
- Avoid direct contact with cooling fluids
- Clean spills immediately and safely
- Dispose of fluids according to local rules
Frequently Asked Questions
How Can I Make A Simple Air Conditioner At Home?
You can create a DIY air conditioner using ice, a fan, and a container. Place ice in the container and position the fan to blow air over the ice. This setup cools the air as it passes through, providing a refreshing breeze.
What Materials Are Needed For A Homemade Air Conditioner?
Essential materials include a fan, ice or frozen water bottles, a container to hold ice, and possibly a small cooler box. These items work together to circulate cooled air, making a simple and effective homemade air conditioner.
Is A Homemade Air Conditioner Energy Efficient?
Yes, homemade air conditioners use less electricity than traditional units. They rely on ice and fans, which consume minimal power. However, they are best for small spaces and short-term cooling, not replacing full air conditioning systems.
Can Homemade Air Conditioners Cool Large Rooms Effectively?
No, homemade air conditioners are best suited for small areas. Their cooling power depends on ice and fan size, limiting their effectiveness in large rooms. For bigger spaces, professional air conditioning systems are recommended.
Conclusion
Creating your own air conditioner can be simple. Just follow the steps carefully. Gather the necessary materials first. Understand each step before starting the project. Safety should always be your top priority. This DIY project saves money and teaches valuable skills.
You’ll enjoy cool air without high costs. Plus, it’s satisfying to build something yourself. Keep experimenting and learning. Who knows what else you can create? Stay curious and keep exploring new ideas. Remember, practice makes perfect. Soon, you’ll become more confident in DIY projects.
Enjoy the cool comfort you crafted with your own hands.