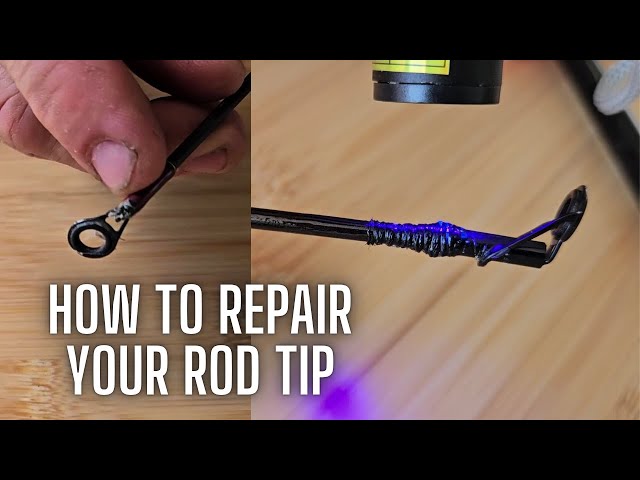
Is your fishing rod tip broken or damaged? Don’t let that small problem ruin your entire fishing trip.
Fixing your fishing rod tip might seem tricky, but with the right steps, you can do it yourself quickly and save money. In this guide, you’ll discover simple, clear methods to repair your rod tip so it works like new again.
Keep reading to learn how to get your gear back in shape and ready for your next big catch.
Common Rod Tip Issues
Fishing rod tips are delicate parts that often face wear and tear. Small problems can affect your fishing experience.
Knowing common rod tip issues helps you fix them quickly. This keeps your rod working well for longer.
Cracks And Breaks
Cracks or breaks happen when the rod tip hits hard objects or bends too much. These damages weaken the rod tip.
You can repair small cracks with strong glue made for fishing rods. For big breaks, replacing the tip is best.
- Use epoxy or rod tip repair glue for cracks
- Remove broken tip carefully before replacement
- Match new tip size with your rod
Loose Or Missing Tips
Sometimes rod tips become loose or fall off during use. This reduces control and can cause line tangles.
To fix loose tips, clean the base and apply glue before pushing it back. Replace missing tips with the right size.
- Check tip fit before applying glue
- Use rod tip adhesive for a strong hold
- Let glue dry fully before fishing
Bent Tips
Bent tips happen when the rod bends too far or hits something hard. Bent tips can change how your rod works.
You can try to straighten a slightly bent tip by hand. For severe bends, replace the tip to avoid damage.
- Gently bend the tip back to shape
- Don’t force the tip to avoid breaking
- Replace the tip if it stays bent
Tools And Materials Needed
Fixing a fishing rod tip requires a few simple tools and materials. These help you repair the rod quickly and safely.
Gathering the right supplies before you start makes the repair easier and more effective.
Replacement Tips
Replacement tips are the small parts that go on the end of the fishing rod. They guide the fishing line and protect the rod.
You need a tip that matches your rod size and style. Tips come in metal or ceramic materials.
- Choose the right size tip for your rod
- Pick metal tips for strength and durability
- Ceramic tips reduce line friction
Epoxy And Glue
Epoxy and glue secure the replacement tip to the rod. Use strong adhesives to keep the tip in place.
Clear epoxy works well because it dries hard and holds firmly. Make sure the surface is clean before applying.
- Use clear, waterproof epoxy or strong glue
- Clean the rod tip area before applying adhesive
- Apply a small amount to avoid mess
- Allow proper drying time as per instructions
Cutting And Sanding Tools
Cutting and sanding tools help prepare the rod and replacement tip. They create a smooth fit for the new tip.
Use a sharp cutter to remove old glue and a fine sandpaper to smooth rough edges. This improves the bond.
- Use a sharp knife or cutter to remove damaged tip
- Sand the rod end lightly with fine-grit sandpaper
- Sand inside the replacement tip for a better fit
- Wear safety gloves and work carefully
Removing The Damaged Tip
Fixing a fishing rod tip starts by removing the broken piece. This is a delicate task that needs care. Damaged tips can affect how the rod works.
Taking off the old tip correctly helps to attach a new one firmly. The process involves softening glue and careful handling.
Softening The Old Glue
Old glue holds the tip tightly to the rod. You must soften it to remove the tip easily. Heat is the best way to soften the glue.
Use a hairdryer or heat gun on low heat. Warm the tip area evenly for a few minutes. The glue will become soft and lose grip.
- Set heat device to low or medium
- Move heat source around the tip slowly
- Do not overheat to avoid rod damage
- Check if glue feels soft before pulling
Careful Tip Removal
Once the glue is soft, gently twist and pull the damaged tip. Use light force to avoid breaking the rod further. Work slowly for best results.
If the tip does not come off easily, warm it again. Use pliers with a cloth if extra grip is needed. Protect the rod from scratches during removal.
- Hold the rod firmly
- Twist the tip gently while pulling
- Use cloth-covered pliers for grip
- Reheat if the tip is stuck
- Avoid strong force to prevent damage

Credit: www.reddit.com
Preparing The Rod For Repair
Fixing a fishing rod tip starts with good preparation. You need to get the rod ready before any repair work.
Cleaning and sanding the rod end helps the new tip stick well. These steps make the repair last longer.
Cleaning The Rod End
Remove dirt, old glue, and debris from the rod end. Use rubbing alcohol or warm soapy water and a cloth.
Make sure the rod is dry and free of any loose material before moving on. This helps the glue stick better.
Sanding For Better Adhesion
Lightly sand the rod end with fine-grit sandpaper. This creates a rough surface for the glue to grip.
Sand evenly and avoid removing too much material. Wipe away sanding dust with a dry cloth after sanding.
Attaching The New Tip
Fixing a fishing rod tip means attaching a new one carefully. This step is important for your rod’s performance.
Follow simple steps to make sure the new tip fits well and stays secure.
Choosing The Right Glue
Select glue that works well with the rod material. It should be strong and dry clear.
Common options include epoxy and super glue. Epoxy is good for strong holds, while super glue dries fast.
- Epoxy: strong and durable, but takes time to dry
- Super glue: fast drying, best for quick fixes
- Waterproof glue is best to avoid damage
Proper Alignment
Align the new tip with the rod’s guides. This keeps the line running straight and smooth.
Place the tip carefully before glueing. Check from different angles to avoid bends.
- Hold the tip next to the rod to check fit
- Make sure the guide rings line up perfectly
- Adjust until the tip is straight and centered
Securing The Tip
After applying glue, insert the tip onto the rod end. Push gently but firmly.
Keep the tip steady until the glue sets. Use tape or a clamp to hold it in place if needed.
- Apply glue inside the tip and on the rod end
- Slide the tip onto the rod carefully
- Hold or tape the tip until fully dry

Credit: www.youtube.com
Drying And Finishing Touches
Fixing a fishing rod tip needs careful drying and finishing. These steps make sure the repair lasts long.
Proper drying and smooth finishing keep your rod strong and easy to use again.
Curing Time
After applying glue or epoxy, let the rod tip dry fully. Curing time depends on the material used.
Usually, curing takes 24 hours at room temperature. Avoid touching or moving the tip during this time.
- Keep the rod in a dry place
- Avoid heat or direct sunlight
- Wait at least 24 hours before handling
Smoothing The Joint
Once the glue is dry, check the joint for bumps or rough spots. Use fine sandpaper to smooth them out.
Sand gently to avoid damaging the rod. Smooth joints help prevent line damage and improve casting.
- Use 400 to 600 grit sandpaper
- Sand lightly in one direction
- Clean dust with a soft cloth after sanding
Testing The Repair
After finishing, test the rod tip to check the repair strength. Hold the rod and flex it carefully.
If the tip feels secure and does not move, the repair is good. If it feels weak, repeat the repair steps.
- Hold the rod firmly
- Bend the tip gently
- Check for any cracks or looseness
Preventing Future Damage
Fixing a fishing rod tip is only part of the solution. You need to protect it from breaking again. Good care helps your rod last longer.
Simple habits can stop damage. Using the right storage, careful handling, and regular checks keeps your rod tip strong.
Proper Storage
Store your fishing rod in a safe place. Avoid places where it can bend or fall. Keep it dry to stop rust and wear.
Use a rod rack or holder to keep the rod straight. Keep the tip away from heavy items or sharp objects.
- Use a vertical rod rack to keep rods upright
- Store rods in a dry and cool area
- Keep rods away from direct sunlight
- Use rod covers for extra protection
Handling Tips
Handle your fishing rod gently. Avoid dropping or hitting the tip on hard surfaces. Be careful when passing through tight spaces.
Take off the fishing line tension before putting the rod away. Check the guides and tip for cracks after each use.
- Always hold the rod by the handle
- Do not lean the rod against walls or cars
- Remove tension from the line before storage
- Inspect the tip for damage after fishing
Regular Maintenance
Clean your fishing rod often. Dirt and salt can weaken the tip and guides. Use fresh water and a soft cloth to wipe it down.
Check the rod tip and guides for damage regularly. Replace any broken parts to keep the rod working well.
- Rinse rod with fresh water after each use
- Dry rod completely before storing
- Look for cracks or bends in the tip
- Replace damaged guides or tips quickly

Credit: anglersresource.net
Frequently Asked Questions
How Do I Repair A Broken Fishing Rod Tip?
To repair a broken rod tip, first remove the damaged tip guide. Then, slide a new tip over the rod blank and secure it with strong epoxy glue. Allow the glue to dry fully before using the rod again.
What Tools Are Needed To Fix Fishing Rod Tips?
You need replacement tip guides, strong epoxy adhesive, a heat source like a lighter, and pliers. These tools help remove old tips and securely attach new ones for a reliable fix.
Can I Fix A Cracked Fishing Rod Tip Myself?
Yes, you can fix a cracked tip by reinforcing it with a rod tip repair kit. Use epoxy and thread wraps to strengthen the tip, ensuring it’s ready for fishing without professional help.
How Long Does It Take To Fix A Fishing Rod Tip?
Fixing a fishing rod tip usually takes about 30 minutes to an hour. This includes removing the old tip, attaching the new one, and letting the epoxy dry completely.
Conclusion
Fixing a fishing rod tip is simpler than it seems. Gather basic tools and follow clear steps. Check the guide above for easy instructions. Practice patience and precision. Avoid rushing the process. This ensures lasting repairs. A well-maintained rod enhances your fishing experience.
Keep your gear in top shape. Enjoy smooth casting and reeling. Share your experiences with fellow anglers. Encourage them to maintain their rods too. Happy fishing awaits with a fully functional rod.