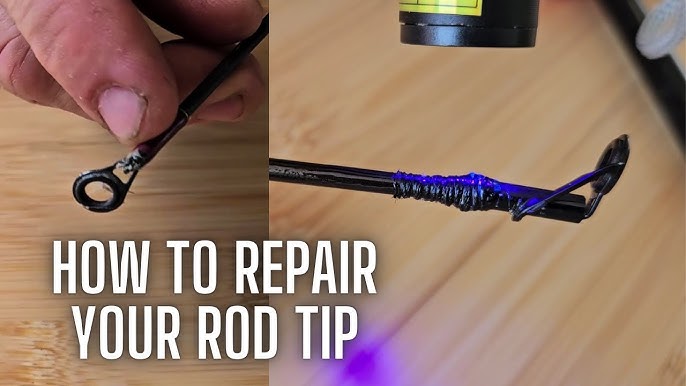
Have you ever been out fishing when suddenly the tip of your rod snaps? It’s frustrating and can ruin your whole day on the water.
But don’t worry—fixing the tip of your fishing rod is easier than you might think. In this guide, you’ll discover simple, step-by-step methods to repair your rod quickly and get back to fishing in no time. Keep reading, because your next great catch shouldn’t be stopped by a broken rod tip.
Tools And Materials Needed
Fixing the tip of a fishing rod needs the right tools and materials. Using the proper items makes the repair easier and stronger.
Gather everything before you start to avoid interruptions. This guide lists all essential tools and materials.
Replacement Rod Tip
You need a new tip that fits your fishing rod. Choose one with the right size and style for your rod.
Measure the old tip or the rod’s diameter to find the correct replacement tip.
Heat Source
A heat source softens the glue or adhesive holding the old tip. This helps you remove it without damage.
- A lighter or match can work for small tips
- A heat gun is better for larger or stubborn tips
Pliers Or Tweezers
Use pliers or tweezers to pull off the old tip after heating it. They give you a good grip and control.
Be gentle to avoid breaking the rod or hurting yourself.
Sandpaper
Sandpaper cleans the rod tip’s end. It removes old glue and roughens the surface for better adhesion.
- Use fine-grit sandpaper (around 400 grit)
- Sand carefully to avoid removing too much material
Epoxy Or Strong Glue
Use epoxy or strong glue to fix the new tip in place. It holds the tip firmly during fishing.
Choose a glue that works with your rod material and dries clear.
Cloth Or Paper Towels
Keep cloth or paper towels nearby to clean spills or excess glue. They help keep your work neat.
Use them to wipe the rod tip and your hands during the repair.

Credit: www.youtube.com
Assessing The Damage
Fixing the tip of a fishing rod starts with a careful check of the damage. Understanding the problem helps you choose the right repair method.
Look closely at the rod tip and surrounding parts. This step saves time and prevents further damage.
Visual Inspection
First, look at the rod tip for cracks, breaks, or bends. Check if the tip guide is loose or missing. Damage may be small but important to spot early.
Check The Rod’s Flexibility
Gently bend the rod to see if it still flexes normally. A bent or stiff tip means more serious damage. Do not force it, or the rod might break more.
List Of Common Damage Signs
- Cracks along the rod tip
- Broken or missing tip guide ring
- Loose or bent tip section
- Fraying or damage to wrapping thread
- Discoloration or soft spots on the rod
Using A Table To Record Damage
| Damage Type | Location | Severity | Repair Needed |
|---|---|---|---|
| Crack | Tip section | Minor | Glue and wrap |
| Broken guide | Rod tip | Major | Replace guide |
| Bent tip | Last 6 inches | Major | Replace tip section |
| Frayed thread | Tip wrapping | Minor | Rewrap thread |
Removing The Broken Tip
Fixing a fishing rod starts with removing the broken tip. This part often breaks during use or transport.
Careful removal helps prepare the rod for a new tip. It also protects the rod from further damage.
Gather The Right Tools
Start by collecting tools you need to remove the broken tip safely. This makes the process easier and quicker.
- Use a sharp knife or razor blade
- Have sandpaper or a file ready
- Use a heat source like a lighter carefully
- Wear gloves to protect your hands
Heat The Broken Tip Area
Heat softens the glue holding the broken tip. It helps you slide the tip off easily without breaking the rod.
Hold a lighter near the tip for a few seconds. Do not burn the rod; just warm the area gently.
Cut And Remove The Broken Tip
Use a sharp knife to cut the broken tip off the rod. Cut slowly to avoid damaging the rod blank underneath.
After cutting, gently twist and pull the broken tip away from the rod. It should come off smoothly if heated well.
Clean The Rod End
Remove any leftover glue or debris from the rod end. This makes the new tip fit properly and hold tight.
- Use sandpaper to smooth the rod end
- Wipe away dust with a clean cloth
- Check for cracks or damage before adding a new tip
Choosing The Right Replacement Tip
Fixing the tip of a fishing rod needs the right replacement part. Picking the correct tip ensures your rod works well again.
Using the wrong tip can cause problems like line damage or poor casting. Learn how to choose the best tip for your rod.
Match The Tip Size To Your Rod
Check the diameter of your rod tip before buying a replacement. The new tip should fit snugly on your rod’s end.
Using a tip that is too big or small can cause it to fall off or break easily. Measure carefully with a ruler or caliper.
Choose The Correct Material
Fishing rod tips come in materials like stainless steel, ceramic, or aluminum. Each material has different strengths.
Ceramic tips reduce line friction and are good for smooth casting. Steel tips are strong and durable for heavy fishing.
Pick The Right Guide Type
Rod tips include different guide styles such as single-foot or double-foot guides. Choose one that matches your rod’s design.
Single-foot guides are lighter and fit smaller rods. Double-foot guides add strength and suit bigger rods or heavy lines.
Consider The Tip’s Ring Size
The ring size affects how the fishing line moves through the tip. A proper ring size helps avoid line wear and tangles.
- Smaller rings work well with light lines and small rods
- Larger rings suit heavy lines and bigger rods
- Match the ring size to your fishing style and line type
Check The Tip’s Weight
A heavy tip can change how your rod feels and casts. Choose a tip with similar weight to your old one to keep balance.
Light tips help with sensitivity and long casts. Heavy tips give extra strength but may tire your arm faster.
Attaching The New Tip
Fixing the tip of a fishing rod is simple with the right steps. You can attach a new tip to make your rod usable again.
This guide shows how to prepare the rod end and secure the new tip properly.
Preparing The Rod End
First, clean the broken rod end. Remove any old glue or rough edges carefully.
Use sandpaper to smooth the surface. This helps the new tip fit tightly and stick well.
- Cut off any damaged fibers with scissors
- Sand the rod end lightly to remove glue
- Wipe the area with a clean cloth
- Check the rod end for a snug fit with the new tip
Securing The Tip With Adhesive
Choose a strong adhesive made for fishing rods or similar materials. Apply a small amount inside the new tip.
Slide the tip onto the rod end. Push it gently but firmly to ensure full contact.
- Apply glue inside the tip
- Slide the tip onto the rod end carefully
- Hold the tip in place for a few minutes
- Let the glue dry fully before using the rod

Credit: anglersresource.net
Finishing Touches
Fixing the tip of a fishing rod requires careful finishing steps. These steps help ensure the repair lasts long and works well.
Pay close attention to how you finish the repair. Proper alignment and curing time are key to a strong fix.
Aligning The Tip Properly
Align the tip with the rod carefully. A straight tip helps your rod cast better and stay balanced.
Check the alignment from different angles. Make small adjustments before the glue sets.
- Hold the tip steady in line with the rod
- Use a marker to match the guides if needed
- Avoid twisting or bending the tip
- Double-check alignment before moving on
Allowing Adhesive To Cure
Let the adhesive dry completely before using the rod. Rushing this step can weaken the repair.
Follow the glue maker’s instructions for curing time. Keep the rod still and avoid stress on the tip.
- Place the rod in a safe spot
- Do not touch or move the tip during curing
- Wait at least 24 hours for full strength
- Test the repair gently after curing
Testing The Repair
After fixing the tip of your fishing rod, you need to check if the repair holds up. Testing ensures the rod works well and is safe to use.
Testing helps you find any weak spots or problems before you go fishing again. It saves you from breaking the rod further.
Visual Inspection
Look closely at the repaired tip. Check for cracks, gaps, or loose parts. Make sure the glue or tape holds firmly.
Good repairs will look clean and tight. If you see any damage, the repair might need more work.
Flex Test
Gently bend the rod near the tip. The rod should flex smoothly without feeling weak or breaking.
Do not force the rod too hard. If the tip feels unstable or too soft, fix it again before use.
Line Test
Attach the fishing line and pull it lightly. This test shows if the tip can handle real fishing tension.
Watch the repaired area during this test. If it moves or cracks, the repair is not strong enough.
Water Test
Place the rod tip in water and try casting gently. This test checks if the tip works well under real conditions.
Feel the rod’s action and balance. A good repair should not change how the rod casts or handles.

Credit: www.reddit.com
Tips For Preventing Future Damage
Fixing the tip of a fishing rod is important, but preventing damage is better. Taking care of your rod helps it last longer.
Use these tips to avoid breaking the rod tip again. Small actions can save you time and money.
Handle Your Rod Carefully
Always carry your rod with care. Avoid hitting it against hard surfaces or stepping on it. Use rod covers when you travel.
Store Your Rod Properly
Keep your fishing rod in a dry, cool place. Avoid leaning it against walls or storing it in tight spaces. Use racks or holders to keep it straight.
Inspect Your Rod Regularly
Check your rod before and after fishing trips. Look for cracks, loose guides, or damage to the tip. Early detection helps prevent bigger problems.
Use A Protective Rod Tip Cover
- Buy a soft foam or plastic tip cover
- Place it on the rod tip when not fishing
- Protects from bumps and scratches
- Easy to carry and use
Avoid Overloading Your Rod
Use the right line strength and lure weight for your rod. Overloading can stress the tip and cause it to break more easily.
Clean Your Rod After Use
| Cleaning Task | Reason |
| Wipe rod with fresh water | Removes dirt and salt |
| Dry rod completely | Prevents rust and damage |
| Check guides for debris | Keeps line smooth and safe |
Frequently Asked Questions
How Do I Repair A Broken Fishing Rod Tip?
To fix a broken fishing rod tip, remove the damaged section. Use a rod tip replacement kit, glue the new tip, and allow it to dry. Ensure proper alignment for optimal performance.
What Tools Are Needed To Fix A Fishing Rod Tip?
You need a replacement tip, rod tip glue, a heat source like a lighter, and pliers. These tools help remove the old tip and attach the new one securely.
Can I Fix A Fishing Rod Tip Without Professional Help?
Yes, you can fix it yourself with basic tools and a replacement tip. Follow step-by-step guides or videos for best results, ensuring proper alignment and secure attachment.
How Long Does It Take To Fix A Fishing Rod Tip?
Fixing a fishing rod tip typically takes 15 to 30 minutes. Drying time for glue varies, so allow at least an hour before use.
Conclusion
Fixing a fishing rod tip is simple with the right steps. Follow the guide, and you’ll be fishing again soon. Remember to gather all necessary tools before starting. This saves time and frustration. Be gentle when handling the rod. It ensures a longer lifespan.
Practice patience, as quick fixes can lead to mistakes. With these tips, you’re ready to tackle any rod repair. Enjoy your fishing trips with confidence. Keep your gear in top shape for the best experience. Happy fishing!