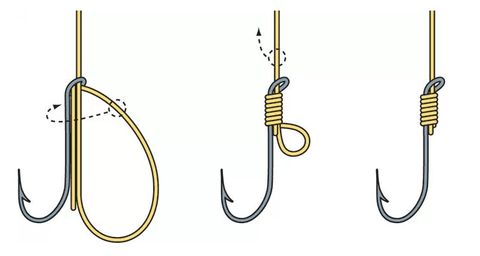
Have you ever struggled with your fishing line slipping off the hook or tangled beyond repair? Knowing how to hook a fishing line properly is the key to catching more fish and enjoying your time by the water.
When you master this simple skill, you’ll spend less time fixing your gear and more time reeling in your next big catch. In this guide, you’ll discover easy, step-by-step tips to secure your line perfectly every time—making your fishing experience smoother and more successful.
Keep reading, and get ready to upgrade your fishing game!
Choosing The Right Hook
Choosing the right fishing hook is key to a good catch. The right hook helps keep the bait and catch the fish easily.
This guide explains how to pick hooks by type, fish species, and size.
Types Of Fishing Hooks
Fishing hooks come in many shapes. Each type fits different fishing needs and bait styles.
- J-Hook: Classic shape, good for many fish.
- Circle Hook: Curved, reduces fish injury.
- Treble Hook: Three points, good for lures.
- Siwash Hook: Long shank, used with spoons.
- Bait Holder Hook: Has barbs to hold bait better.
Matching Hooks To Fish Species
Different fish need different hooks. Match hook type and size to the fish you want to catch.
| Fish Species | Recommended Hook Type | Hook Size Range |
| Trout | J-Hook or Circle Hook | 10 – 14 |
| Bass | Wide Gap J-Hook | 2 – 6 |
| Catfish | Bait Holder Hook | 1/0 – 5/0 |
| Salmon | Circle Hook | 1 – 4 |
| Panfish | Siwash or Small J-Hook | 8 – 12 |
Hook Sizes And Their Uses
Hook size affects bait and fish size. Smaller hooks catch small fish and keep small bait.
- Size 20-16: Very small fish and delicate bait.
- Size 14-8: Medium fish like trout and panfish.
- Size 6-2: Larger fish like bass and walleye.
- Size 1/0-5/0: Big fish such as catfish and pike.
- Size 6/0 and above: Very large fish or saltwater fishing.
Credit: n1outdoors.com
Selecting The Best Fishing Line
Choosing the right fishing line is key to a good fishing experience. The line must match the fish type and water conditions.
This guide explains different line types, their strength, and what affects your choice.
Monofilament Vs. Fluorocarbon Vs. Braided
Monofilament lines are flexible and easy to handle. Fluorocarbon lines are less visible underwater. Braided lines are very strong and thin.
- Monofilament:Best for beginners, stretches to absorb shocks.
- Fluorocarbon:Nearly invisible in water, sinks faster.
- Braided:High strength with thin diameter, no stretch.
Line Strength And Test Ratings
Line strength shows how much weight it holds before breaking. Test ratings help pick the right line for the fish size.
| Line Type | Test Range (lbs) | Strength Features |
| Monofilament | 4 – 30 | Good stretch, easy knotting |
| Fluorocarbon | 6 – 40 | Low visibility, abrasion resistant |
| Braided | 10 – 80+ | Very strong, no stretch |
Factors Affecting Line Choice
Several things affect which line you should use. These include water type, fish species, and fishing method.
- Water Clarity:Clear water needs less visible lines like fluorocarbon.
- Fish Size:Bigger fish need stronger lines with higher test ratings.
- Fishing Style:Casting, trolling, or bottom fishing can need different line types.
- Line Stretch:Stretch helps absorb shock but can reduce sensitivity.
Preparing The Line
Preparing your fishing line is key before you start fishing. A well-prepared line helps you catch fish without trouble.
This guide covers measuring and cutting line length, checking for damage, and attaching leaders.
Measuring And Cutting Line Length
Choose the right length of line for your fishing type. Too short or too long lines can cause problems.
- Decide the total length of line needed based on fishing spot.
- Use a ruler or measuring tape for accuracy.
- Cut the line with sharp scissors or a line cutter.
- Leave extra line for knots and tying hooks.
Checking For Line Damage
Inspect your fishing line for cuts, frays, or weak spots. Damaged line breaks easily and loses fish.
| Type of Damage | What to Look For | Action |
| Fraying | Loose fibers on the line surface | Cut off damaged section |
| Small Cuts | Visible nicks or slices | Remove and replace line |
| Discoloration | Faded or cloudy spots | Test strength; replace if weak |
Attaching Leaders
Leaders protect your main line and help with bait presentation. Attach them properly for best results.
- Select a leader with the right strength and length for your fishing style.
- Use strong knots like the Palomar or Improved Clinch knot to attach leaders.
- Check knots for tightness and trim excess line close to knots.
- Make sure the leader and main line align smoothly to avoid snags.
Tying Strong Knots
Tying strong knots is important for fishing. A good knot keeps the line secure and prevents losing fish.
This guide covers three popular knots. Each knot has a clear way to tie it and strong holding power.
Improved Clinch Knot
The Improved Clinch Knot is common and easy to tie. It works well with most types of fishing line.
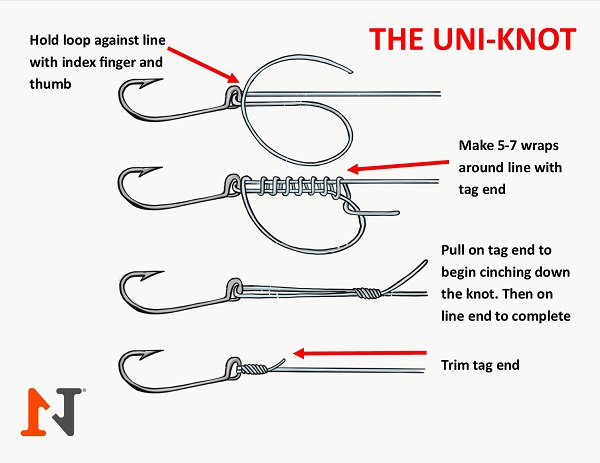
- Thread the line through the hook eye.
- Wrap the tag end around the standing line 5 to 7 times.
- Pass the tag end through the small loop near the eye.
- Then pass it through the big loop formed.
- Wet the knot and pull it tight.
- Trim the excess tag end.
Palomar Knot
The Palomar Knot is strong and simple. It is good for braided and monofilament lines.
- Double about 6 inches of line and pass it through the hook eye.
- Tie a loose overhand knot with the doubled line.
- Pass the hook through the loop of the overhand knot.
- Pull the loop over the hook.
- Moisten the knot and pull both ends tight.
- Cut the tag end.
Loop Knot Variations
Loop knots let the lure move freely. They keep action natural in the water.
| Loop Knot Type | Best Use | Key Feature |
|---|---|---|
| Non-Slip Loop | Large lures | Strong loop that does not slip |
| Knotless Knot | Soft plastic baits | Hides the knot inside the lure |
| Perfection Loop | Light lines | Simple and neat loop |
Attaching The Hook
Attaching the hook properly is key for successful fishing. The right knot keeps the hook tight and secure.
This guide explains how to tie the knot, align the hook, and test its strength for the best results.
Step-by-step Knot Tying
Tying a strong knot ensures the hook stays on the line. Use these steps to tie a common fishing knot.
- Thread the line through the hook eye.
- Wrap the tag end around the standing line five times.
- Pass the tag end back through the loop near the eye.
- Moisten the knot with water or saliva.
- Pull the standing line and tag end to tighten the knot.
- Trim the extra tag end close to the knot.
Ensuring Hook Alignment
Correct hook alignment improves bait presentation and hook setting. Check these points for proper alignment.
- The hook eye points straight along the line.
- The hook shank lies flat without twisting.
- The point faces away from the line without bending.
- The knot sits snug at the hook eye without slipping.
Testing Knot Strength
Test the knot to avoid losing fish. Pull the line firmly and check for slippage or breaks.
| Test Method | What to Look For |
|---|---|
| Pull Line Firmly | No slip or loosening of the knot |
| Inspect Knot | No frayed or cut line fibers |
| Wet Knot Test | Knot tightens smoothly when moistened |

Credit: www.wikihow.com
Setting Up For Different Fishing Styles
Fishing lines need different setups for each fishing style. Using the right setup helps catch fish easier. This guide shows how to hook a fishing line for three styles.
Each style uses specific knots, hooks, and gear. Learn the basics to prepare your line correctly before fishing.
Bottom Fishing Setup
Bottom fishing targets fish near the water floor. Use heavier weights to keep the bait down. A strong line and a simple hook work best.
- Use a sliding sinker to avoid spooking fish
- Tie a Palomar knot for a strong hook connection
- Choose a wide gap hook for bigger bait
- Use braided line for better sensitivity
Fly Fishing Setup
Fly fishing uses lightweight lines and artificial flies. It needs precise tying and a special leader. The knots must be small but strong.
| Fly Fishing Knot | Purpose |
|---|---|
| Improved Clinch Knot | Attaches fly to leader |
| Surgeon’s Knot | Joins two lines |
| Loop Knot | Keeps fly movement natural |
Casting And Trolling Setup
Casting and trolling require longer lines and specific hooks. Use circle hooks to reduce fish loss. The line must be strong but flexible.
- Use a casting knot like the Improved Clinch
- Choose hooks that match bait size
- Set drag properly to avoid line break
- Check knots often for wear
Maintaining Your Gear
Keeping your fishing gear in good shape helps you catch fish more easily.
Regular care stops damage and saves you money on replacements.
Inspecting Hooks And Lines
Look at your hooks and lines before each fishing trip. Check for rust, bends, or cracks.
- Make sure hooks are sharp and not dull.
- Check lines for frays or weak spots.
- Test knots to ensure they hold tight.
Replacing Worn Components
Replace any parts that show signs of wear. Old hooks or lines can break and lose fish.
| Component | Signs to Replace |
| Hook | Rust, dull point, bent shape |
| Line | Fraying, discoloration, weak spots |
| Swivel | Corrosion, stiffness, cracks |
Storing Equipment Properly
Store your gear in a dry, cool place. This prevents rust and damage.
- Keep hooks in a tackle box to avoid dulling.
- Store lines loosely to stop kinks and tangles.
- Use silica gel packs to reduce moisture.
- Keep reels clean and lubricated after use.

Credit: www.youtube.com
Frequently Asked Questions
How Do I Tie A Fishing Line To A Hook?
To tie a fishing line to a hook, use the improved clinch knot. Thread the line through the hook eye, wrap it around the line five times, pass the end through the loop near the eye, and tighten. This knot is strong and reliable for fishing.
What Type Of Fishing Line Works Best?
Monofilament lines are versatile and beginner-friendly. Fluorocarbon lines are nearly invisible underwater, ideal for clear water. Braided lines offer high strength and sensitivity, suitable for heavy cover. Choose based on your fishing environment and target species for the best results.
How Can I Prevent My Fishing Line From Slipping?
Use secure knots like the Palomar or improved clinch knot to prevent slipping. Wet the line before tightening to reduce friction and ensure a tight knot. Regularly check your knots for wear and retie as needed to maintain strength.
When Should I Replace My Fishing Line?
Replace your fishing line after 3-6 months of regular use or if it shows signs of wear. Look for fraying, discoloration, or stiffness. Fresh line improves casting performance and reduces the risk of losing fish due to line breakage.
Conclusion
Mastering fishing line techniques is simpler than you think. Practice makes perfect. With patience, you’ll improve each time. Feel the satisfaction of a well-hooked line. Remember to choose the right tools. Pay attention to your environment. Safety first, always. Enjoy the tranquility fishing brings.
Connect with nature, unwind, and relax. Fishing is more than a hobby. It’s a lifelong skill. Share your new knowledge with friends. Create memorable adventures together. Happy fishing!