
Is your window air conditioner acting up just when you need it most? You’re not alone.
When your AC stops cooling or makes strange noises, it can quickly turn your home into an uncomfortable place. But before you rush to call a repair technician or buy a new unit, there’s good news—you might be able to fix it yourself.
You’ll discover simple, effective steps to troubleshoot and repair your window air conditioner. By the end, you’ll feel confident handling common problems and saving money. Keep reading—your cool comfort is just a few fixes away.
Common Window Ac Issues
Window air conditioners can stop working properly over time. Many common problems are easy to fix.
Knowing these issues helps you save money and keep your room cool. Below are frequent problems and how to handle them.
Unit Not Cooling
Your window AC might run but not cool the air. This can happen due to dirty filters or low refrigerant.
Check if the air filter is clean. A dirty filter blocks airflow and lowers cooling power. Also, leaks can cause refrigerant loss.
- Clean or replace the air filter regularly
- Check for ice on the coils
- Call a technician if refrigerant is low
Water Leaks
Water dripping inside the room means the AC is leaking. This happens if the drain hole is blocked or the unit is not level.
Clear the drain hole and make sure the AC tilts slightly outside. This helps water flow out and prevents leaks inside.
- Unclog the drain hole with a thin wire
- Adjust the AC tilt to slope outside
- Check the drain pan for cracks or damage
Strange Noises
Unusual sounds from the AC can mean loose parts or dirt build-up. Rattling or buzzing noises need attention.
Turn off the unit and inspect fan blades and screws. Tighten any loose screws and clean dirt from the fan.
- Check for loose screws or parts
- Clean fan blades and motor area
- Replace worn-out parts if needed
Ac Won’t Turn On
If your window AC does not start, check the power supply first. The plug might be loose or the outlet broken.
Also, inspect the fuse or circuit breaker. Reset the breaker or replace the fuse if it is blown.
- Ensure the AC is plugged in securely
- Test the power outlet with another device
- Reset circuit breaker or replace blown fuse

Credit: www.youtube.com
Basic Tools Needed
Fixing a window air conditioner needs some simple tools. These help you check and repair the unit safely and correctly.
Having the right tools ready saves time and makes the job easier. This guide covers the basic tools you should have.
Screwdrivers And Wrenches
Screwdrivers and wrenches help you open the air conditioner case and remove parts. Different sizes may be needed.
- Flathead screwdriver for simple screws
- Phillips screwdriver for cross-head screws
- Adjustable wrench for bolts and nuts
- Socket wrench for tight spots
Multimeter
A multimeter measures electrical current and voltage. It helps check if parts get power and if circuits work well.
You can test the compressor, fan motor, and thermostat using a multimeter. It shows if parts are broken or working.
Cleaning Supplies
Cleaning supplies remove dirt and dust from the air conditioner. Clean parts work better and last longer.
| Supply | Use |
| Soft brush | Remove dust from coils and fins |
| Vacuum cleaner | Clear debris inside the unit |
| Rags or cloths | Wipe surfaces and clean spills |
| Mild detergent | Clean greasy or sticky areas |
Replacement Parts
Some parts may need replacement to fix the air conditioner. Having common spares helps you repair quickly.
- Thermostat
- Fan motor
- Compressor relay
- Air filters
- Fuses
Cleaning And Maintenance
Keeping your window air conditioner clean helps it run smoothly. Regular maintenance stops problems and saves energy. Simple cleaning tasks can extend the life of your AC unit.
We will cover three important tasks: cleaning the filter, clearing the condenser coils, and removing debris. Follow these steps to keep your air conditioner working well.
Cleaning The Filter
The filter catches dust and dirt from the air. A dirty filter lowers airflow and cools less effectively. Clean the filter regularly to improve air quality and efficiency.
- Turn off and unplug the air conditioner.
- Remove the front panel to access the filter.
- Take out the filter carefully.
- Wash the filter with warm water and mild soap.
- Rinse well and let it dry completely before reinstalling.
- Put the filter back and close the panel securely.
Clearing The Condenser Coils
The condenser coils release heat from the air conditioner. Dirt buildup makes the coils less effective. Clean them to keep the unit cool and working properly.
| Tools Needed | Steps |
|---|---|
| Soft brush | Brush off dust gently from coils. |
| Vacuum cleaner | Use vacuum with soft brush to remove dirt. |
| Coil cleaner (optional) | Apply coil cleaner and rinse if heavily soiled. |
Removing Debris
Debris around the air conditioner blocks airflow. Leaves, dirt, and other material should be cleared away. Keep the area clean to help the AC work efficiently.
- Turn off and unplug the air conditioner.
- Check outside for leaves, grass, and dirt near the unit.
- Remove any debris by hand or with a soft brush.
- Trim plants and bushes at least two feet from the unit.
- Clear the inside area around the AC to avoid blockage.
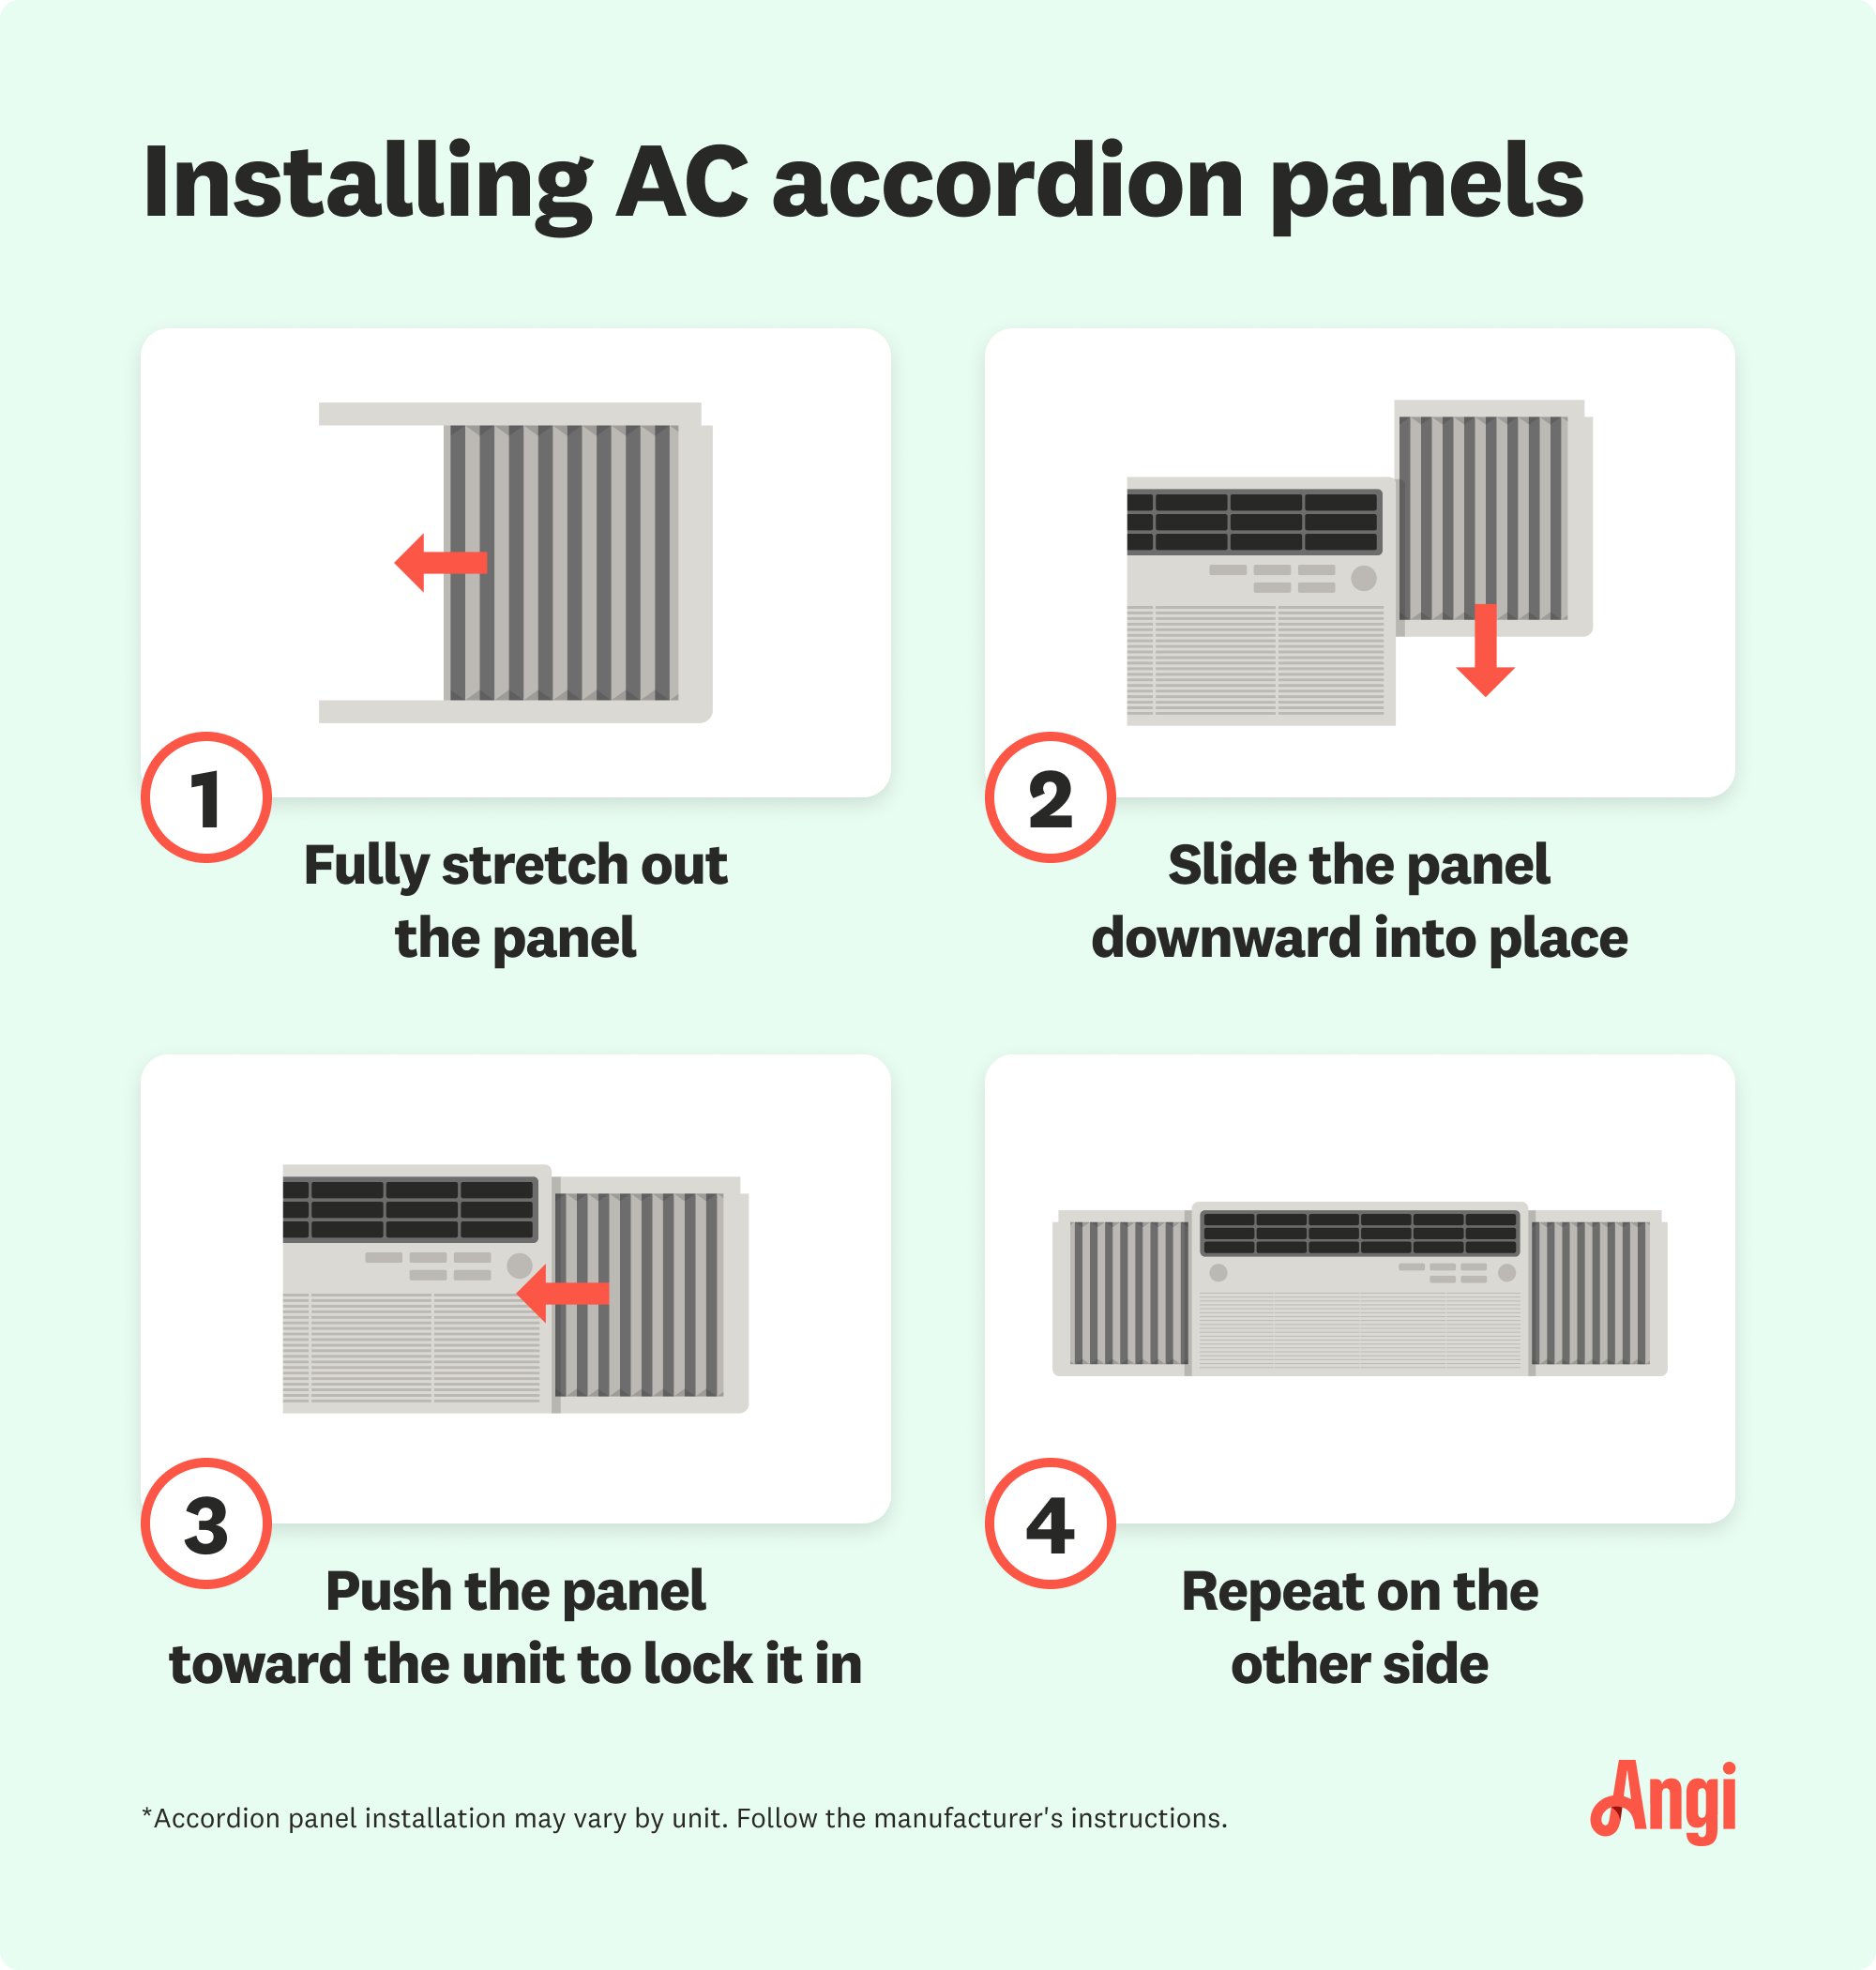
Credit: www.angi.com
Fixing Cooling Problems
Window air conditioners sometimes stop cooling properly. This can make your room uncomfortable. Fixing the cooling problem can save you money and keep you cool.
Check a few common issues first. These include the thermostat, refrigerant levels, and air leaks. Each part plays a role in how well your air conditioner works.
Checking The Thermostat
The thermostat controls the temperature setting. If it is not working, the air conditioner may not cool right. Check if the thermostat is set to “cool” and at a lower temperature than the room.
- Make sure the thermostat is on the cooling mode.
- Set the temperature below the current room temperature.
- Replace the thermostat batteries if it uses any.
- Test if the thermostat responds when you change settings.
Inspecting Refrigerant Levels
Refrigerant is the fluid that cools the air. Low refrigerant means less cooling. Usually, a leak causes low refrigerant. You can check the level using a gauge if you have one.
| Signs of Low Refrigerant | Possible Fix |
|---|---|
| Warm air from the unit | Call a professional to refill refrigerant |
| Ice buildup on coils | Turn off unit and defrost, then check for leaks |
| Hissing sound near unit | Inspect for leaks and seal them |
Sealing Air Leaks
Air leaks around your window AC let cool air escape. This lowers efficiency and cooling power. Check the edges of the unit for gaps or cracks.
- Use weather stripping to seal gaps around the unit.
- Apply caulk to cracks in the window frame.
- Install foam insulation strips if needed.
- Close curtains or blinds to reduce heat entering the room.
Repairing Water Leaks
Water leaks from a window air conditioner cause damage and reduce efficiency. Fixing these leaks keeps your room dry and your AC working well.
Common causes include clogged drains, uneven installation, and damaged parts. Follow the steps below to solve water leaks safely.
Clearing Drain Channels
Drain channels carry water out of the unit. Dirt and debris can block them, causing leaks inside your home.
- Turn off and unplug the air conditioner.
- Remove the front panel carefully.
- Locate the drain channels at the back or bottom.
- Use a soft brush or pipe cleaner to clear blockages.
- Flush the channels with warm water to remove residue.
- Dry the area and reassemble the unit.
Leveling The Unit
If the air conditioner tilts inward, water leaks inside instead of draining outside. Leveling the unit fixes this problem.
| Check | How to Fix |
| Unit tilts inward | Raise the front edge slightly |
| Unit tilts outward too much | Lower the front edge until slightly higher than the back |
| Unit sits unevenly | Use shims or small blocks under the frame |
Replacing Drain Pan
The drain pan collects water and directs it outside. A cracked or rusted pan causes leaks and needs replacement.
To replace the drain pan:
- Unplug and remove the air conditioner.
- Locate the drain pan under the unit.
- Unscrew and remove the damaged pan carefully.
- Buy a replacement pan matching your model.
- Install the new pan securely in place.
- Reinstall the air conditioner and test for leaks.

Credit: www.youtube.com
Addressing Electrical Issues
Electrical problems often cause window air conditioners to stop working. Checking these issues can help you fix the unit yourself.
This guide covers how to test the power supply, replace fuses and capacitors, and inspect wiring connections.
Testing The Power Supply
First, make sure the air conditioner is plugged in correctly. Sometimes the outlet or power source has the problem.
Use a voltage tester or multimeter to check if the outlet supplies power. Test the cord and plug for damage too.
- Unplug the unit before testing
- Set the tester to AC voltage
- Insert probes into the outlet slots
- Check for voltage reading around 110-120 volts
- If no power, try a different outlet
Replacing Fuses And Capacitors
Fuses and capacitors help control power flow inside the air conditioner. Faulty parts can stop it from working.
Look for blown fuses or bulging capacitors. Replace any damaged parts with the exact type for your model.
- Turn off and unplug the unit
- Open the service panel carefully
- Find the fuse and check for breaks or burns
- Inspect capacitors for swelling or leaks
- Use a screwdriver to remove and replace parts
Inspecting Wiring Connections
Loose or damaged wires can cause electrical failures. Check all wire connections inside the unit.
Look for frayed wires, loose screws, or corrosion. Tighten or replace wires as needed to restore power flow.
- Unplug the air conditioner
- Remove the cover to access wiring
- Check for loose or disconnected wires
- Look for burnt or melted insulation
- Use a screwdriver to tighten connections
- Replace damaged wires with proper gauge wire
Handling Noisy Operation
A noisy window air conditioner can disturb your comfort. Fixing the noise helps improve its performance and peace in your room.
Common causes of noise include loose parts, dry moving components, and worn fan blades. Fix these issues to reduce sound and maintain your AC.
Tightening Loose Parts
Loose screws and bolts inside the unit cause rattling sounds. Check all visible fasteners and tighten them with a screwdriver or wrench.
- Turn off and unplug the air conditioner before starting.
- Remove the front cover to access internal parts.
- Inspect screws and bolts on panels and motor mounts.
- Use the right tool to tighten any loose fasteners.
- Replace any damaged screws if needed.
Lubricating Moving Components
Dry fan motors or bearings create humming or grinding noises. Adding lubricant can make these parts run smoothly and quietly.
Follow these steps to lubricate moving parts:
- Unplug the unit and remove the cover.
- Locate the fan motor and bearings.
- Apply a few drops of light machine oil or electric motor oil.
- Spin the fan blades by hand to spread the oil.
- Reassemble the unit and test for noise reduction.
Replacing Worn Fan Blades
Fan blades can become bent or cracked, causing imbalance and noise. Replace worn blades to restore smooth operation.
| Blade Issue | Effect | Solution |
|---|---|---|
| Bent blade | Vibration and noise | Replace with new blade |
| Cracked blade | Imbalance and rattling | Install a matching replacement |
| Loose blade | Wobbling sound | Tighten blade screws |
When To Call A Professional
Fixing a window air conditioner can be simple or hard. Some problems need special tools or skills.
Knowing when to call a professional helps keep you safe and saves time.
Complex Refrigerant Repairs
Refrigerant leaks or refills need special tools and knowledge. Handling refrigerants wrong can harm the environment.
Only trained technicians can safely fix these problems and check the system for leaks.
Electrical Safety Concerns
Air conditioners use electricity and can cause shocks or fires if handled wrong. If you see frayed wires or burning smells, call a pro.
Do not try to fix electrical parts if you are not sure what to do. Safety is very important.
- Damaged power cords
- Tripped circuit breakers
- Burning or melting smells
- Non-working switches or controls
Persistent Problems After Diy
If your air conditioner still does not work after trying to fix it, call a professional. Some issues need expert tools or experience.
Professionals can diagnose hidden problems and make sure the unit runs correctly and safely.
Frequently Asked Questions
How Do I Troubleshoot A Window Air Conditioner Not Cooling?
Check if the air filter is clean and free from dust. Ensure the thermostat is set correctly. Inspect the condenser coils for dirt. Verify the unit has adequate power supply. These simple checks often resolve cooling issues.
What Causes A Window Ac To Leak Water Inside?
A clogged or frozen drain line usually causes water leaks. Dirt blocks the drainage path, causing water to spill indoors. Cleaning the drain and ensuring proper tilt can prevent leaks.
How Often Should I Clean My Window Air Conditioner?
Clean your window air conditioner every 3 months during usage. Regular cleaning improves efficiency and prevents buildup of dust and mold. Focus on filters, coils, and drainage areas.
Can I Fix A Noisy Window Air Conditioner Myself?
Yes, often noise is due to loose parts or dirt buildup. Tighten screws, clean fan blades, and lubricate moving parts. If noise persists, professional repair may be needed.
Conclusion
Fixing a window air conditioner can be simple. Follow the steps carefully. Ensure safety first by unplugging the unit. Clean the filters regularly to maintain efficiency. Check for any unusual noises or leaks. Tighten loose parts and replace faulty components.
Regular maintenance prevents bigger issues and extends the unit’s life. Always refer to the manufacturer’s manual for guidance. Keep tools handy and ensure all screws are secured. A well-maintained air conditioner cools effectively, ensuring comfort in your home. Enjoy a cooler, more comfortable environment with these easy-to-follow tips.