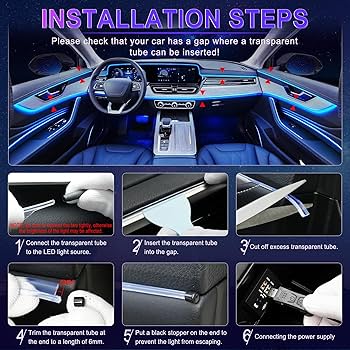
Are you ready to give your car a fresh, modern look that turns heads everywhere you go? Installing LED lights in your car is one of the easiest and most effective ways to upgrade its style and improve visibility on the road.
But if you’ve never done it before, the thought of wiring and fitting new lights can feel overwhelming. Don’t worry—this guide breaks down the process into simple steps you can follow right now. By the end, you’ll know exactly how to install LED lights in your car quickly and safely, making your ride stand out like never before.
Keep reading to unlock the secrets to a brighter, cooler drive!
Choosing The Right Led Lights
Installing LED lights in your car can improve its look and safety. Picking the right LED lights is important for the best results.
You need to think about the type, brightness, color, and vehicle compatibility before buying LED lights.
Types Of Led Lights For Cars
There are many types of LED lights for cars. Each type serves a different purpose and fits different parts of your vehicle.
- Headlight LEDs: Bright and clear for night driving
- Fog light LEDs: Help see better in fog or rain
- Interior LEDs: Used inside the car for better lighting
- Strip LEDs: Flexible strips for decoration or extra lighting
- Brake and signal LEDs: Important for safety and visibility
Brightness And Color Options
LED lights come in different brightness levels. Choose a brightness that is safe and fits your needs.
Colors affect the look and function of your car lights. White and yellow are common for headlights and fog lights.
- Cool white: Bright and modern look
- Warm white/yellow: Better in fog and rain
- Red and amber: Used for brake and signal lights
- RGB LEDs: Change colors for interior or decoration
Compatibility With Vehicle Models
Not all LED lights fit every car model. Check your vehicle’s manual for the right size and type.
Using the wrong LED lights can cause poor fit or electrical problems. Match the LED lights with your car’s requirements.
| Vehicle Type | Recommended LED Type | Notes |
|---|---|---|
| Sedan | Headlight and interior LEDs | Most standard sizes fit |
| SUV | Bright headlight LEDs | May need high-power LEDs |
| Truck | Heavy-duty LED lights | Durable and bright for work use |
| Motorcycle | Compact LED bulbs | Check size carefully |

Credit: www.youtube.com
Gathering Necessary Tools
Installing LED lights in your car is easier with the right tools. Gathering tools first helps you work quickly and safely.
This guide lists basic tools, safety gear, and optional items you may need for your LED light installation.
Basic Tools Needed
You will need some basic tools to install LED lights. These help you open panels, connect wires, and fix lights securely.
- Screwdrivers (flathead and Phillips)
- Wire strippers and cutters
- Electrical tape
- Multimeter to test electrical connections
- Socket wrench set for bolts
- Plastic pry tools to remove panels safely
Safety Equipment
Safety equipment protects you from accidents and electrical shocks. Always use safety gear during the installation.
- Safety glasses to protect your eyes
- Insulated gloves to avoid shocks
- Long sleeves to protect your skin
- Work light for clear visibility
Optional Accessories
These accessories can make the installation easier or improve the final look of your LED lights.
- Heat shrink tubing to protect wire joints
- Zip ties to organize wires
- Fuse taps for safe electrical connections
- Double-sided tape for mounting lights
- Wire connectors for secure joins
Preparing Your Vehicle
Before installing LED lights in your car, you need to get the vehicle ready. Proper preparation helps the installation go smoothly.
Focus on finding the right spots for the lights, ensuring safety by disconnecting power, and cleaning the areas well.
Locating Existing Light Fixtures
Identify where your car’s current lights are. These spots are good places to add LED lights. Common locations include the headlights, tail lights, and interior lights.
- Check the front and rear light housings.
- Look inside the dashboard and footwells for interior lights.
- Inspect the side mirrors and undercarriage if you want extra lighting.
Disconnecting The Battery
Always disconnect your car battery before working with any electrical parts. This prevents shocks and short circuits.
- Open the hood and locate the battery.
- Use a wrench to loosen the negative terminal first.
- Remove the negative cable and then the positive cable.
- Keep the cables away from the battery terminals to avoid contact.
Cleaning The Installation Area
Clean the spots where you will place the LED lights. Dirt and grease reduce light adhesion and cause problems.
| Cleaning Step | Tools Needed | Purpose |
|---|---|---|
| Wipe surface | Microfiber cloth | Remove dust and loose dirt |
| Apply cleaner | Isopropyl alcohol or mild detergent | Remove grease and oils |
| Dry area | Dry cloth or air dry | Ensure surface is dry for better adhesion |
Removing Old Lights
Removing old lights from your car is the first step to install new LED lights. You need to be careful to avoid damage. This guide helps you remove old lights safely.
Follow these simple steps to access and detach the light assembly and bulbs. Handle each part with care.
Accessing The Light Assembly
Open the hood or trunk depending on the light location. Remove any covers or screws that hold the light assembly. You may need a screwdriver or socket wrench.
Sometimes, you must move parts like the battery or air filter to reach the assembly. Work slowly and keep all parts safe.
Detaching Bulbs And Connectors
After removing the assembly, you will see the bulbs connected by wiring plugs. Carefully unplug the connectors by pressing the release tab. Turn the bulb socket counterclockwise to remove it.
- Press the connector tab gently to release it.
- Pull the connector straight out without twisting.
- Turn the bulb socket left to unlock it.
- Pull the bulb out of the socket carefully.
Handling Fragile Components
| Component | Care Tips |
|---|---|
| Glass Bulbs | Hold with clean hands or gloves, avoid dropping |
| Plastic Connectors | Do not force or bend pins, unplug straight out |
| Light Assembly | Handle gently to avoid cracks or scratches |
Keep bulbs and connectors in a safe place to prevent damage. Clean your hands before touching bulbs to avoid oils that reduce bulb life.
Installing Led Lights
Installing LED lights in your car can improve visibility and style. It is a simple task with the right tools and steps.
Follow these clear instructions to connect, secure, and test your new LED lights safely and effectively.
Connecting The Led Bulbs
First, disconnect the car battery to avoid any electrical shocks. Locate the existing bulb holders where you want to install the LED bulbs.
- Remove the old bulbs carefully by twisting them out.
- Match the LED bulbs with the correct socket type for your car.
- Insert the LED bulbs into the holders and twist to lock them in place.
- Connect the wiring harness to the LED bulbs if needed.
Securing The Assembly
Properly securing the LED light assembly prevents damage and ensures long-lasting use. Make sure the bulbs fit tightly in the sockets.
| Tool | Purpose |
|---|---|
| Electrical tape | Insulate wire connections |
| Zip ties | Hold wiring in place |
| Screwdriver | Secure light covers or panels |
Use electrical tape on all wire connections to avoid short circuits. Fasten loose wires with zip ties. Reattach any panels or covers securely using a screwdriver.
Testing The Lights
Once everything is connected and secured, reconnect the car battery. Turn on the headlights or signal lights to check the LED lights.
- Check that all LED bulbs light up evenly.
- Look for any flickering or dim lights.
- Ensure no wires are exposed or loose.
- Test all related light functions like brake or turn signals.
If any light does not work, turn off the power and check the bulb connections again. Proper testing helps keep you safe on the road.
Troubleshooting Common Issues
Installing LED lights in your car can improve visibility and style. Sometimes, issues may arise after installation. This guide helps you fix common problems easily.
Read the tips below to solve flickering lights, error messages, and alignment problems. These fixes need basic tools and clear steps.
Fixing Flickering Lights
Flickering LED lights often mean poor power connection or incompatible parts. Check the wiring and the bulb type first to find the cause.
- Inspect all wiring for loose or damaged connections.
- Use a multimeter to check voltage at the LED bulbs.
- Replace bulbs if they do not match your car’s specifications.
- Install a resistor or capacitor if flicker is due to voltage fluctuations.
- Ensure the car’s electrical system supports LED bulbs.
Dealing With Error Messages
After installing LED lights, your car may show error messages on the dashboard. This happens because LEDs use less power than traditional bulbs.
| Error Message | Cause | Fix |
| Bulb Out | Low power draw of LED | Install load resistor or CAN bus decoder |
| Check Light | Faulty wiring or connection | Inspect and repair wiring |
| Signal Failure | Wrong bulb type | Replace with correct LED bulb |
Adjusting Light Alignment
Proper light alignment ensures safe driving and avoids blinding others. After installing LEDs, you may need to adjust the beam direction.
Follow these steps to align your LED headlights:
- Park your car on a flat surface facing a wall about 25 feet away.
- Turn on the low beam headlights.
- Mark the center of each light beam on the wall with tape.
- Use the adjustment screws on the headlight housing to align the beams to the marks.
- Test the alignment by driving and checking visibility.
Maintaining Led Lights
LED lights in your car need care to last long. Good maintenance keeps them bright and safe.
Simple steps help you avoid problems and save money on repairs.
Cleaning Tips
Clean LED lights often to remove dirt and dust. This keeps light clear and bright.
Use a soft cloth and mild soap with water. Avoid harsh chemicals that can damage the lights.
- Turn off the lights before cleaning.
- Use gentle circular motions with the cloth.
- Dry the lights fully to stop water spots.
Regular Inspection
Check your LED lights regularly for cracks or dim spots. Early checks stop bigger issues.
Look at the wiring and connections to make sure they are tight and clean.
- Inspect lights every few weeks.
- Look for flickering or uneven brightness.
- Check for moisture inside the light covers.
Replacing Faulty Leds
If an LED stops working, replace it quickly. Faulty LEDs can affect your safety.
Use the correct LED type made for your car. Follow the car manual for replacement steps.
- Turn off power before replacing LEDs.
- Handle LEDs with care to avoid damage.
- Test new LEDs before final installation.
Credit: www.jaginfo.org

Credit: www.chevymalibuforum.com
Frequently Asked Questions
How Do I Install Led Lights In My Car?
To install LED lights, disconnect the car battery first. Remove the existing bulbs, then connect the LED bulbs to the sockets. Secure wiring using connectors and test the lights before finalizing the installation.
What Tools Are Needed For Car Led Light Installation?
You typically need screwdrivers, wire strippers, electrical tape, connectors, and sometimes a multimeter. These tools help safely remove old bulbs and connect new LED lights properly.
Can I Install Led Lights Without Professional Help?
Yes, many LED lights come with plug-and-play kits, making installation easy for beginners. Follow instructions carefully, and ensure the car battery is disconnected to avoid electrical issues.
Are Led Lights Better Than Traditional Car Bulbs?
LED lights are more energy-efficient, last longer, and provide brighter illumination. They also generate less heat and improve your vehicle’s overall lighting performance.
Conclusion
Installing LED lights in your car can change its look and feel. The process is simple and does not take much time. Choose the right lights and tools before you start. Follow each step carefully to avoid mistakes. Safety matters, so disconnect the battery first.
Test the lights after installation to ensure they work well. Enjoy the brighter, cooler light inside your car. Now, your car looks modern and stylish. Try this easy upgrade to make your ride better.