Imagine stepping onto a warm floor on a chilly morning. Sounds inviting, right?
If you’ve ever wondered how to make floor heating systems that bring that cozy feeling to your home, you’re in the right place. This guide will walk you through simple, clear steps to create your own efficient and comfortable floor heating setup.
By the end, you’ll know exactly how to keep your feet warm and your energy bills low. Ready to transform your space? Let’s dive in!

Credit: www.warmlyyours.com
Types Of Floor Heating Systems
Floor heating systems make rooms warm and cozy. They use different ways to heat floors evenly.
Choosing the right system depends on your needs and floor type. Here are the main types of floor heating.
Electric Heating Mats
Electric heating mats are thin mats with wires inside. They heat up when electricity passes through.
These mats are easy to install under tiles or laminate floors. They warm the floor quickly and evenly.
- Works well in small or medium rooms
- Simple to control with a thermostat
- Good for remodeling projects
Hydronic Heating Systems
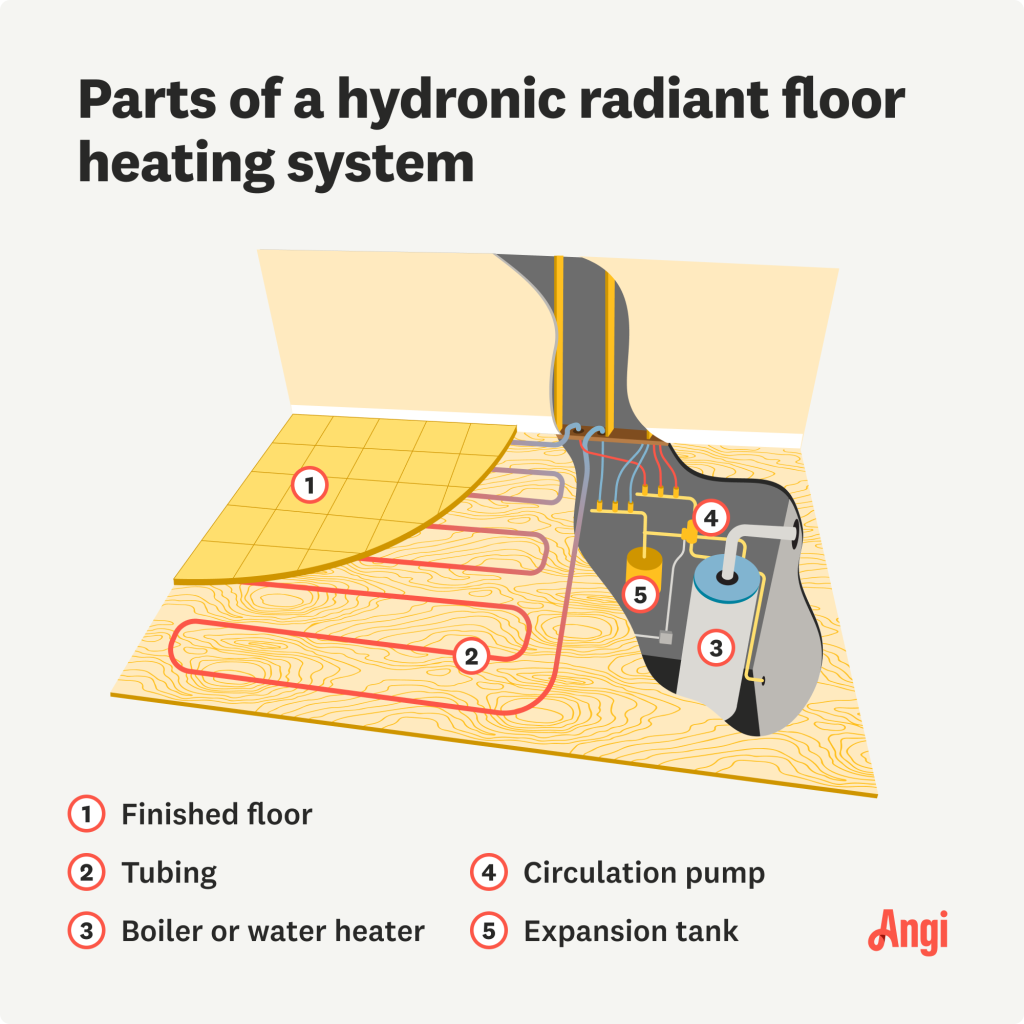
Hydronic systems use warm water to heat floors. Pipes run under the floor and carry heated water.
This system is very efficient for large areas. It works with boilers or heat pumps to warm the water.
- Lower energy costs over time
- Works well with many floor types
- Needs professional installation
Radiant Heating Films
Radiant heating films are thin sheets that use electricity to create heat. They go under floors like mats.
These films are flexible and easy to install. They work best under floating floors like wood or laminate.
- Very thin and lightweight
- Fast heating with low energy use
- Good for renovations and new builds
Tools And Materials Needed
Installing a floor heating system needs the right tools and materials. This guide lists what you need to get started.
Each part plays a key role in making your floor warm and comfortable. Let’s look at the main categories.
Heating Elements
Heating elements create the warmth under your floor. They come in different types to fit your needs.
- Electric heating cables or mats
- Hydronic tubes for water-based systems
- Heating panels for quick installation
- Connection wires and terminals
Insulation Materials
Insulation keeps the heat from escaping downwards. It helps the system work efficiently.
| Material | Purpose | Notes |
| Foam boards | Block heat loss | Lightweight and easy to cut |
| Reflective foil | Reflect heat upward | Use under heating cables |
| Insulation mats | Support cables and insulate | Good for electric systems |
Thermostats And Controllers
Thermostats control the temperature. Controllers help you set the heat level easily.
- Digital thermostat with temperature sensor
- Wall-mounted or floor sensor options
- Remote control or app-enabled controllers
- Power supply and connectors
Installation Tools
Proper tools make installation safe and smooth. Use tools designed for electrical and flooring work.
- Measuring tape and chalk line
- Wire cutters and strippers
- Screwdrivers and drills
- Utility knife and scissors
- Multimeter for electrical testing
- Staple gun or fixing clips
- Protective gear like gloves and goggles
Preparing The Floor Surface
Preparing the floor surface is important for a good floor heating system. The floor must be clean and ready before installation.
This step helps the heating system work well and last longer. It also makes installation easier and safer.
Cleaning And Leveling
Start by cleaning the floor surface completely. Remove dust, dirt, and debris to prevent problems later.
Check the floor for uneven areas. Level the floor using a leveling compound if needed. A flat surface helps the heating system fit well.
- Sweep or vacuum the floor
- Use a damp cloth to remove sticky dirt
- Fill holes and cracks with filler
- Apply leveling compound on uneven spots
- Let the surface dry fully before next steps
Installing Insulation
Put insulation on the floor before the heating system. Insulation keeps heat from going down and saves energy.
Choose insulation that fits your floor type. Lay it smoothly without gaps or overlaps. Secure it if needed to keep it in place.
- Select rigid foam boards or reflective insulation
- Cut insulation to fit the floor size
- Place insulation evenly on the floor surface
- Seal joints with tape for better efficiency
- Check for any gaps or spaces to fill
Planning Layout
Plan the heating system layout before you start installing. This helps avoid mistakes and saves time.
Mark where heating pipes or cables will go. Keep space for furniture and avoid areas that will not get heat.
- Draw a floor plan with heating zones
- Allow space around walls and fixed objects
- Plan pipe or cable spacing for even heat
- Account for thermostat and control locations
- Double-check measurements before installation
Installing Electric Floor Heating
Electric floor heating adds warmth under your floors. It makes rooms comfortable and cozy.
This guide shows how to install electric floor heating safely and correctly.
Laying Heating Mats
Start by cleaning the floor surface well. Remove dust and debris to ensure good contact.
Roll out the heating mats evenly on the floor. Avoid overlapping the mats to prevent damage.
- Measure the room and cut mats to fit carefully
- Place mats away from fixed furniture and appliances
- Keep heating cables flat and secure to the floor
- Leave enough slack near connection points
Connecting Electrical Components
Turn off power from the main circuit before starting any electrical work. Safety is very important.
| Component | Description |
| Thermostat | Controls temperature and power to the heating mats |
| Power Supply Cable | Connects mats to the electrical panel |
| Junction Box | Protects wiring connections |
| Ground Wire | Ensures safe operation and prevents shocks |
Connect wires according to the manufacturer’s instructions. Use connectors to secure the joints.
Securing And Testing
Fix the heating mats to the floor with tape or adhesive. This prevents movement during flooring installation.
- Inspect all electrical connections
- Check the resistance of the heating mats with a multimeter
- Turn on the thermostat and verify it powers the mats
- Look for any cold spots or irregular heating
- Cover mats with the flooring material carefully
Testing ensures the system works before final floor installation. It saves time and avoids damage.
Setting Up Hydronic Floor Heating
Hydronic floor heating uses warm water to heat your floors. This system is efficient and comfortable for homes.
Setting up hydronic heating involves installing pipes, connecting to a heat source, and testing the system.
Installing Piping
Start by laying out the piping on the subfloor. Use flexible plastic pipes designed for heating systems.
Secure the pipes with clips or fasteners to keep them in place during installation.
- Plan pipe layout for even heat distribution
- Keep pipes spaced 6 to 12 inches apart
- Avoid sharp bends to prevent damage
- Use insulation beneath pipes to reduce heat loss
Connecting To Boiler Or Heat Source
Connect the piping to a boiler or another heat source that warms the water. Use proper fittings for a tight seal.
Install a mixing valve to control water temperature before it enters the pipes. This prevents overheating.
- Attach supply and return pipes to the boiler
- Use pipe insulation on exposed connections
- Install valves to control flow and temperature
- Check all connections for leaks before use
Pressure Testing
Pressure testing checks for leaks and ensures pipes can handle system pressure. Use an air or water pressure tester.
Fill the pipes with water or air and pressurize them to the recommended level. Watch for pressure drops.
- Pressurize pipes to system’s maximum pressure
- Keep pressure steady for 30 minutes or more
- Inspect all pipes and connections for leaks
- Fix any leaks before covering the pipes
Installing Flooring Over Heating System
Installing flooring over a floor heating system needs care. The right steps help keep warmth efficient and safe.
This guide explains how to add flooring on top of your heating system correctly. Follow these tips for best results.
Choosing Compatible Flooring Materials
Not all flooring works well with heated floors. Pick materials that allow heat to pass through easily.
Some materials may crack or warp from heat. Choose floors that stay stable and last longer.
- Engineered wood works better than solid wood
- Laminate flooring is a good heat conductor
- Tile and stone are excellent for heat transfer
- Avoid thick carpets that block heat
- Check flooring manufacturer instructions for heating compatibility
Laying Floor Covering
Before laying the floor, test the heating system to make sure it works. Turn it on and check for warmth.
Use proper underlayments that fit heated floors. They protect the heating system and help spread heat evenly.
- Clean and dry the surface before installation
- Lay the heating system cables or mats as per instructions
- Install the underlayment recommended for heated floors
- Place flooring carefully without damaging heating elements
- Leave small gaps for expansion if needed
Final Checks
After installation, check all flooring areas for any loose spots or damage. Fix problems before use.
Turn on the heating system slowly. Watch for even heat and no unusual sounds or smells.
- Inspect floor surface for cracks or gaps
- Ensure heating system control works properly
- Allow time for floor and heating to adjust before heavy use
- Keep temperature within recommended limits
Operating And Maintaining Floor Heating
Floor heating systems provide warmth and comfort in your home. Proper operation and maintenance keep them working well. This guide helps you manage your floor heating system easily.
Understanding thermostat settings, doing regular inspections, and fixing common problems improve system performance. Follow these tips to enjoy steady heat and save energy.
Thermostat Settings
Set your thermostat to the right temperature for comfort and energy saving. Avoid high settings that waste power. Use a timer to control heating hours automatically.
- Keep thermostat between 68°F and 72°F for living spaces
- Lower temperature during the night or when away
- Use programmable thermostats for easy control
- Avoid sudden changes to prevent system strain
- Check thermostat batteries regularly if it is wireless
Regular Inspections
Inspect your floor heating system to find any damage or issues early. Look for leaks, unusual noises, or uneven heating on the floor. Clean sensors and controls to keep them accurate.
| Inspection Item | What to Check | Frequency |
| Thermostat | Accuracy and response | Every 6 months |
| Heating Pipes | Leaks or cracks | Yearly |
| Electrical Connections | Loose wires or corrosion | Yearly |
| Floor Surface | Hot or cold spots | Seasonally |
| Control Valves | Proper opening and closing | Yearly |
Troubleshooting Common Issues
If your floor heating system is not working well, check for these common problems. Fixing small issues quickly avoids costly repairs later.
- Check if the thermostat is set correctly and has power.
- Look for leaks in the heating pipes or connections.
- Ensure the circuit breaker is on and no fuses are blown.
- Listen for unusual sounds like banging or gurgling.
- Inspect the floor for cold spots and report if uneven.
- Reset the system if it has a reset button.
- Call a professional if problems persist or seem complex.

Credit: www.warmlyyours.com

Credit: www.wconline.com
Frequently Asked Questions
What Materials Are Needed For Floor Heating Installation?
You need heating cables or mats, insulation boards, a thermostat, a floor sensor, and a suitable floor covering. Proper tools include a multimeter, trowel, and adhesive. These materials ensure efficient heat distribution and system durability.
How Do Electric And Hydronic Floor Heating Differ?
Electric systems use heating cables powered by electricity, ideal for smaller areas. Hydronic systems circulate warm water through pipes, better for large spaces. Each type suits different budgets, installation complexity, and heating needs.
Can I Install Floor Heating Myself?
DIY installation is possible with electric systems if you follow instructions carefully. Hydronic systems usually require professional help due to plumbing complexity. Always check local building codes and safety standards before starting.
How Long Does Floor Heating Installation Take?
Installation time varies by system and area size. Electric systems can take 1-2 days for average rooms. Hydronic systems may require several days due to pipe laying and boiler setup. Proper curing time is essential before use.
Conclusion
Installing floor heating systems brings warmth and comfort to any space. It saves energy and cuts heating costs. The process is simple when you follow clear steps. Choose the right materials and tools for best results. Proper planning helps avoid common mistakes and delays.
Enjoy cozy floors during cold seasons with your new system. Start your project today and feel the difference. Warm floors make homes more inviting and comfortable.