Setting up a tarp over your tent might seem tricky at first, but it’s one of the smartest moves you can make for a better camping experience. Imagine staying dry during unexpected rain or creating extra shade on a sunny day—all with just a simple tarp.
In this guide, you’ll learn step-by-step how to protect your tent and stay comfortable no matter the weather. Keep reading, and you’ll discover easy tips that save you time, keep you safe, and make your outdoor adventures more enjoyable.

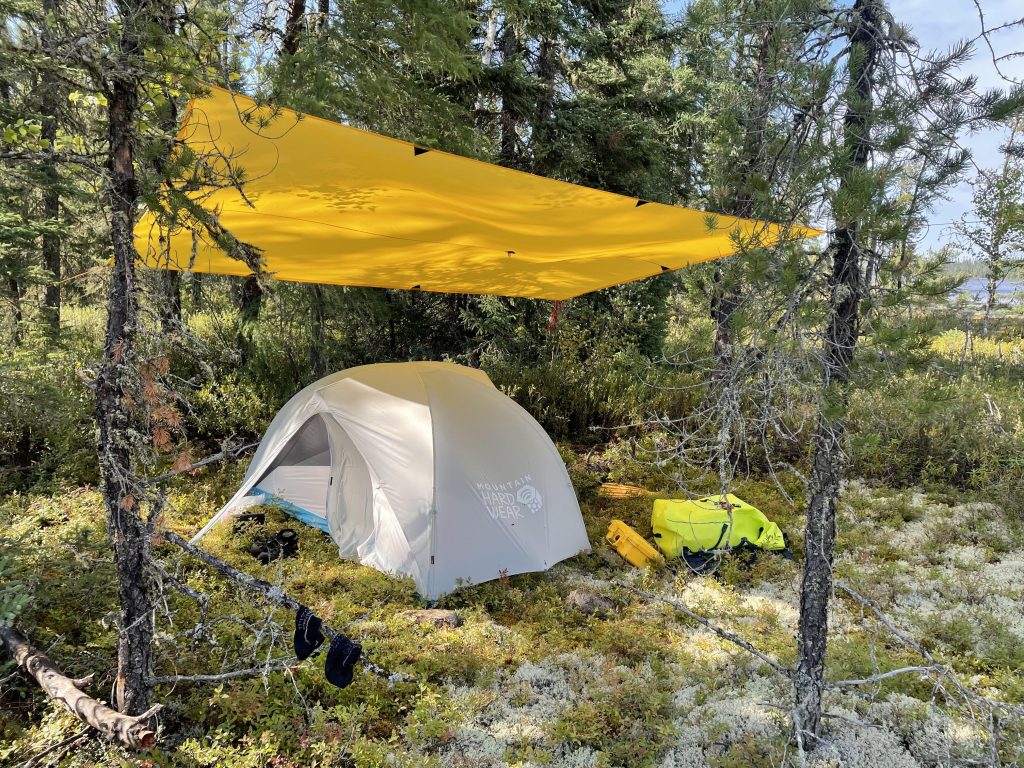
Credit: www.reddit.com
Choosing The Right Tarp
Setting up a tarp over your tent protects you from rain and sun. Picking the right tarp is important to keep dry and safe.
Look at the material, size, shape, and waterproof rating before buying a tarp. These features affect how well the tarp works.
Material Types
Tarp materials vary in weight, strength, and water resistance. Common materials include polyethylene, nylon, and canvas.
Polyethylene tarps are cheap and waterproof but heavier. Nylon tarps are light and strong but may need a waterproof coating. Canvas tarps are durable and breathable but heavier and can absorb water.
- Polyethylene:Waterproof, affordable, heavier
- Nylon:Lightweight, strong, may need coating
- Canvas:Durable, breathable, heavier
Size And Shape
Choose a tarp size that covers your tent well with extra space for rain runoff. Too small means poor protection; too big is hard to set up.
Tarps come in rectangular, square, and hexagonal shapes. Rectangular tarps fit most tents. Hexagonal tarps offer more coverage and can create a good shelter area.
- Measure your tent before picking tarp size
- Rectangular tarps fit most tents
- Hexagonal tarps provide extra shelter space
Waterproof Ratings
Waterproof ratings tell how well a tarp blocks water. Ratings are usually given in millimeters of water pressure the tarp can resist.
Look for a tarp with a rating of at least 1500mm for good rain protection. Higher ratings mean better waterproofing but may cost more.
- 1500mm rating suits most rain conditions
- 3000mm or more is best for heavy rain
- Check if the tarp has sealed seams for extra waterproofing
Essential Gear And Tools
Setting up a tarp over a tent needs the right gear. This gear helps keep the tarp stable and protects you from rain or sun.
Below are the key tools you need for a good tarp setup. Each plays a role in making your shelter strong and safe.
Ropes And Cordage
Strong ropes or cords hold the tarp in place. Choose ropes that resist stretching and are weatherproof. Nylon or polyester cords are good choices.
- Use at least 1/4 inch thick rope for strength.
- Bring extra length for tying knots and adjustments.
- Consider reflective cords for visibility at night.
- Use guy lines to secure tarp corners and edges.
Stakes And Pegs
Stakes hold the tarp and tent to the ground. Pick stakes that match the soil type. For soft soil, use longer stakes. For rocky ground, use strong metal stakes.
| Type of Ground | Recommended Stakes |
| Soft Soil | Long, sturdy plastic or metal stakes |
| Rocky Ground | Heavy-duty metal stakes with sharp ends |
| Sand | Wide, sand-specific stakes or sandbags |
| Snow | Snow stakes or deadman anchors |
Poles And Supports
Poles hold the tarp up and create shelter space. You can use tent poles or find sturdy sticks. Adjustable poles work well for different tarp sizes.
- Check pole length to match tarp height needs.
- Use shock-corded poles for easy setup.
- Secure poles firmly to avoid collapse in wind.
- Consider using trees as natural supports if available.
Selecting The Best Location
Choosing the right spot to set up a tarp over your tent is very important. It helps protect you from weather and makes your camping more comfortable.
Look for a place that keeps your tent dry and safe. Think about the ground, wind, sun, and nearby natural features before setting up.
Terrain Considerations
Pick flat ground to place your tent and tarp. Uneven spots can cause water to collect under your tent.
Avoid low areas where rainwater may pool. Hard or rocky soil can make it hard to drive stakes into the ground.
- Choose flat, firm ground
- Avoid areas that flood easily
- Check for sharp rocks or roots
- Clear debris before setting up
Wind And Sun Exposure
Set your tarp and tent where wind is not too strong. Strong wind can blow your tarp away or damage your tent.
Look for places that get shade during the hottest parts of the day. A tarp helps block sun, but natural shade adds extra comfort.
- Face the tent entrance away from wind
- Use trees or hills as windbreaks
- Find shade spots for cooler temperatures
- Check sun path to plan tarp placement
Natural Shelter Options
Natural features like trees and rocks can help protect your tent and tarp. They add extra cover from rain and wind.
Use tree branches to tie tarp lines. Be careful not to damage living plants or trees when setting up your tarp.
- Look for sturdy trees to anchor tarp
- Use large rocks to block wind
- Avoid dead branches that may fall
- Respect the environment while camping

Credit: www.youtube.com
Basic Tarp Setup Techniques
Setting up a tarp over a tent protects you from rain, wind, and sun. It also helps keep your tent dry and extends its life.
This guide explains three common tarp setups. Each style works well for different weather and terrain conditions.
A-frame Style
The A-Frame style uses the tent’s ridgeline to support the tarp. It creates a roof that slopes on both sides to shed water.
- Attach the tarp to the tent ridgeline with clips or cords.
- Tie the tarp edges to nearby trees or stakes in the ground.
- Keep the tarp taut to avoid sagging and water pooling.
- Adjust the height so rain flows away from the tent.
Lean-to Style
The Lean-To style shelters one side of the tent. It is fast to set up and works well against wind or sun from one direction.
To build a Lean-To tarp:
- Secure one long edge of the tarp to trees or poles.
- Raise the opposite edge with trekking poles or sticks.
- Stake down the open edges to the ground tightly.
- Ensure the tarp slants so rain runs off away from the tent.
Flat Roof Style
The Flat Roof style covers the tent like a flat canopy. It offers shade and rain protection but needs good drainage.
| Step | Action | Tip |
| 1 | Lay the tarp flat over the tent. | Use a tarp larger than the tent for coverage. |
| 2 | Secure all corners to stakes in the ground. | Keep the tarp tight to prevent flapping. |
| 3 | Create a slight slope by raising one side. | Use poles or tie lines to nearby trees. |
| 4 | Check for water pooling after rain starts. | Adjust stakes and lines to improve drainage. |
Securing The Tarp Over The Tent
Setting up a tarp over your tent helps protect you from rain and sun. Securing it properly keeps it stable during wind and bad weather.
Use the tent’s loops, guy lines, and adjust tension to make sure the tarp stays in place. Each step helps create a strong shelter.
Attaching To Tent Loops
Most tents have loops designed for attaching tarps. Use these loops to connect your tarp securely to the tent.
Clip or tie the tarp’s corners or edges to the loops. This creates a strong base to hold the tarp in place.
- Find all loops on the tent’s roof and sides
- Use clips, carabiners, or knots to attach the tarp
- Make sure attachments are tight but not too tight
Using Guy Lines
Guy lines help hold the tarp away from the tent and add extra stability. Attach them to the tarp’s grommets or loops.
Secure the other end of the guy lines to stakes in the ground. This stops the tarp from flapping or collapsing.
- Tie guy lines to tarp corners and sides
- Place stakes firmly in the ground
- Pull the lines tight and tie them off
Adjusting Tension
Proper tension keeps the tarp smooth and strong. Too loose and the tarp will flap. Too tight and it may tear or damage the tent.
Check all attachment points. Tighten or loosen guy lines and loops to get the right tension.
- Start with a medium tension
- Adjust each side evenly
- Test by gently pushing the tarp
- Fix any sagging or overly tight spots
Tips For Weather Protection
Setting up a tarp over a tent helps protect you from bad weather. It adds extra cover from rain, wind, and sun.
Use simple steps to secure the tarp well. This keeps your tent dry and comfortable during your camping trip.
Rain And Drainage
Place the tarp so rainwater flows away from your tent. Make sure the tarp slopes down to avoid water pooling.
Secure the tarp tightly with ropes and stakes. This stops rain from getting inside your tent.
- Angle the tarp to let water run off
- Keep edges wider than the tent for more coverage
- Use strong ropes and stakes to hold the tarp
- Check for leaks or holes before rain starts
Wind Resistance
Attach the tarp tightly to resist strong winds. Loose tarps can flap and cause damage.
Use extra stakes or tie the tarp to nearby trees or poles. This adds stability during windy weather.
- Pull the tarp tight to reduce flapping
- Secure corners with stakes deep in the ground
- Tie ropes to trees or poles for extra support
- Check knots and tighten if needed
Sunshade Benefits
Use a tarp to create shade and keep your tent cool. It helps block harsh sunlight during hot days.
Set the tarp higher than the tent to allow air flow. This lowers the temperature inside your tent.
- Position the tarp to block direct sun rays
- Keep space between tarp and tent for air circulation
- Use light-colored tarps to reflect heat
- Adjust tarp as the sun moves during the day
Maintenance And Storage
Keeping your tarp clean and dry helps it last longer. Proper care stops damage and mold growth.
Store your tarp the right way to avoid wrinkles and tears. Follow simple steps for cleaning, drying, and folding.
Cleaning The Tarp
Remove dirt and debris after every use. Use mild soap and water to clean the tarp gently. Avoid harsh chemicals that can damage the fabric.
- Shake off loose dirt and leaves
- Use a soft brush for stuck dirt
- Wash with mild soap and warm water
- Rinse thoroughly to remove all soap
- Let the tarp air dry completely
Drying Before Packing
Always dry your tarp fully before packing. Moisture can cause mold and bad smells. Hang the tarp in a shaded, breezy spot to dry quickly.
| Drying Location | Benefit |
|---|---|
| Shaded area | Prevents sun damage |
| Breezy spot | Speeds up drying |
| Flat surface | Stops dirt from sticking |
Proper Folding Techniques
Fold your tarp carefully to avoid creases and tears. Keep the tarp clean and dry before folding. Use gentle folds instead of tight creases.
- Lay the tarp flat and smooth out wrinkles
- Fold the tarp in half lengthwise
- Repeat folding lengthwise until narrow
- Fold into sections from one end
- Store in a dry bag or container

Credit: www.reddit.com
Frequently Asked Questions
How Do I Secure A Tarp Over A Tent?
Use strong ropes or cords to tie tarp corners to nearby trees or stakes. Ensure the tarp covers the tent fully and slopes to allow rain runoff. Tighten all lines to prevent sagging and wind damage during bad weather.
What Materials Work Best For Tent Tarps?
Polyethylene tarps are durable, waterproof, and lightweight, making them ideal. Canvas tarps are breathable but heavier and less waterproof. Choose a tarp with reinforced grommets for easy and secure attachment around your tent.
Can A Tarp Improve Tent Weather Protection?
Yes, a tarp adds an extra waterproof layer and shields the tent from rain, wind, and sun. It helps prevent leaks and extends the tent’s lifespan. Proper setup is crucial to ensure effective weather protection.
How High Should I Set The Tarp Above The Tent?
Set the tarp about 1 to 2 feet above the tent to allow airflow. This spacing reduces condensation inside the tent and improves ventilation, keeping the interior dry and comfortable.
Conclusion
Setting up a tarp over your tent keeps you dry and comfortable. It also protects your tent from sun and rain damage. Use strong ropes and secure knots for safety. Check the tarp often during bad weather. This simple step makes camping easier and more fun.
Try it on your next trip for better shelter. You’ll see how much difference a tarp can make. Camping smart means staying prepared and safe outdoors.