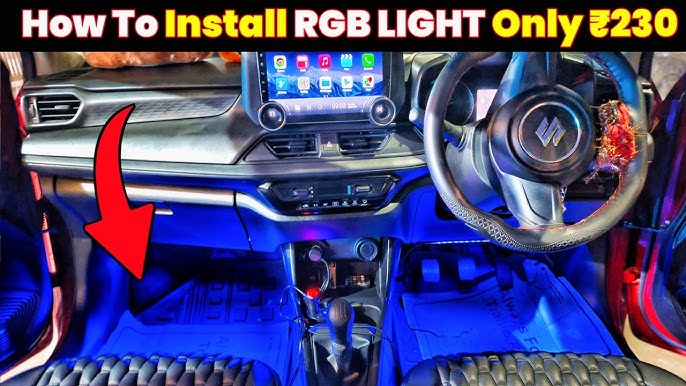
Are you looking to give your car a fresh, stylish look that turns heads wherever you go? Installing LED strip lights inside or under your car is one of the easiest and most affordable ways to achieve that.
But maybe you’re unsure where to start or worried about making mistakes. Don’t worry—you’re in the right place. This guide will walk you through every step of how to install car LED strip lights quickly and safely, even if you have little to no experience.
Keep reading, and you’ll soon have your car glowing just the way you want it.
Credit: www.jaginfo.org
Choosing The Right Led Strip Lights
Installing LED strip lights in your car can improve its look and safety. Picking the right LED strips is important for the best results.
This guide helps you understand what to consider before buying LED strip lights for your car.
Types Of Led Strips
There are different types of LED strip lights. Each type has a unique design and use. Choose one that fits your car and needs.
- Single color strips: light up in one color only
- RGB strips: can change to many colors
- Addressable strips: can control each LED separately
Brightness And Color Options
Brightness is how much light the strip gives. Pick brightness based on where you want to install the lights.
Color options let you choose the mood and style. Some LED strips offer many colors, while others have only one.
- Brightness is measured in lumens
- Higher lumens mean brighter lights
- Choose colors that match your car’s interior
- Some strips offer color changing modes
Waterproof And Durability Features
Car LED strips must handle weather and road conditions. Waterproof strips protect from rain and splashes.
Durability means the strip lasts long. Look for strips with strong materials and good build quality.
- IP65 or higher rating means water resistance
- Silicone or epoxy coating adds protection
- Check for heat resistance to avoid damage
- Good adhesive backing helps keep strips in place
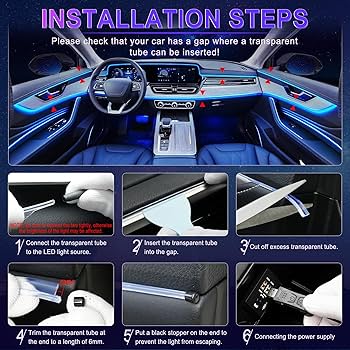
Credit: www.amazon.ca
Gathering Required Tools And Materials
Installing LED strip lights in your car needs specific tools and materials. Collecting these before you start makes the job easier. This guide helps you prepare everything required for a smooth installation.
Having the right tools and accessories ensures safety and quality. Let’s look at what you need to gather first.
Essential Tools
These tools help you handle the LED strips and work on your car’s electrical system safely.
- Screwdrivers (flathead and Phillips) for removing panels
- Wire stripper to prepare wires for connection
- Multimeter to check electrical current and voltage
- Electrical tape for insulation
- Heat gun or lighter to shrink heat shrink tubing
- Wire cutters to trim wires as needed
- Plastic pry tools to avoid damaging car surfaces
Additional Accessories
These accessories support the installation and help secure the LED strips inside your car.
| Accessory | Purpose |
|---|---|
| LED strip lights | Main lighting source |
| 12V power adapter or wiring kit | Provides power to the lights |
| Fuse holder and fuse | Protects electrical circuit from overload |
| Double-sided tape or mounting clips | Secures strips in place |
| Heat shrink tubing | Protects wire connections |
| Connectors (optional) | Makes wiring easier without soldering |
Preparing Your Car For Installation
Before installing LED strip lights on your car, you must prepare the surface. Proper preparation helps the lights stick well and last longer.
Take your time to plan where you want to place the lights. This step ensures a clean look and easy installation.
Cleaning The Surface
Clean the areas where you will attach the LED strips. Dirt and grease can stop the tape from sticking properly.
Use a mild soap and water solution or rubbing alcohol to wipe down the surface. Let it dry completely before continuing.
- Wash area with soap and water
- Wipe with rubbing alcohol for best results
- Dry the surface fully before installation
Planning The Light Placement
Decide where to place the LED strips on your car. Choose spots that are visible and easy to reach for wiring.
Measure the length of each area to cut the strip lights properly. Avoid sharp corners and moving parts.
- Pick visible but protected locations
- Measure each section before cutting
- Avoid places that bend sharply
- Keep away from moving car parts

Credit: www.walmart.com
Wiring And Electrical Setup
Installing car LED strip lights requires careful wiring and electrical setup. This ensures the lights work safely and last long. Understanding your car’s electrical system is the first step.
After that, you connect the LED strips to a power source. Using a fuse and a switch adds safety and control to your installation.
Understanding Your Car’s Electrical System
Your car has a 12-volt electrical system. This powers lights, radio, and other parts. The battery supplies power, and the alternator keeps it charged. Wires carry electricity to different components.
- Positive wire carries current from the battery
- Negative wire connects to the car’s ground
- Fuse boxes protect circuits from damage
- Switches control when power flows
Connecting To Power Source
Choose a power source that turns on with the car. This can be the fuse box or a battery wire. Use a test light or multimeter to find the right wire. Connect the LED strip’s positive wire to this source.
Connect the negative wire to a clean metal ground point. Avoid rusty or painted spots. A good ground ensures the lights work well and prevents flickering.
- Locate a switched 12V power wire
- Attach the LED strip’s positive wire
- Find a clean metal ground for the negative wire
- Secure all connections with wire connectors or solder
Using A Fuse And Switch
A fuse protects your car and LEDs from short circuits. A switch lets you turn the lights on or off easily. Install the fuse close to the power source on the positive wire.
| Component | Purpose | Placement |
| Fuse | Protects circuit from overload | Near battery or power source |
| Switch | Controls power flow to LED strip | Inside cabin or easy-to-reach spot |
Use the correct fuse rating for your LED strips. Too high can cause damage, too low will blow fuse quickly. Connect the switch between the fuse and the LED strip’s positive wire.
Installing The Led Strip Lights
Installing LED strip lights in your car can brighten the interior and add style. This guide helps you fit the strips properly to get the best look.
Focus on cutting the strips to the right length and securing them well. These steps make sure the lights stay in place and work correctly.
Cutting And Fitting The Strips
Measure the area where you want to place the LED strips. Cut the strips only at the marked lines to avoid damage.
- Use sharp scissors or a blade to cut on the copper marks.
- Test the strip by connecting it to power after cutting.
- Plan the layout so the strips fit corners and curves well.
- Keep the strips dry and clean before installation.
Securing The Strips In Place
Attach the LED strips firmly to prevent them from falling or moving. Use the correct tools and materials for a lasting hold.
| Method | Details | Tips |
|---|---|---|
| Adhesive Backing | Peel off the tape and press the strip to the surface. | Clean surface first for better grip. |
| Double-sided Tape | Use extra tape on weak spots for more strength. | Choose automotive-grade tape for durability. |
| Clips or Holders | Fix clips along the strip for curved or uneven areas. | Use small screws to secure clips tightly. |
| Zip Ties | Bundle strips and fasten with ties if wiring is exposed. | Do not tighten ties too much to avoid damage. |
Testing And Adjusting The Lights
After installing your car LED strip lights, testing and adjusting them ensures they work properly. This step helps you find and fix any issues early.
Checking the lights includes powering them on, troubleshooting problems, and adjusting brightness and effects to your liking.
Powering On And Troubleshooting
First, connect the power source and turn on the LED strips. If the lights do not turn on, check the wiring and connections carefully.
- Verify the fuse is not blown.
- Ensure the LED strip is connected to the correct power source.
- Check the remote or controller batteries.
- Look for any damaged wires or loose connections.
- Test the LED strip on another power supply if possible.
Adjusting Brightness And Effects
Once the lights power on, adjust the brightness and effects using the remote or controller. This lets you customize the light to fit your style.
| Adjustment | How to Do It |
| Brightness | Use the brightness buttons on the remote to increase or decrease light output. |
| Color Modes | Select different colors or patterns from the controller menu. |
| Speed | Adjust the speed of color changes or flashing effects. |
| On/Off Timer | Set automatic on/off times if your controller supports it. |
Safety Tips And Maintenance
Installing car LED strip lights can improve your vehicle’s look and visibility. Proper safety and care help the lights work well for a long time.
Follow safety rules to avoid accidents. Regular maintenance keeps your lights bright and lasting.
Avoiding Electrical Hazards
Always disconnect the car battery before starting installation. This stops electric shocks and short circuits.
Use the right tools and materials made for automotive use. Avoid cutting or damaging wires during setup.
- Check wiring for damage before connecting
- Use fuses to protect electrical circuits
- Secure wires to avoid rubbing or pinching
- Do not connect lights to high-power circuits
- Test connections before final assembly
Cleaning And Longevity
Keep the LED strips clean to prevent dirt build-up. Dirt can block light and cause overheating.
Use a soft cloth and mild cleaner. Avoid harsh chemicals that can damage the lights or wiring.
- Turn off lights before cleaning
- Wipe gently with a damp cloth
- Check for loose connections regularly
- Replace damaged strips quickly
- Store extra strips in a dry place
Frequently Asked Questions
What Tools Do I Need To Install Led Strip Lights?
To install LED strip lights, you’ll need a screwdriver, adhesive tape, and a wire stripper. Additionally, a voltage tester can ensure safety. Ensure you have a power source or adapter. These tools will help in securely attaching and connecting the strips to your vehicle.
Can I Cut Led Strip Lights For Custom Fit?
Yes, you can cut LED strip lights to fit your needs. Look for designated cutting points on the strip. Use sharp scissors or a knife for a clean cut. Ensure you seal the ends properly to prevent damage or short circuits, preserving the strip’s functionality.
How Do I Connect Led Strip Lights To Power?
To connect LED strip lights, use the provided connectors or solder the wires to the power source. Ensure the voltage matches the strip’s requirements. Secure connections prevent flickering and ensure consistent lighting. Follow the manufacturer’s instructions for optimal results and safety.
Are Led Strip Lights Waterproof For Cars?
Most car LED strip lights are waterproof, designed for external use. Check the IP rating on the packaging for confirmation. Waterproof strips can withstand rain and moisture. This feature ensures durability and longevity when installed on vehicles exposed to various weather conditions.
Conclusion
Installing car LED strip lights is simple with the right steps. Start with clean surfaces and check the wiring carefully. Secure the strips tightly to avoid falling or flickering. Test the lights before finishing the installation. Bright, colorful lights can improve your car’s look and safety.
Take your time and follow instructions closely. Enjoy the new style and better visibility on the road. This small upgrade makes a big difference in night driving. Try it yourself and see how easy it can be.