Have you ever wanted to catch your own fish with a rod you built yourself? Making your own fishing rod is easier than you might think, and it can give you a real sense of pride every time you cast your line.
Imagine feeling the tug of a fish on a rod you crafted with your own hands. You’ll discover simple steps to create a fishing rod that fits your style and needs. Keep reading, and you’ll be ready to head out on your next fishing trip with a rod that’s truly yours.
Choosing Materials
Making a fishing rod starts with picking the right materials. Good materials help build a strong and light rod.
Each part of the rod needs careful material choice to perform well in water and last long.
Selecting The Rod Blank
The rod blank is the main part of the fishing rod. It is a long, thin tube that bends when you catch fish.
Common materials for rod blanks are graphite and fiberglass. Graphite is light and sensitive. Fiberglass is strong and flexible.
- Graphite rods are good for feeling small bites.
- Fiberglass rods work well for heavy fishing.
- Composite blanks mix both materials for balance.
Picking The Reel Seat
The reel seat holds the fishing reel in place. It keeps the reel tight and secure on the rod.
Reel seats come in plastic, metal, or graphite. Metal seats are strong but heavy. Plastic seats are light but less durable.
- Graphite reel seats offer a good mix of strength and weight.
- Choose a reel seat that fits your reel size well.
- Make sure the seat locks the reel firmly without slipping.
Choosing Guides And Tips
Guides are small rings that guide the fishing line along the rod. Tips are the last guide at the rod’s end.
Materials for guides include stainless steel and ceramic. Ceramic guides reduce line friction. Steel guides are strong and last long.
- Pick guides with smooth inserts to protect your line.
- Use lightweight guides to keep the rod balanced.
- Tips should be strong but flexible to avoid breaking.
Handle Options
The handle lets you hold and control the fishing rod comfortably. It affects how long you can fish without pain.
Common handle materials are cork and EVA foam. Cork is light and feels natural. EVA foam is soft and resists water well.
- Cork handles offer good grip, even when wet.
- EVA foam handles are durable and easy to clean.
- Choose a handle shape that fits your hand size.

Credit: anglersresource.net
Gathering Tools
Making a fishing rod needs the right tools. Gathering tools helps you work safely and well.
Some tools are essential to start. Others help to finish and improve your rod.
Essential Tools List
These tools are must-haves for building a fishing rod. They help shape, cut, and assemble parts.
- Measuring tape – to measure rod parts accurately
- Hacksaw or rod cutter – to cut the rod blank
- Sandpaper – to smooth the rod surface
- Drill with small bits – to make holes for guides
- Epoxy glue – to attach guides and handle
- Thread wraps – to secure guides in place
- Clamps – to hold parts while glue dries
- Heat source or lighter – to shrink thread wraps
Optional Tools For Finishing
These tools help make your fishing rod look and work better. They are not needed but nice to have.
- Rod dryer – spins the rod to dry epoxy evenly
- Fine paintbrushes – for applying epoxy smoothly
- Rod varnish or finish – protects and shines the rod
- Guide wrapping jig – helps wrap threads neatly
- Polishing cloth – for a clean, smooth finish
- Masking tape – to mark guide spots and protect areas
Preparing The Rod Blank
Preparing the rod blank is an important step when making a fishing rod. This process helps ensure the rod is strong and smooth.
Careful measuring, cutting, sanding, and smoothing give your rod a good finish and improve its performance.
Measuring And Cutting
Start by measuring the length of the rod blank. Use a tape measure to get the exact size you want for your fishing rod.
Mark the point where you will cut the blank. Use a pencil or tape to mark it clearly before cutting.
- Measure twice to avoid mistakes
- Use a fine-toothed saw for a clean cut
- Cut slowly to prevent splintering
Sanding And Smoothing
After cutting, sand the edges of the blank to remove rough spots. Start with coarse sandpaper and move to finer grit for smoothness.
Make sure the whole rod blank is smooth. This helps the guides stick better and prevents damage to fishing lines.
- Use 120 grit sandpaper for first sanding
- Finish with 220 grit for a smooth surface
- Wipe off dust with a clean cloth
Attaching The Reel Seat
Attaching the reel seat is an important step in making a fishing rod. The reel seat holds the fishing reel firmly in place. This section explains how to position and secure the reel seat properly.
Correct attachment ensures the reel stays stable during fishing. It also helps balance the rod for better control.
Positioning The Seat
Place the reel seat where your hand will hold the rod comfortably. Usually, this is near the handle’s end. The position affects how you cast and control the rod.
Check that the reel seat lines up with the rod guides. This alignment helps the line flow smoothly when casting.
- Hold the reel seat against the rod handle
- Ensure the reel foot fits well in the seat
- Align the seat with the rod guides
- Mark the spot lightly for glue application
Securing With Epoxy
Use epoxy glue to secure the reel seat firmly. Epoxy creates a strong bond that holds the seat in place during use.
Mix the epoxy well and apply a thin layer inside the reel seat. Slide the seat onto the rod handle at the marked spot. Wipe off any extra epoxy to keep the rod clean.
- Prepare the epoxy according to instructions
- Apply epoxy evenly inside the reel seat
- Fit the seat on the rod at the marked position
- Hold the seat steady until epoxy sets
- Clean off any extra glue quickly
Installing Guides
Installing guides is a key step in making a fishing rod. Guides help control the line and improve casting.
This part covers aligning guides, wrapping them with thread, and applying a finish coating for durability.
Aligning Guides Properly
Start by placing the guides along the rod blank. Space them evenly from the tip to the handle.
- Lay the rod flat on a table.
- Attach the tip-top guide first.
- Add the other guides along the rod.
- Make sure all guides line up straight.
- Adjust spacing for smooth line flow.
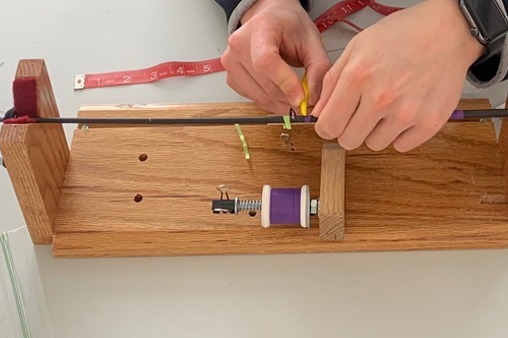
Wrapping With Thread
Use nylon or polyester thread to wrap the guides tightly to the rod blank. This holds them in place.
| Wrapping Tips | Details |
| Thread type | Nylon or polyester |
| Wrap direction | Clockwise or counterclockwise |
| Wrap tightness | Firm but not too tight |
| Wrap length | Cover guide foot fully |
| Finish | Secure thread ends with glue |
Applying Finish Coating
Finish coating protects the thread wraps and adds shine. Use epoxy or rod finish to coat the wraps.
Follow these points for finish coating:
- Mix epoxy according to instructions.
- Apply thin coats with a brush or applicator.
- Rotate the rod slowly to avoid drips.
- Allow each coat to dry fully before next.
- Apply 2-3 coats for best protection.
Adding The Handle
The handle is an important part of your fishing rod. It lets you hold the rod comfortably. A good handle improves your fishing experience.
Adding the handle takes care and the right materials. You will learn how to choose and attach the handle properly.
Choosing Handle Material
Pick a handle material that feels good in your hand. It should be strong and light. The material also affects how long the handle lasts.
- Cork is light and comfortable. It gives a good grip even when wet.
- EVA foam is soft and durable. It is easy to clean and lasts long.
- Wood looks nice and feels solid. It can be heavier than other materials.
Fitting And Gluing
Fit the handle to the rod’s blank carefully. The handle should be snug but not too tight. You want no gaps between the handle and rod.
Use strong glue made for fishing rods. Apply glue inside the handle and on the rod end. Then slide the handle on and hold it until it sets.
- Clean the rod end before gluing.
- Use epoxy or special rod glue.
- Wipe off extra glue quickly.
- Let the glue dry fully before use.
Final Touches
After assembling your fishing rod, some last steps will make it ready to use. These final touches ensure the rod is strong and works well.
Pay attention to these details to get the best performance and durability from your fishing rod.
Curing Time
Let the rod dry completely after applying glue or finish. This curing time makes the rod strong and stable.
Keep the rod in a dry, dust-free place during curing. Avoid moving it to stop cracks or weak spots.
- Place the rod on a flat surface
- Keep it away from direct sunlight
- Wait at least 24 to 48 hours
- Check for any soft or sticky areas
Testing The Rod
Test your fishing rod before using it in real fishing. This helps find any problems early.
Try bending the rod gently to check its strength. Make sure the guides and reel seat feel secure.
- Hold the rod firmly
- Bend it slowly to test flexibility
- Check if the tip snaps back
- Inspect all parts for looseness
- Fix any issues before fishing

Credit: www.littlegeniusworkshop.com
Maintenance Tips
Keeping your fishing rod in good shape helps it last longer. Regular care prevents damage and keeps it ready to use.
Simple maintenance steps protect your investment and improve your fishing experience.
Cleaning The Rod
Cleaning your fishing rod removes dirt, salt, and debris that can cause damage. Use fresh water and a soft cloth for best results.
- Rinse the rod with fresh water after every use, especially after saltwater fishing.
- Wipe the rod gently with a soft cloth to remove dirt and grime.
- Use mild soap if needed, but avoid harsh chemicals.
- Check guides and reel seats for dirt and clean them carefully.
- Dry the rod completely before storing to prevent rust and corrosion.
Storing Properly
Proper storage keeps your fishing rod safe from damage and warping. Choose a dry, cool place away from sunlight.
| Storage Tip | Reason |
| Store rod vertically or horizontally with support | Prevents bending or warping |
| Avoid placing heavy items on the rod | Prevents breaks and cracks |
| Keep away from direct sunlight | Protects rod material from UV damage |
| Use rod covers or cases | Protects from dust and scratches |
| Keep in a dry place | Prevents mold and corrosion |
Credit: lakeladyrods.com
Frequently Asked Questions
What Materials Are Needed To Make A Fishing Rod?
To make a fishing rod, you’ll need a rod blank, reel seat, guides, thread, and epoxy. A cork or EVA foam handle is also essential. These materials form the basic structure of a fishing rod. You can purchase them from fishing supply stores or online retailers.
How Do I Attach Guides To A Fishing Rod?
To attach guides, first, align them along the rod blank’s spine. Secure them with masking tape temporarily. Next, wrap thread tightly around each guide foot. Ensure the wraps are even. Finally, apply epoxy over the wraps to secure them permanently.
Allow the epoxy to cure fully before use.
How Long Does It Take To Make A Fishing Rod?
Making a fishing rod typically takes several hours to a few days. The time depends on your experience and the complexity of the design. Allow time for epoxy curing between steps. Beginners might take longer, while experienced builders can finish faster.
Can Beginners Make Their Own Fishing Rod?
Yes, beginners can make their own fishing rod with patience and the right tools. Start by researching and gathering materials. Follow step-by-step guides and tutorials. Take your time with each step. Practice makes perfect, and building your own rod is a rewarding experience.
Conclusion
Making your own fishing rod is simple and rewarding. You learn how each part works together. This helps you enjoy fishing even more. With a little practice, you can build a rod that fits your style. Take your time and choose good materials.
Soon, you will feel proud using a rod you made yourself. Give it a try and enjoy peaceful fishing days ahead.