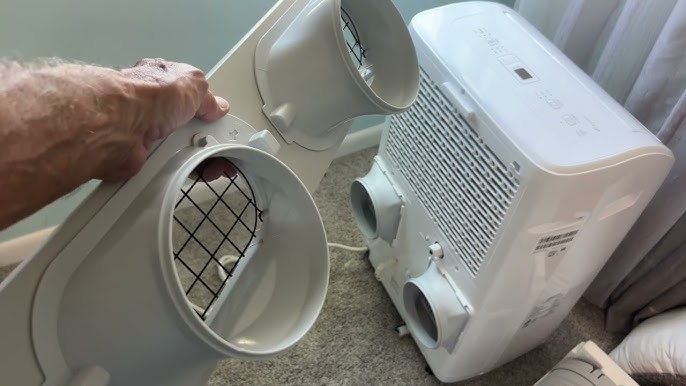
Are you ready to stay cool without the hassle? Installing your Hisense portable air conditioner is easier than you think, and you don’t need to be an expert to do it.
In this guide, you’ll find simple, step-by-step instructions that will have your unit up and running quickly. Imagine enjoying a refreshing breeze in your favorite room, all set up by your own hands. Keep reading, and you’ll discover how to make your space comfortable with confidence and ease.
Choosing The Right Location
Placing your Hisense portable air conditioner in the right spot helps it work better. A good location makes the room cooler and saves energy.
Consider power access, air flow, and sunlight when choosing the place to set up your unit. These factors keep the air conditioner safe and efficient.
Check Power Source Accessibility
Make sure the air conditioner is near a power outlet. Using an extension cord can cause safety issues and reduce performance.
- Use a grounded outlet that matches the unit’s plug type
- Keep the power cord away from water and heat sources
- Check if the outlet supports the unit’s voltage and current
Ensure Proper Ventilation
The air conditioner needs space for air to flow freely. Blocked vents reduce cooling and can damage the unit.
| Ventilation Tip | Recommended Space |
| Clear air intake area | At least 20 inches |
| Clear exhaust vent | At least 20 inches |
| Keep unit away from walls or furniture | At least 12 inches |
Avoid Direct Sunlight And Obstacles
Direct sunlight makes your air conditioner work harder. Obstacles block airflow and lower cooling efficiency.
Follow these tips to avoid problems:
- Place the unit away from windows facing the sun
- Do not cover the air intake or exhaust vents
- Keep furniture and curtains at least 12 inches from the unit
- Choose a shaded and open area if possible
Unpacking And Inspecting The Unit
Before using your Hisense portable air conditioner, you need to unpack it carefully. Checking the unit ensures it works well and nothing is missing.
Follow these steps to remove the packaging, inspect the unit, and confirm all parts are included.
Remove Packaging Materials
Start by placing the box on a flat surface. Open the box carefully using a box cutter or scissors.
Take out all the packaging materials like foam, plastic wrap, and cardboard pieces. Remove all plastic covers from the air conditioner.
- Cut tape along the box edges
- Lift the unit out gently
- Remove all foam and plastic wrapping
- Keep the packaging in case you need to move the unit later
Check For Damages
Look over the air conditioner for any visible damage. Check the body, vents, and control panel for cracks or dents.
If you find any damage, do not use the unit. Contact the seller or manufacturer for help with replacement or repair.
- Inspect sides and back of the unit
- Check for broken or loose parts
- Make sure the control buttons work properly
- Look for dents or scratches
Verify Included Accessories
Check the box for all the accessories. Make sure the parts match the list in the user manual or on the box.
Common accessories include the exhaust hose, window kit, remote control, and user guide.
- Exhaust hose and connectors
- Window installation kit
- Remote control with batteries
- User manual and warranty card
Assembling The Exhaust Hose
The exhaust hose removes hot air from your Hisense portable air conditioner. It needs to be set up correctly for the unit to work well. Follow these simple steps to assemble the hose.
Make sure you have all parts ready before starting. This will make the process faster and easier.
Connect Hose Sections
The exhaust hose usually comes in two or more parts. You must join these parts to reach the window easily.
- Align the ends of each hose section.
- Push the parts together firmly until they click.
- Check that the hose is straight and not bent.
Attach Hose To Air Conditioner
Connect the hose to the back of the air conditioner. This allows hot air to leave the unit.
- Find the exhaust port on the air conditioner.
- Place the hose end over the port.
- Turn the hose clockwise to lock it in place.
- Make sure it is tight to avoid air leaks.
Secure Hose To Window Kit
The other end of the hose connects to the window kit. This lets hot air exit outside your home.
- Insert the hose end into the window kit opening.
- Twist or push the hose until it fits snugly.
- Use any clips or fasteners provided to hold it tight.
- Check for gaps and seal them if needed.

Credit: www.youtube.com
Installing The Window Kit
Installing the window kit is a key part of setting up your Hisense portable air conditioner. The kit helps vent hot air outside through your window.
Follow these steps to fit the window kit correctly. This will keep your room cool and your unit working well.
Measure And Adjust The Window Kit
Start by measuring the width and height of your window opening. This helps you adjust the window kit to fit perfectly.
Most window kits slide to fit different window sizes. Pull the panels to match your window measurements.
- Use a tape measure for accuracy
- Adjust the kit panels to fit the window width
- Check the height fits your window frame
Fit The Kit Into The Window Frame
Place the adjusted window kit into the bottom part of your window frame. The kit should sit securely without gaps.
Lower the window sash so it holds the kit in place. Make sure the kit is tight and stable before continuing.
- Insert the kit horizontally into the window frame
- Push the window sash down to secure the kit
- Ensure the kit does not move or fall out
Seal Gaps For Efficiency
Check for any gaps between the window frame and the kit. Gaps let warm air enter and reduce cooling power.
Use foam strips or weather stripping to seal these gaps. This keeps your room cooler and saves energy.
- Inspect all sides of the window kit
- Apply foam or weather stripping to fill gaps
- Press firmly to keep the seal tight
Connecting The Drain Hose
Installing the drain hose on your Hisense portable air conditioner is important. It helps remove water that collects inside the unit.
This guide will help you find the drain outlet and connect the hose properly. You will also learn about manual drainage options.
Locate The Drain Outlet
First, find the drain outlet on the back or side of the air conditioner. It is usually a small round opening.
The drain outlet lets water flow out through the hose. Check your user manual if you have trouble finding it.
Attach Drain Hose For Continuous Drainage
Attach the drain hose firmly to the drain outlet. Make sure it fits tightly to avoid leaks.
Place the other end of the hose where water can drain safely, like a floor drain or outside.
- Use a hose that matches the outlet size
- Keep the hose straight to prevent blockages
- Check for leaks after attaching
Options For Manual Drainage
If you do not want to use continuous drainage, you can drain water manually. This means emptying the water tank regularly.
To drain manually, remove the drain plug or cap and let the water flow into a container. Then replace the plug tightly.
- Check the water tank often to avoid overflow
- Drain water in a safe place to prevent spills
- Use this option if you cannot set up a drain hose

Credit: manuals.plus
Powering On And Testing
After installing your Hisense portable air conditioner, the next step is to power it on and test it. This helps you make sure the unit works well and cools your space properly.
Follow these simple steps to safely plug in the unit, set the temperature, and check the airflow and cooling.
Plug In The Unit Safely
Find a grounded electrical outlet near the air conditioner. Make sure the plug fits tightly and the cord is not damaged. Avoid using extension cords or power strips.
Keep the cord away from water and heat sources. This prevents electrical hazards and keeps the unit running smoothly.
Set Desired Temperature
Turn on the air conditioner using the power button. Use the control panel or remote to set your preferred temperature. Choose a comfortable setting based on your room.
The unit will start cooling after you set the temperature. You can adjust the temperature anytime to keep the room comfortable.
Check For Proper Cooling And Airflow
Feel the air coming from the front vent. It should be cool and strong. Make sure there is no warm air or weak airflow.
Also, check the exhaust hose. It should be properly connected and venting hot air outside. This keeps your room cool and the unit efficient.
- Cool air from the front vent
- Strong airflow without blockage
- Exhaust hose securely attached
- Hot air vented outside the room
Maintenance Tips
Keeping your Hisense portable air conditioner in good shape helps it last longer. Regular care ensures it works well and cools your room efficiently.
Follow these simple maintenance tips to keep your unit clean and ready for use.
Cleaning The Air Filter
The air filter traps dust and dirt to keep the air clean. A dirty filter lowers the air conditioner’s performance.
Remove the filter every two weeks and clean it with warm water. Let it dry completely before putting it back.
- Turn off and unplug the unit first
- Open the filter cover
- Take out the air filter carefully
- Rinse with warm water
- Let it air dry fully
- Reinstall the filter and close the cover
Emptying The Water Tank
Your portable air conditioner collects water during use. This water goes into a tank inside the unit.
Check the water tank regularly. Empty it to avoid leaks and keep the unit working well.
- Turn off and unplug the air conditioner
- Locate the water tank drain plug
- Place a container below to catch the water
- Open the drain plug and let water flow out
- Close the plug tightly after emptying
Storing The Unit After Season
Store your portable air conditioner properly in the off-season. This protects it from dust and damage.
Clean the unit, empty the water tank, and keep it in a dry place before storing.
- Turn off and unplug the unit
- Clean the air filter and dry it
- Empty the water tank completely
- Wipe the outside with a soft cloth
- Cover the unit with a breathable cloth
- Store in a cool, dry place away from sunlight

Credit: www.youtube.com
Frequently Asked Questions
How Do I Prepare For Installation?
Before installation, ensure you have the correct model and all necessary parts. Choose a suitable location near a power outlet and window. Ensure the window kit fits your window type. Gather tools like a screwdriver and tape measure for an efficient setup process.
What Tools Are Needed For Installation?
You’ll need a screwdriver, tape measure, and possibly a drill. These tools help in securing the window kit and assembling the unit. Ensure you have the correct size screwdriver for your model. Having tools ready can make the installation process smoother and quicker.
How Do I Install The Window Kit?
Measure your window to ensure a proper fit for the window kit. Insert the kit into the window frame and adjust as needed. Secure the kit using screws provided. Ensure it’s tightly sealed to prevent air leaks. This will maximize the efficiency of your air conditioner.
Can I Install It Without Professional Help?
Yes, you can install a Hisense portable air conditioner yourself. Follow the user manual for step-by-step guidance. Ensure all parts are included and in good condition. If unsure, online tutorials can provide additional support. Professional help is optional but not necessary.
Conclusion
Installing a Hisense portable air conditioner is simple and fast. Follow each step carefully for the best results. Make sure to place the unit near a window for proper ventilation. Check that all parts fit securely to avoid leaks. Clean and maintain the unit regularly for long-lasting use.
Enjoy cool air during hot days without hassle. This easy setup saves time and keeps your space comfortable. Now you can beat the heat with your new air conditioner.