Putting fishing line on your pole might seem tricky at first, but once you learn the right steps, it becomes quick and easy. Whether you’re a beginner or just need a refresher, this guide will help you avoid common mistakes that waste time and money.
Imagine casting smoothly without worrying about tangled or weak lines. By following simple tips, you’ll get your pole ready to catch more fish and enjoy your time on the water. Keep reading to discover exactly how to put fishing line on your pole like a pro.
Choose The Right Line
Choosing the right fishing line is important for a good fishing experience. The right line helps you catch fish easily and keeps your gear safe.
There are many types of fishing lines. Each type works best for different fishing needs. Knowing about them helps you pick the best line for your pole.
Types Of Fishing Line
Fishing lines come in several types. Each has unique features that suit different fishing styles and conditions.
- Monofilament:A single strand of nylon. It is flexible and easy to handle.
- Fluorocarbon:Nearly invisible underwater and resists abrasion well.
- Braided:Made of many fibers woven together. It is very strong and thin.
Line Strength And Thickness
Line strength is called “pound test.” It shows how much weight the line can hold before breaking.
| Line Type | Strength Range (lbs) | Thickness (inches) |
| Monofilament | 2 – 30 | 0.008 – 0.035 |
| Fluorocarbon | 4 – 40 | 0.009 – 0.040 |
| Braided | 10 – 80 | 0.006 – 0.030 |
Thicker lines are stronger but harder to cast. Thin lines cast better but break easier.
Matching Line To Fish Species
Different fish need different line strengths. Use the right line to avoid losing fish or breaking gear.
- Small fish (like trout): Use light lines, 2 to 6 lbs.
- Medium fish (like bass): Use medium lines, 8 to 15 lbs.
- Large fish (like catfish): Use strong lines, 20 lbs or more.

Credit: www.youtube.com
Prepare Your Fishing Pole
Preparing your fishing pole before putting the line on is important. It makes fishing easier and keeps your gear safe.
Start by checking the pole and reel. Clean the parts and make sure everything works well.
Inspect The Pole And Reel
Look over the fishing pole for any cracks or damage. Check the reel for smooth spinning. Make sure the handle turns without sticking.
Clean The Reel Spool
Remove old line and dirt from the reel spool. Use a soft cloth and mild cleaner if needed. Dry the spool before adding new line.
- Take off the reel spool carefully
- Wipe off dirt and dust
- Check for rust or damage
- Let it dry completely
- Put the spool back on the reel
Check Guides And Tips
Inspect the guides and tip of the pole for cracks or bends. Damaged guides can cut the line. Replace or fix any broken parts.
| Part | What to Check | Action |
| Guides | Cracks, bends, smoothness | Replace or smooth rough edges |
| Tip | Secure fit, no damage | Fix or replace if loose or cracked |
| Reel | Spool cleanliness, smooth rotation | Clean and lubricate if needed |
Attach The Line To The Reel
Attaching the fishing line to the reel is an important step before you start fishing. It keeps your line secure and ready for casting.
Follow the right method to tie the line so it stays strong and does not slip off the reel.
Tie The Arbor Knot
The arbor knot is the best knot to attach the line to the reel spool. It holds the line tight and prevents it from slipping.
- Wrap the line around the reel spool.
- Tie an overhand knot around the main line.
- Make a second overhand knot at the tag end.
- Pull both knots tight against the spool.
- Trim the tag end close to the knot.
Secure The Line Properly
After tying the arbor knot, make sure the line is wound evenly on the reel. This prevents tangles and helps smooth casting.
| Tip | Reason |
|---|---|
| Keep tension on the line while winding | Prevents loose coils that cause tangles |
| Wind the line evenly across the spool | Ensures smooth line release during casting |
| Fill the spool to about 1/8 inch from the edge | Avoids overfilling that leads to line breakage |
Credit: n1outdoors.com
Spool The Line Onto The Reel
Putting fishing line on your pole is an important skill. It helps your fishing line last longer and work better.
Spooling the line correctly avoids problems like tangles and breaks. This guide covers key tips for spooling the line well.
Maintain Proper Tension
Keep steady tension on the line as you spool it. This helps the line wind tightly and evenly on the reel.
- Hold the line firmly with your fingers or a cloth
- Ask someone to hold the spool if needed
- Turn the reel slowly to keep tension steady
- Do not let the line go loose or slack
Avoid Line Twists And Overlap
Line twists cause tangles and knots. Overlapping line can cause uneven spooling and damage.
| Problem | Cause | How to Avoid |
|---|---|---|
| Line Twist | Line spins as it spools | Keep line tight and reel in smoothly |
| Overlap | Line crosses over itself | Guide line evenly across the spool |
Fill The Spool Correctly
Fill the spool with the right amount of line. Too little line reduces casting distance. Too much line can cause tangles.
- Check your reel’s line capacity
- Stop filling when line is about 1/8 inch below spool edge
- Leave some space so line moves freely
Thread The Line Through Guides
Putting fishing line on your pole is easier when you thread it through the guides correctly. The guides help the line flow smoothly during casting and reeling.
Follow these tips to thread the line properly and avoid tangles or damage.
Start From The Bottom Guide
Begin threading the line at the bottom guide near the reel. This guide is usually the largest and closest to the reel seat.
Pull the line through this guide first to keep it steady. This step helps maintain tension and control as you work up the pole.
Pass Through Each Guide Smoothly
Thread the line through each guide moving from the bottom to the tip of the pole. Take your time to avoid catching or twisting the line.
- Hold the pole steady and pull the line gently.
- Pass the line through each guide one by one.
- Check that the line sits in the center of each guide.
- Keep the line tight but not too tight to avoid damage.
- Inspect the guides for cracks or rough spots before threading.
Finish The Setup
After spooling the fishing line onto your pole, you need to complete the setup. This includes attaching the leader or hook and testing the line. These steps ensure smooth casting and better control while fishing.
Tie On The Leader Or Hook
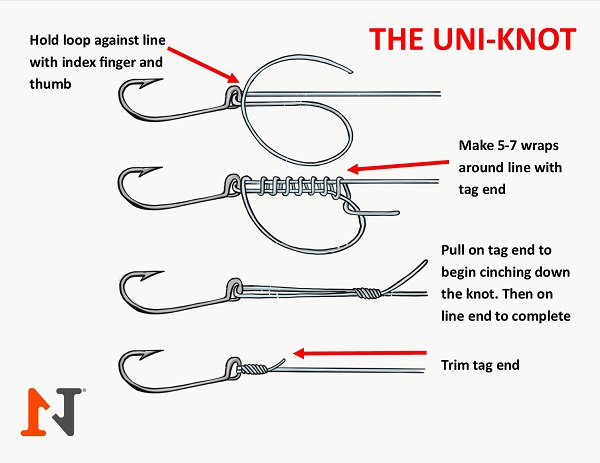
Secure the leader or hook to the end of the fishing line with a strong knot. A good knot prevents the hook from slipping off during casting or fighting a fish.
- Thread the line through the eye of the hook or leader.
- Wrap the line around itself 5 to 7 times.
- Pass the end of the line through the loop near the eye.
- Moisten the knot with water or saliva to reduce friction.
- Pull the knot tight and trim the excess line.
Test The Line For Smooth Casting
Before fishing, check that the line runs smoothly through the guides. This reduces snags and improves casting distance and accuracy.
| Test | What to Check | Action if Problem Found |
| Pull Line | Line moves without resistance | Adjust spool tension |
| Cast Slowly | Line flows freely through guides | Lubricate guides or remove tangles |
| Hook Attachment | Knot is tight and secure | Retie knot properly |
Common Mistakes To Avoid
Putting fishing line on a pole seems simple but can be tricky. Many beginners make mistakes that cause problems while fishing.
Knowing what to avoid helps keep your line strong and ready for the catch. Here are some common errors to watch out for.
Overfilling The Spool
Overfilling the spool can cause tangles and knots. Too much line leaves no room for smooth casting or reeling.
It is best to fill the spool about 1/8 inch below the edge. This space helps the line move freely without snags.
- Fill the spool to just below the rim
- Avoid packing the line too tight
- Leave space for line movement
Incorrect Knot Tying
Tying the wrong knot or tying it poorly weakens the line. A bad knot can slip or break when reeling in a fish.
Use simple, strong knots like the improved clinch knot. Make sure to wet the line before tightening the knot to avoid damage.
- Choose strong, reliable knots
- Wet the line before tightening
- Check knots for tightness and neatness
Ignoring Line Maintenance
Fishing line wears out from sun, salt, and abrasion. Ignoring maintenance reduces line strength and causes breaks.
Regularly check your line for cracks or frays. Replace old line and clean it after saltwater fishing to keep it in good shape.
- Inspect line before each fishing trip
- Replace damaged or old line promptly
- Clean line after saltwater exposure

Credit: www.youtube.com
Frequently Asked Questions
How Do You Choose The Right Fishing Line?
Choosing the right fishing line depends on your target fish and fishing environment. Monofilament is versatile and affordable. Fluorocarbon is nearly invisible underwater, ideal for clear water. Braided line offers strength and durability for heavy cover.
What’s The Best Knot For Attaching Fishing Line?
The Palomar knot is ideal for attaching the fishing line. It’s simple and reliable, offering excellent strength. First, double the line, pass it through the hook eye, and tie an overhand knot. Then, pass the loop over the hook and tighten.
How Often Should You Replace Your Fishing Line?
Replace your fishing line at least once a year. Frequent fishing or exposure to sunlight may require more frequent changes. Check for frays, nicks, or discoloration. Regular maintenance ensures optimal performance.
What Is The Ideal Line Length On A Fishing Reel?
Fill your fishing reel with line about 1/8 inch below the spool lip. This prevents tangles and ensures smooth casting. Overfilling or underfilling can lead to casting issues.
Conclusion
Putting fishing line on your pole is simple with practice. Start slow and follow each step carefully. Check the line for knots or twists before you begin. Keep the tension steady while winding the line. This helps avoid tangles and makes casting easier.
Regularly inspect your line for wear and replace it as needed. With patience, your fishing setup will be ready for a great day on the water. Enjoy the process and happy fishing!