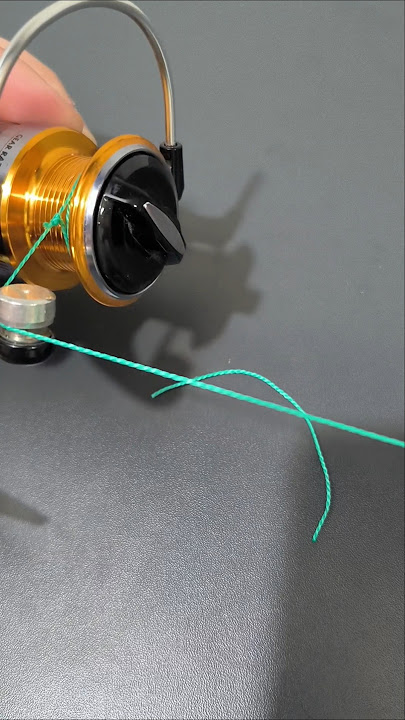
Tying a fishing line on a reel might seem simple, but doing it the right way can make all the difference in your fishing experience. If your line isn’t secure, you risk losing fish or dealing with frustrating tangles.
You want your setup to be strong, smooth, and reliable every time you cast. In this guide, you’ll learn easy steps to tie your fishing line correctly, so you can spend less time fixing knots and more time enjoying your time on the water.
Ready to improve your fishing skills? Let’s get started!
Choosing The Right Line
Choosing the right fishing line is key for a good fishing experience. The line affects casting, bait presentation, and fish landing.
Different fishing lines work best for different reels and fish types. Learn how to pick the right line for your reel.
Types Of Fishing Lines
There are mainly three types of fishing lines: monofilament, fluorocarbon, and braided lines. Each type has unique features.
- Monofilament:Stretchy and easy to handle, good for beginners.
- Fluorocarbon:Nearly invisible underwater, sinks faster.
- Braided:Very strong and thin, with little stretch.
Matching Line To Reel
Each reel type needs a compatible line type and size for best performance. Spinning reels handle lighter lines well.
Baitcasting reels work better with thicker, stronger lines like braided lines. Make sure line fits spool capacity and reel design.
| Reel Type | Recommended Line Type | Notes |
| Spinning | Monofilament or Fluorocarbon | Good for light to medium fishing |
| Baitcasting | Braided or Monofilament | Handles heavier lines well |
| Spincast | Monofilament | Easy to use, best for beginners |
Line Strength And Flexibility
Line strength is measured by test weight, the max weight a line can hold without breaking. Choose strength based on target fish.
Flexibility helps with casting distance and knot strength. Softer lines tie better knots and cast smoothly.
- Use light lines for small fish and clear water.
- Use medium lines for general fishing situations.
- Use heavy lines for big fish or rough conditions.
Preparing The Reel
Getting your reel ready is the first step before tying a fishing line. Proper preparation helps the line stay secure and prevents tangles. Follow these simple steps to prepare your reel well.
Cleaning and checking the reel parts make the process easier. A clean reel works smoothly and lasts longer.
Cleaning The Reel
Remove dirt, dust, and old grease from your reel before tying the line. Use a soft cloth and mild cleaner to wipe the surface. Avoid harsh chemicals that can damage the reel parts.
- Wipe the reel body and handle with a damp cloth.
- Clean the spool area carefully to remove debris.
- Apply a small amount of reel oil on moving parts.
- Let the reel dry completely before use.
Opening The Reel Spool
Open the spool so you can tie the line properly. Most reels have a drag knob or a button to release the spool. Check your reel’s manual if unsure.
| Reel Type | How to Open Spool |
|---|---|
| Spinning Reel | Turn drag knob counterclockwise to loosen |
| Baitcasting Reel | Press spool release button or pull spool |
| Spin-Cast Reel | Open cover and pull spool outward |
Securing The Reel
Hold the reel steady on your fishing rod before attaching the line. Tighten the reel seat to prevent movement. This step keeps your reel in place while fishing.
- Place the reel foot into the rod reel seat.
- Turn the seat locking ring clockwise.
- Check that the reel does not wobble.
- Adjust tightness if needed for a firm hold.
Basic Knots For Tying Line
Tying a fishing line to your reel needs a strong and secure knot. Good knots keep your line from slipping or breaking. Learning simple knots helps you fish with confidence.
Below are three basic knots that are easy to tie. They work well for most fishing lines and reels.
Improved Clinch Knot
The Improved Clinch Knot is a popular choice for anglers. It holds tight and is easy to tie. This knot works best with monofilament and fluorocarbon lines.
To tie it, pass the line through the reel’s eye. Wrap the tag end around the main line five to seven times. Then, thread the tag end through the loop near the eye. Pull the knot tight and trim the excess line.
- Pass line through reel eye
- Wrap tag end 5-7 times
- Thread tag end through loop
- Tighten knot and trim excess
Palomar Knot
The Palomar Knot is strong and simple. It works well with braided and monofilament lines. This knot keeps good strength and is less likely to slip.
Double about six inches of line and pass the loop through the reel eye. Tie an overhand knot with the doubled line. Pass the reel through the loop and pull tight. Trim the tag end.
- Double the line and pass loop through eye
- Tie an overhand knot
- Pass reel through the loop
- Pull tight and trim tag end
Uni Knot
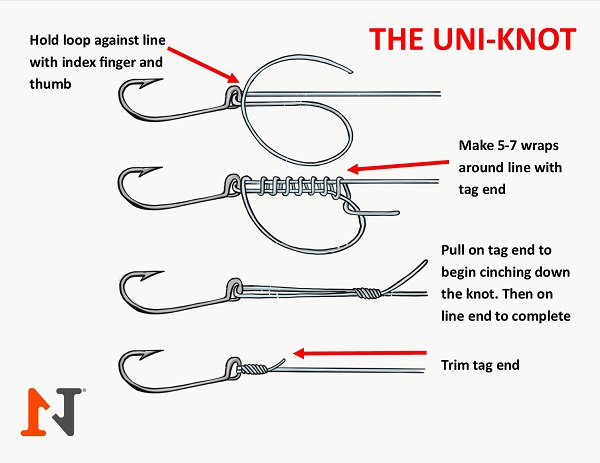
The Uni Knot is versatile and easy to tie. It works with many lines and is great for attaching the line to the reel spool. This knot holds well under tension.
Pass the line through the reel eye and double back. Form a loop and wrap the tag end around the main line five to six times. Pull the tag end to tighten the coils. Slide the knot down to the eye and pull tight.
- Pass line through reel eye and double back
- Make a loop and wrap tag end 5-6 times
- Tighten coils by pulling tag end
- Slide knot to eye and pull tight
Step-by-step Line Attachment
Tying a fishing line onto your reel is a key skill for fishing. It ensures the line stays secure and ready to cast. This guide will help you attach the line properly.
Follow these steps carefully to avoid losing fish or damaging your gear. Each part of the process is important for a strong setup.
Threading The Line Through The Reel
Start by pulling the line from the spool. Pass it through the guides on your fishing rod. Then thread it through the reel’s line roller. Make sure the line is straight and not twisted.
- Open the bail arm of the reel.
- Pass the line through the rod guides starting from the tip.
- Thread the line through the reel’s line roller.
- Close the bail arm to secure the line.
Tying The Knot
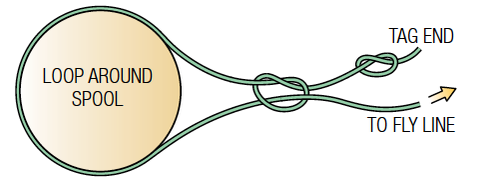
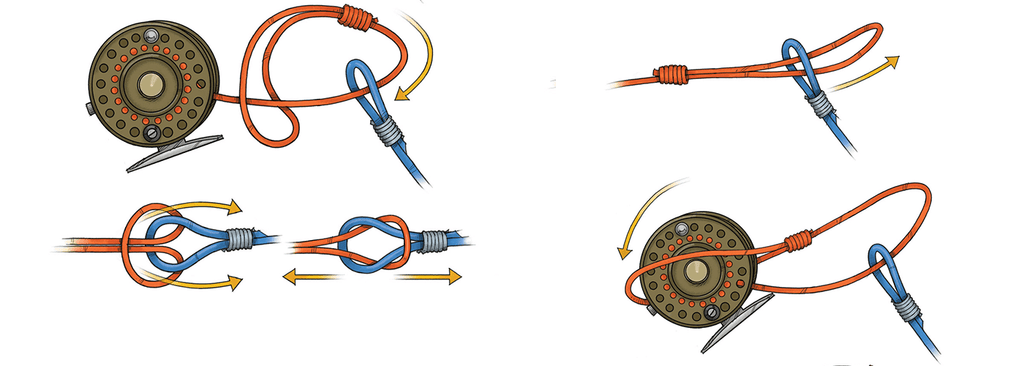
Use a strong knot to attach the line to the reel spool. The Arbor knot works well. It holds tight and is easy to tie.
- Wrap the line around the spool.
- Tie an overhand knot around the main line.
- Tie a second overhand knot at the tag end.
- Pull both knots tight against the spool.
- Trim the excess line close to the knot.
Securing The Line On The Spool
After tying the knot, spool the line evenly. Keep tension on the line to avoid loose loops. This prevents tangles and helps casting.
| Tip | Reason |
| Keep line tight while spooling | Prevents tangles and loose loops |
| Fill spool 1/8 inch from edge | Allows smooth line release |
| Check knot tightness | Ensures line does not slip |
Spooling The Line Properly
Tying a fishing line on a reel needs careful spooling. Proper spooling helps your fishing line last longer and work better.
This guide explains how to spool the line properly to avoid problems like tangles and twists.
Maintaining Tension
Keep the fishing line tight while spooling it on the reel. Tension stops the line from wrapping loosely or unevenly.
You can hold the line between your fingers to keep steady pressure. This helps the line lay flat and neat on the spool.
Avoiding Twists And Tangles
Line twists cause tangles and knots. To avoid twists, let the line unwind from the spool naturally as you spool it.
Check that the line flows straight from the spool to the reel. If the line twists, stop and fix it before continuing.
- Use a swivel to reduce line twists
- Let the line spin freely off the supply spool
- Stop and remove any twists immediately
Filling The Spool Correctly
Fill the spool so the line is close to the edge but not over it. Overfilling causes tangles and casting problems.
Leave a small gap to prevent the line from slipping off. A properly filled spool helps your fishing line last longer.
- Fill to about 1/8 inch from the spool edge
- Check the line level often while spooling
- Adjust tension to keep the line tight and even
Credit: monsterbass.com
Testing The Knot Strength
After tying a fishing line on a reel, testing the knot is important. This ensures the knot will hold under pressure.
Strong knots prevent losing fish and protect your gear from damage.
Pulling The Line
Pull the line firmly but slowly away from the reel. This action tests the knot’s hold against tension.
Feel for any slipping or loosening as you increase the pull force.
Checking For Slippage
Watch the knot area closely while pulling. Look for these signs of slippage:
- The knot moving along the line
- Line strands shifting inside the knot
- Visible gaps or looseness forming
Re-tying If Necessary
If you spot slippage or weak tension, re-tie the knot. Use these tips to improve strength:
| Action | Reason |
|---|---|
| Use more wraps around the spool | Increases friction to hold the knot |
| Moisten the line before tightening | Prevents damage and helps tighten evenly |
| Pull the knot tight slowly | Ensures a firm and secure knot |
Tips For Knot Maintenance
Keeping your fishing line knots in good shape helps prevent line breaks. Proper care makes your fishing more reliable and safe.
Regular checks and cleaning can extend the life of your knots. Follow these simple tips to keep your knots strong and secure.
Regular Inspection
Look at your knots before and after each fishing trip. Check for any signs of wear, fraying, or loosening. Replace knots if you find damage.
Replacing Old Line
Old fishing line loses strength and can cause knots to fail. Change your line regularly to avoid unexpected breaks. Pay attention to discoloration and stiffness.
- Remove the old line from your reel
- Choose a new line with the right strength for your fishing
- Tie fresh knots securely on the new line
- Test the knots with a firm pull before fishing
Keeping Knots Clean And Tight
Dirt and debris weaken knots and cause slippage. Keep your knots clean and wet before tightening them firmly. Avoid over-tightening which can cut the line.
| Do | Don’t |
| Rinse knots with fresh water after use | Use dry knots without wetting |
| Pull knots tight slowly and evenly | Pull knots too fast or roughly |
| Check knots for dirt and clean gently | Ignore dirt buildup on knots |
Credit: www.epicflyrods.com
Credit: n1outdoors.com
Frequently Asked Questions
How Do I Start Tying A Fishing Line?
Begin by selecting the appropriate fishing line for your reel. Thread the line through the rod guides. Create an arbor knot around the spool of the reel. Tighten it securely, ensuring no slack remains. Wind the line evenly onto the spool while maintaining tension.
This ensures a smooth, tangle-free fishing experience.
What Knot Should I Use For A Reel?
The Arbor Knot is ideal for tying a fishing line to a reel. It is simple and secure, preventing slippage. To tie it, make an overhand knot around the main line. Tie another knot at the tag end. Pull tight to secure the line on the reel.
How Do I Prevent Line Twists?
To prevent line twists, spool the line under tension and avoid overfilling the reel. Ensure the line is evenly distributed across the spool. Use a swivel to reduce twists while casting. Regularly check for and remove any tangles or knots.
Proper maintenance ensures a smooth fishing experience.
How Much Line Should I Put On A Reel?
Fill the reel spool to about 1/8 inch below the rim. This prevents overfilling and reduces tangles. Too much line can lead to knots and casting issues. Ensure the line is evenly distributed. Follow the reel manufacturer’s recommendations for optimal performance and a hassle-free fishing experience.
Conclusion
Tying a fishing line on a reel is simple with practice. Start slow and follow each step carefully. A secure knot keeps your line strong and ready. Check your work before you start fishing. This small skill helps catch more fish and enjoy your time.
Keep trying, and it will get easier fast. Fishing becomes more fun with the right setup. Don’t rush; patience makes a big difference. Now you can prepare your reel with confidence. Ready to cast and enjoy the water!