Are you worried about your car’s safety but don’t want to spend a fortune on professional installation? Installing a car alarm yourself might be easier than you think.
Imagine having full control over your car’s security without waiting for a technician or paying high fees. In this guide, you’ll discover simple steps to set up a reliable car alarm that protects your vehicle and gives you peace of mind.
Keep reading to find out how you can boost your car’s security quickly and affordably—right from your own garage.
Benefits Of A Diy Car Alarm
Installing a car alarm by yourself can save money and time. It also lets you choose features that fit your needs.
A DIY car alarm is a smart choice for people who want control over their car’s security. It is easy to learn and apply.
Cost Savings
Buying and installing a car alarm yourself costs less than hiring a professional. You avoid extra fees for labor.
DIY kits are often affordable and come with clear instructions. This helps you save money without losing quality.
- Lower purchase price
- No installation fees
- Less expensive repairs
Customization Options
When you install your own alarm, you can pick exactly what features you want. This lets you build a system that suits your car.
You can add sensors, choose alert sounds, or connect with your phone. Customizing means better protection for your vehicle.
- Select specific sensors
- Choose alarm tones
- Integrate with mobile apps
Quick Installation
DIY car alarms come with simple guides. Most people can install them in a short time, often under an hour.
Fast installation means less hassle and you can protect your car right away. No need to wait for a technician.
- Clear instructions included
- Minimal tools needed
- Protect your car quickly
Choosing The Right Alarm System
Installing a car alarm yourself saves money and adds security. Picking the right system is key for good protection.
Different alarms offer various features. Knowing what fits your needs helps you choose well.
Types Of Car Alarms
Car alarms come in several forms. Each type has its own way to warn you and stop thieves.
- Shock Sensor Alarms: Triggered by bumps or hits on the car.
- Motion Sensor Alarms: Detect movement inside or around the vehicle.
- Glass Break Sensors: React to the sound or vibration of breaking glass.
- GPS Tracking Alarms: Help find your car if it is stolen.
Features To Look For
| Feature | Benefit |
| Remote Control | Arm or disarm the alarm from a distance |
| Shock Sensor | Detects impacts on the car |
| LED Indicator | Shows if the alarm is active |
| Backup Battery | Keeps the alarm working if power is cut |
| Silent Mode | Alerts owner without loud siren |
Make sure the alarm has the features you want. Some add safety but cost more.
Compatibility With Your Vehicle
Not all alarms fit every car. Check if the system works with your vehicle’s make and model.
- Check your car’s electrical system type.
- Confirm the alarm supports your car’s battery voltage.
- Look for alarms that fit your car’s wiring setup.
- See if the system can connect to your car’s existing remote.
Tools And Materials Needed
Installing a car alarm by yourself needs the right tools and materials. Using proper equipment helps make the job easier and safer.
This guide lists the basic tools, alarm kit components, and safety gear you need for a smooth installation.
Basic Tools
You need some common tools to install a car alarm. These tools help with wiring and mounting the alarm system parts.
- Screwdrivers (flathead and Phillips)
- Wire strippers and cutters
- Electrical tape
- Multimeter for voltage testing
- Drill with drill bits
- Pliers and wrenches
- Zip ties for cable management
Alarm Kit Components
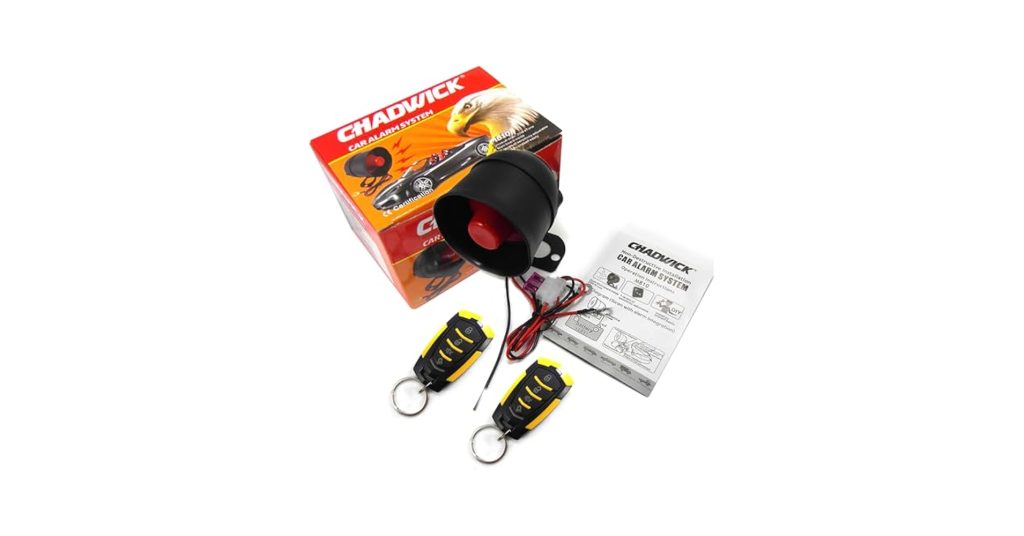
The alarm kit comes with several parts. Knowing these parts helps you organize the installation.
| Component | Description |
| Control Module | Main unit controlling the alarm system |
| Siren | Produces loud sound when alarm triggers |
| Sensors | Detects door openings and movement |
| Wiring Harness | Connects all parts to the car power and controls |
| Remote Controls | Used to arm and disarm the alarm |
| LED Indicator | Shows alarm status on the dashboard |
Safety Gear
Wear safety gear to protect yourself during the installation. Car wiring can be risky if not handled well.
- Insulated gloves to avoid electric shock
- Safety glasses to protect your eyes
- Long sleeve shirt to prevent scratches
- Work boots for foot protection

Credit: www.amazon.ca
Preparing Your Vehicle
Installing a car alarm yourself needs careful preparation. Getting your vehicle ready helps the process go smoothly.
Start by making sure you understand the parts of your car you will work on. This keeps you safe and protects your car.
Locating Wiring
Find the wires you need before starting the alarm installation. Look under the dashboard and near the steering column.
Use your car’s manual or wiring diagram to identify the correct wires. This helps avoid mistakes and damage.
- Check for power wires for the ignition
- Locate wires for door sensors
- Identify ground wires
Disconnecting The Battery
Before you touch any wires, disconnect your car battery. This stops electrical shorts and keeps you safe.
Use a wrench to remove the negative cable first. Then remove the positive cable. Keep them apart while you work.
- Wear gloves and eye protection
- Remove negative cable first
- Keep cables away from battery terminals
Cleaning Work Area
Clear the area where you will install the alarm. Remove dust, dirt, and any loose parts.
A clean workspace helps you find small parts and prevents damage to wires or connections.
- Use a cloth to wipe surfaces
- Remove trash and tools not in use
- Keep a small container for screws and clips
Step-by-step Installation
Installing a car alarm yourself saves money and gives you control. Follow these simple steps to set up your alarm system correctly.
Take your time and make sure each connection is secure. This guide will help you mount, connect, and test your alarm.
Mounting The Alarm Unit
Find a hidden spot under the dashboard to mount the alarm unit. It should be out of reach and not visible from outside.
Use screws or double-sided tape to fix the unit firmly. Avoid areas that get wet or hot.
- Choose a dry, secure location
- Keep it away from moving parts
- Mount the unit firmly to avoid vibrations
Connecting The Wires
Identify the wires for power, ground, and sensors. Match the wires from the alarm to the car’s wiring system.
Use wire connectors or solder to join wires. Cover connections with electrical tape to prevent shorts.
- Connect red wire to constant power
- Attach black wire to a clean ground point
- Connect sensor wires as per instructions
- Secure all connections with tape or heat shrink
Testing The System
Turn on your car and activate the alarm to check if it works. Test all sensors like door, hood, and shock sensors.
If the alarm sounds when a sensor is triggered, installation is successful. If not, recheck your wiring and connections.
- Arm the alarm system
- Open doors and hood to trigger sensors
- Check for alarm sounds and flashing lights
- Fix any issues before finalizing installation
Troubleshooting Common Issues
Installing a DIY car alarm can keep your vehicle safe. Sometimes, problems can happen. Troubleshooting helps fix these issues quickly.
This guide covers common problems you may face with your car alarm. Follow these tips to solve them easily.
Alarm Not Arming
Your car alarm may fail to arm for several reasons. Check if the remote battery is weak or dead first.
Make sure all doors, trunk, and hood are fully closed. The alarm won’t arm if any are open or not properly closed.
- Replace the remote battery if the LED is dim or not lighting
- Check door and hood sensors for dirt or damage
- Ensure all doors are shut tightly
- Look for blown fuses in the alarm system
False Alarms
False alarms happen when the system triggers without real danger. This can annoy you and others nearby.
Common causes include vibration, faulty sensors, or electrical interference. Inspect these areas first.
- Check shock sensors and adjust their sensitivity
- Clean sensors to remove dust or dirt
- Avoid parking near loud or vibrating machines
- Look for loose wiring that may cause false signals
Power Problems
Power issues can stop the alarm from working at all. Check the car battery and alarm wiring first.
Loose or corroded connections can cause power loss. Make sure all cables are secure and clean.
- Test the car battery voltage to ensure it is strong
- Inspect alarm wiring for cuts or loose ends
- Clean battery terminals and cable ends
- Replace blown fuses in the alarm circuit
Maintaining Your Car Alarm
Keeping your car alarm in good condition helps protect your vehicle. Regular maintenance stops problems before they start.
Simple checks and updates make sure your alarm works when you need it most.
Regular Testing
Test your car alarm every month. This ensures all parts work correctly. Pay attention to sounds and lights.
Try activating the alarm and check if it responds fast. Fix any delays or weak signals.
- Press the alarm button to trigger the sound
- Look for flashing lights on your car
- Check the remote control’s range
- Listen for unusual noises or delays
Battery Replacement
Replace the alarm battery every year or as needed. A weak battery can cause failures.
Use the battery type recommended by the alarm maker. Dispose of old batteries safely.
- Open the alarm case carefully
- Remove the old battery
- Insert a new battery of the same type
- Close the case and test the alarm
Software Updates
Check for software updates for your car alarm system. Updates fix bugs and improve performance.
Follow the manufacturer’s instructions to install updates safely. Keep your alarm system current.
- Visit the alarm maker’s website
- Download the latest software version
- Connect your alarm to a computer or app
- Install the update and restart the alarm
Credit: www.subaruoutback.org

Credit: www.crutchfield.com
Frequently Asked Questions
How Do I Install A Diy Car Alarm?
Installing a DIY car alarm involves several steps. Begin by identifying the alarm components and wiring. Then, follow the manufacturer’s instructions to connect the wiring and mount the sensors. Finally, test the system to ensure it’s functioning properly. Always refer to the user manual for specific installation guidelines.
What Tools Are Needed For Car Alarm Installation?
Basic tools like screwdrivers, pliers, and wire strippers are essential. You may also need a drill and multimeter. Ensure you have the specific tools required for your car’s model. Having these tools ready will make the installation process smoother and more efficient.
Can I Install A Car Alarm Without Professional Help?
Yes, many car alarms come with comprehensive installation guides. These guides are designed for DIY enthusiasts. By following the instructions carefully, you can successfully install the alarm yourself. However, if you’re uncertain, consulting a professional is recommended to avoid any potential issues.
What Are The Benefits Of A Diy Car Alarm?
A DIY car alarm can save you installation costs. It also allows customization to suit your specific needs. Additionally, understanding the system enhances your ability to troubleshoot issues. DIY projects can also be rewarding, providing a sense of accomplishment upon successful installation.
Conclusion
Installing a car alarm yourself saves money and adds security. You gain control over your vehicle’s safety. The process is simple with clear steps. Basic tools and patience make it easier. Protect your car and feel more confident. Small effort leads to big peace of mind.
Start your DIY car alarm project today.