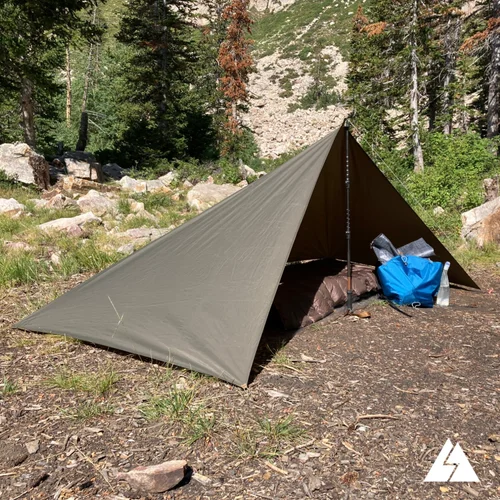
Looking to create a quick, reliable shelter without spending a lot of money? Learning how to make a tent out of a tarp is a skill that can save you time, money, and stress during your outdoor adventures.
Whether you’re camping, hiking, or facing unexpected weather, a tarp tent offers lightweight protection that’s easy to set up. In this guide, you’ll discover simple steps and practical tips to build your own tarp tent—giving you the confidence to stay dry and comfortable no matter where you are.
Keep reading, and you’ll be ready to master this essential outdoor hack in no time.
Choosing The Right Tarp
Making a tent from a tarp is easy if you pick the right tarp first. The right tarp keeps you dry and safe.
Look at the tarp’s material, size, and waterproof qualities before buying. These affect how well your tent works.
Material Options
Tarp materials vary in weight and strength. Choose a material that suits your camping style.
Common materials include polyethylene, canvas, and nylon. Each has good and bad points.
- Polyethylene:Cheap, waterproof, but heavier.
- Canvas:Durable, breathable, but not fully waterproof.
- Nylon:Lightweight, strong, often with waterproof coating.
Size Considerations
The tarp size changes how much space you get inside the tent. Bigger tarps give more room.
Think about how many people will use the tent. Also, add extra space for gear.
- Small tarp (6×8 feet): Good for one person.
- Medium tarp (8×10 feet): Fits two people comfortably.
- Large tarp (10×12 feet or more): Great for groups or extra gear.
Waterproof Features
Waterproof tarps protect you from rain and wind. Look for tarps with strong waterproof coatings.
Check if the tarp has sealed edges or taped seams. These stop water from leaking in.
- Polyethylene tarps are usually waterproof by nature.
- Nylon tarps often have waterproof coatings like polyurethane.
- Canvas tarps may need extra treatment to be waterproof.
- Sealed or taped seams improve waterproofing.

Credit: www.youtube.com
Essential Tools And Supplies
Making a tent out of a tarp needs some basic tools and supplies. These items help secure and support your tarp shelter. Having the right gear makes setup easier and stronger.
Below are key supplies you need to prepare your tarp tent. Each plays a specific role in keeping the tent stable and safe.
Rope And Paracord
Rope or paracord is essential for tying down your tarp. It helps create tension and holds the tarp in place. Choose rope that is strong and weather-resistant.
- Use paracord with at least 550-pound test strength.
- Bring extra rope for adjustments and repairs.
- Make sure the rope is lightweight and easy to handle.
- Consider reflective rope for better visibility at night.
Tent Stakes
Tent stakes anchor your tarp to the ground. They keep it from blowing away in wind. Different grounds need different types of stakes.
| Stake Type | Best For | Material |
| Metal Stakes | Hard or rocky soil | Steel or aluminum |
| Plastic Stakes | Soft ground or snow | Durable plastic |
| Wooden Stakes | Soft soil or grass | Wood |
| Y-Stakes | Loose or sandy soil | Aluminum or steel |
Poles And Support Options
Poles give your tarp structure and height. You can use different supports based on what you have. Some options need no poles at all.
- Camping poles are light and adjustable.
- Tree branches can work as natural supports.
- Backpack trekking poles are good for quick setup.
- Use sturdy sticks if no poles are available.
Selecting Your Campsite
Choosing the right spot is key to setting up your tarp tent safely and comfortably. A good campsite protects you from weather and keeps your gear dry.
Look around carefully before you start pitching your tarp. The area should be easy to access and free of problems that could spoil your trip.
Flat And Clear Ground
Pick a flat area to spread your tarp. Uneven ground makes it hard to sleep and can cause water to pool under your shelter.
- Clear away rocks, sticks, and debris
- Check for holes or roots that could poke through
- Use a ground tarp under your shelter for extra protection
Avoiding Hazards
Steer clear of dangers that could hurt you or damage your tarp. Look up and all around before you settle.
| Hazard | Why Avoid |
| Dead tree branches | They may fall and cause injury |
| Low-lying areas | Water can collect and flood your tent |
| Animal trails | Animals may pass through and disturb you |
| Steep slopes | Risk of sliding or rolling debris |
Wind Direction
Set up your tarp to block the wind as much as possible. Facing the narrow side towards the wind helps keep your shelter stable.
- Look at trees or smoke for wind clues
- Place the tarp’s lowest edge facing the wind
- Secure the tarp tightly to stop flapping
- Use natural windbreaks like bushes or rocks
Basic Tarp Tent Styles
Using a tarp to build a tent is a simple way to create shelter outdoors. Different styles fit different needs and environments. Learning these basic tarp tent styles helps you stay dry and comfortable.
Three common tarp tent styles are the A-Frame setup, the Lean-To shelter, and the Pyramid tent. Each style uses your tarp in a unique way to protect you from wind and rain.
A-frame Setup
The A-Frame setup is a classic tarp tent style. It uses a ridge line to create a roof that looks like the letter A. This style is strong and sheds rain well.
- Attach your tarp to a rope tied between two trees.
- Pull down the tarp edges and stake them into the ground.
- Adjust the height to control airflow and space inside.
Lean-to Shelter
The Lean-To shelter is simple and quick to set up. You lean the tarp against a solid support like a tree or pole. This creates one open side for easy access and good ventilation.
| Advantages | Disadvantages |
| Fast to build | Less protection from wind |
| Good ventilation | One open side |
| Uses natural supports | Needs a tree or pole |
Pyramid Tent
The Pyramid tent uses one central point to hold the tarp up. It forms a shape like a pyramid. This style gives good headroom and sheds rain well on all sides.
- Place a pole or stick in the center under the tarp.
- Pull the tarp edges outward and stake them to the ground.
- Tighten all sides for a stable shape.
Step-by-step Setup Guide
Making a tent from a tarp is a simple way to create shelter outdoors. You only need a tarp, some rope, and stakes.
This guide shows easy steps to set up your tarp tent quickly and safely.
Preparing The Tarp
Start by choosing a tarp that is large enough to cover your space. Lay it flat on the ground to check for holes or tears.
Fold or cut any loose strings hanging from the tarp edges. This helps avoid snags during setup.
Securing The Ridgeline
Find two strong points like trees or poles about the length of your tarp apart. Tie a rope tightly between them to make a ridgeline.
Make sure the ridgeline is high enough to stand under but low enough to keep the tarp tight.
- Use a strong knot like a taut-line hitch for adjustability
- Test the rope’s strength before adding the tarp
- Keep the ridgeline straight and firm
Anchoring The Corners
Drape the tarp over the ridgeline. Pull each corner tight and place a stake through the tarp’s grommet or edge loop.
Drive the stakes into the ground at an angle for better hold. Adjust the tension to remove sagging.
- Place stakes firmly in solid ground
- Keep the tarp edges taut to prevent flapping
- Check all corners for even tension

Credit: www.youtube.com
Tips For Stability And Weatherproofing
Making a tent from a tarp can be simple and effective. Stability and weatherproofing keep you safe and dry. Use the right methods to secure your tarp well.
These tips help your tarp tent stand strong in wind and rain. Small changes make a big difference in comfort outdoors.
Tightening The Tarp
Keep your tarp tight to avoid flapping and water pooling. Use tension on all sides. Tight tarps shed rain better and hold up in wind.
- Pull the tarp edges evenly for balance
- Tie knots firmly but leave some room for adjustment
- Check tension after rain or wind changes
- Use tarp grommets for secure tie points
- Adjust ropes to remove slack quickly
Using Guy Lines
Guy lines add extra support to your tarp tent. They stop it from moving or collapsing in strong wind. Attach them at corners and middle points.
| Guy Line Placement | Purpose |
| Front and Back Corners | Prevent side-to-side sway |
| Center Points | Keep tarp roof tight and stable |
| Extra Stakes | Anchor lines on soft ground |
| Adjustable Tensioners | Easily tighten or loosen lines |
Rain And Wind Protection
Protect your shelter from rain and wind with smart setup. Angle the tarp to let water run off. Block the wind by facing the tarp’s lowest edge into the wind.
- Set up tarp at a slant for water runoff
- Choose a natural windbreak like trees or rocks
- Use extra tarps on sides for wind blocking
- Secure edges close to the ground
- Check for leaks and patch holes quickly
Packing And Storage
Packing and storing your tarp tent properly helps it last longer. Clean and dry the tarp before packing it away. This prevents mold and damage.
Good folding and storage keep the tarp easy to use next time. Follow simple steps to keep it in top shape.
Cleaning The Tarp
Rinse off dirt and debris with clean water. Use mild soap if needed, but avoid harsh chemicals. Let the tarp dry completely before folding.
Folding Techniques
Folding your tarp neatly saves space and prevents wrinkles. Start by laying it flat and smoothing out wrinkles. Fold in halves or thirds to make a long, narrow shape.
- Fold the tarp lengthwise twice to reduce width
- Fold the tarp widthwise into smaller sections
- Keep folds consistent to avoid creases
- Roll tightly if you prefer to save space
Storage Tips
Store your tarp in a dry, cool place away from sunlight. Avoid placing heavy objects on top of it. Use a breathable bag or container to prevent moisture buildup.
| Storage Method | Benefits |
| Hanging on a hook | Prevents wrinkles and damage |
| Folding in a breathable bag | Keeps tarp dry and clean |
| Rolling tightly | Saves space in your backpack |
| Plastic container | Protects from pests and dirt |

Credit: m.youtube.com
Frequently Asked Questions
How Do I Choose The Right Tarp For A Tent?
Select a tarp made of durable, waterproof material like polyethylene or silnylon. Size should cover your sleeping area with extra for staking. Lightweight tarps are ideal for backpacking, while heavier ones suit car camping. Consider UV resistance and ease of setup for best results.
What Basic Tools Do I Need To Make A Tarp Tent?
You need sturdy rope or paracord, tent stakes, and a tarp. Optional tools include a mallet for stakes and carabiners for secure attachments. These items help create tension and stability, ensuring your tarp tent withstands wind and rain effectively.
How Do I Set Up A Tarp Tent In Windy Conditions?
Anchor all corners securely with stakes and use strong guy lines. Position the tarp low to the ground to reduce wind impact. Use natural windbreaks like trees or rocks for extra protection. Tighten all lines to maintain a stable, safe shelter.
Can I Make Different Tent Shapes With One Tarp?
Yes, a tarp can be configured into various tent shapes like A-frame, lean-to, or diamond. Adjust rope lengths and staking points to create different shelters. This versatility allows you to adapt your setup to weather conditions and available space.
Conclusion
Making a tarp tent is simple and practical for camping. It saves space and weight compared to regular tents. You only need a tarp, some rope, and stakes. This method works well in many weather conditions. Try different setups to find what suits you best.
Keep practicing to set it up quickly. Enjoy your outdoor adventure with a tarp tent. It offers shelter and freedom at the same time. Ready to try it on your next trip?