Have you ever struggled to see what’s behind your car while parking or reversing? Installing a backup camera can change that instantly.
It makes driving safer and gives you peace of mind every time you back up. In this guide, you’ll learn exactly how to put a backup camera on your car step-by-step, even if you have little to no experience with car tech.
By the end, you’ll feel confident adding this smart feature yourself—and enjoy safer, easier driving every day. Ready to get started? Let’s dive in!
Credit: dashcamtalk.com
Choosing The Right Backup Camera
Adding a backup camera improves safety when reversing your car. Picking the right camera is important for good results.
This guide helps you understand different types of cameras and features to consider before buying.
Types Of Backup Cameras
There are several types of backup cameras. Each type fits different needs and car models.
- Wired Cameras:Connect directly to the car’s display. They offer stable video but need more installation work.
- Wireless Cameras:Use radio signals to send video. Easier to install but may face interference.
- Flush Mount Cameras:Installed inside the car’s bumper for a clean look.
- Surface Mount Cameras:Attach on the car’s surface. Easier to add but less hidden.
- License Plate Cameras:Mount around the license plate area. They are common and simple to install.
Key Features To Consider
Look at these features to choose a backup camera that fits your needs well.
- Resolution:Higher resolution gives clearer images for better safety.
- Night Vision:Allows you to see well in low light or dark conditions.
- Wide Viewing Angle:Shows more area behind the car to avoid blind spots.
- Waterproof Rating:Protects the camera from rain and dirt.
- Guidelines:Some cameras show lines to help judge distance while reversing.
Budget And Quality Balance
Backup cameras come in many price ranges. Choose one that offers good quality for its cost.
Cheaper cameras may save money but could have lower image quality or durability. Higher-priced cameras often last longer and work better.
- Set a budget before shopping.
- Compare features in your price range.
- Read reviews to check reliability.
- Consider professional installation costs if needed.
Tools And Materials Needed
Installing a backup camera on your car needs the right tools and materials. Using the proper items makes the job easier and safer.
Below are the main tools and supplies you will need to complete the installation correctly.
Essential Tools
These tools help you mount the camera and connect it to your car’s electrical system.
- Screwdriver set (flat and Phillips heads)
- Wire stripper and cutter
- Drill with bits for mounting holes
- Multimeter to check voltage and connections
- Electrical tape to secure wires
- Panel removal tool to avoid damaging trim
Additional Supplies
These supplies support the installation and help protect the camera and wiring.
| Item | Purpose |
| Backup camera kit | Includes camera, wiring harness, and monitor |
| Zip ties | Keep wires organized and secure |
| Heat shrink tubing | Protects wire connections from moisture |
| Fuse tap | Allows safe connection to car’s fuse box |
| Silicone sealant | Prevents water from entering mounting holes |
Preparing Your Car
Installing a backup camera on your car starts with good preparation. It helps to get your car ready before you begin any work. This makes the installation easier and safer.
Focus on finding the right spot for the camera and making sure your car is clean and safe to work on. These steps will save time and prevent problems later.
Locating The Installation Area
Look for a flat area near the rear license plate. This spot is common and gives a clear view behind the car. Avoid places with heavy curves or parts that move.
- Check around the license plate bracket
- Find a spot with space for wiring
- Avoid areas with metal that can block signals
- Make sure the lens will not be blocked by the car trunk or bumper
Cleaning And Safety Measures
Clean the area well before installing the camera. Dirt and dust can cause the camera to stick poorly or give a bad view. Safety is also important to avoid injuries.
| Cleaning Supplies | Safety Tools |
| Microfiber cloth | Gloves |
| Mild soap and water | Safety goggles |
| Isopropyl alcohol | Mask (if working with dust) |
Installing The Backup Camera
Installing a backup camera improves safety when reversing your car. This guide explains how to mount the camera, run the wiring, and connect it to a power source.
Follow these steps carefully to ensure the camera works correctly and lasts a long time.
Mounting The Camera
Choose a good spot for your backup camera. Most people mount it above the license plate or near the rear bumper.
Clean the area well before attaching the camera. Use screws or strong double-sided tape to secure it firmly.
Running The Wiring
Carefully run the camera’s wiring from the rear of the car to the dashboard. Avoid sharp edges and moving parts.
- Remove interior panels to hide the wires.
- Route the cable along the car’s frame.
- Use zip ties to keep wires secure.
- Make sure the wire reaches the monitor or head unit in front.
Connecting To Power Source
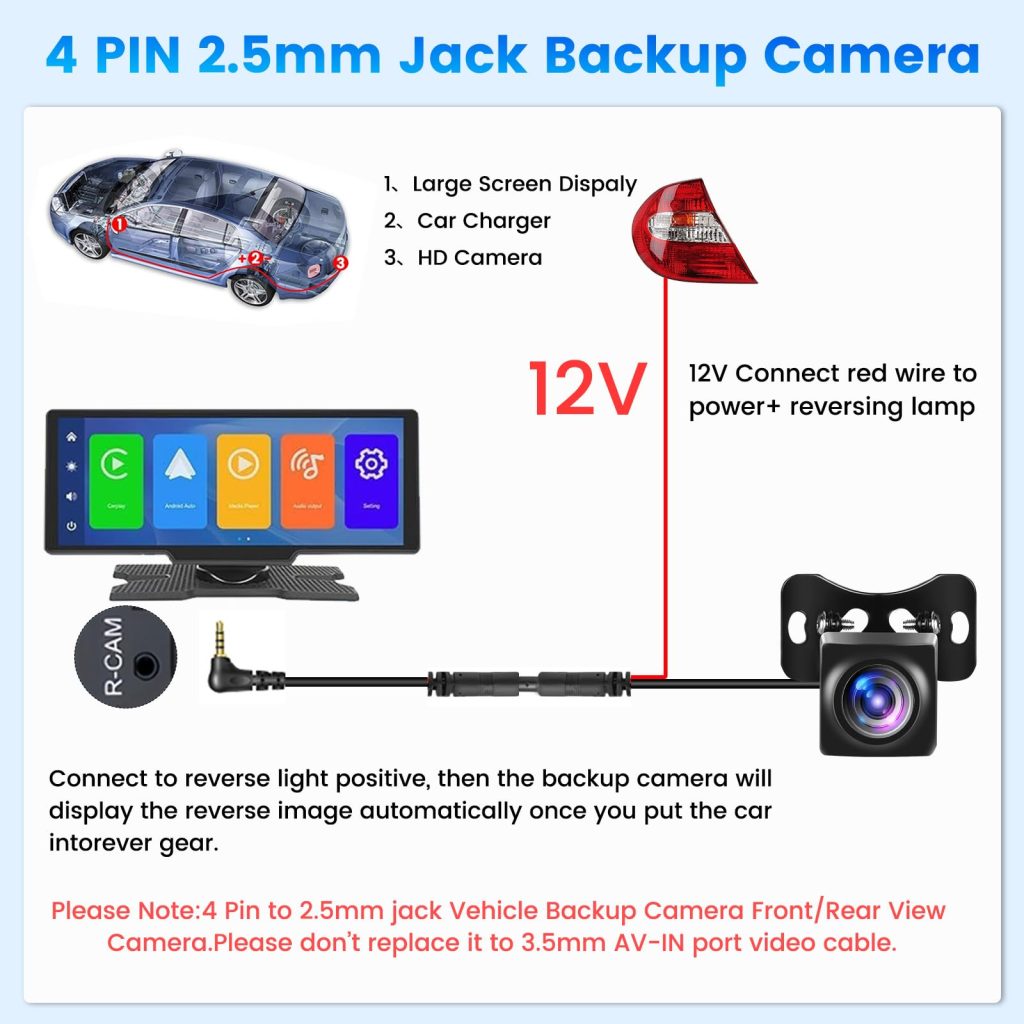
The camera needs power from the car’s electrical system. Connect its power wire to the reverse light wire.
| Wire | Connection Point | Purpose |
| Red (Power) | Reverse light positive wire | Turns camera on when reversing |
| Black (Ground) | Car chassis or negative battery terminal | Completes electrical circuit |
| Video cable | Monitor or head unit video input | Transmits video signal |
Test the camera by putting your car in reverse. The monitor should show the rear view clearly.
Connecting The Display Monitor
Connecting the display monitor is key to using a backup camera. The monitor shows the rear view while reversing.
This guide covers wiring the monitor and adjusting its screen settings for the best view.
Wiring To The Monitor
First, connect the backup camera video cable to the monitor’s video input. This cable sends the camera image.
Next, supply power to the monitor by connecting it to the car’s fuse box or cigarette lighter socket.
- Use the RCA cable to link camera to monitor
- Connect the monitor power wire to a 12V source
- Ground the monitor by attaching the black wire to a metal car part
- Secure all wires to avoid loose connections
Adjusting The Screen Settings
Turn on the monitor and check the image from the backup camera. Adjust brightness and contrast for clarity.
Set the screen angle so you can see the whole rear area easily. Adjust the guidelines if your monitor has them.
- Increase brightness if the image looks dark
- Adjust contrast to sharpen the picture
- Change screen angle to reduce glare
- Enable or disable parking lines as needed

Credit: www.youtube.com
Testing The System
After installing a backup camera on your car, it is important to test the system. Testing ensures the camera works correctly and shows a clear image. This step helps avoid problems when you rely on the camera while driving.
Testing covers checking the camera angle, verifying the image quality, and fixing common issues. Each part is important to get the best view from your backup camera.
Checking Camera Angle
Make sure the camera points in the right direction. The angle should show the area behind your car clearly. Adjust the camera if the view is too high, too low, or off to one side.
- Park your car on a flat surface.
- Look at the screen inside the car.
- Check if the camera shows the full area behind the car.
- Move the camera slowly to fix the angle if needed.
- Secure the camera once the angle is correct.
Verifying Image Quality
Image quality affects how well you see obstacles behind your car. Check if the picture is clear, bright, and shows colors correctly. Poor image quality can cause safety risks.
| Aspect | What to Check |
| Brightness | Is the screen too dark or too bright? |
| Focus | Are objects sharp and clear? |
| Color | Are colors natural and easy to distinguish? |
| Distortion | Is the image free of warping or blurriness? |
Troubleshooting Common Issues
If the camera does not work well, try simple fixes. Many problems come from loose connections or settings. Check cables and power first before looking for complex causes.
- Check if the camera cable is firmly connected.
- Make sure the car is in reverse gear to activate the camera.
- Clean the camera lens to remove dirt or water spots.
- Restart the car’s system to reset the camera view.
- Consult the camera manual for specific error codes or signals.
Tips For Maintenance And Care
Adding a backup camera to your car improves safety. Proper care keeps it working well. Follow simple tips to maintain and protect your camera.
This guide covers cleaning, software updates, and weather protection. Each step helps your camera last longer and stay clear.
Regular Cleaning
Clean the camera lens often. Dirt, dust, and grime block the view. Use a soft cloth with water or mild soap. Avoid harsh chemicals that can damage the lens.
- Wipe the lens gently to avoid scratches
- Remove any debris or bugs around the camera
- Check for water spots and dry the lens after rain
- Clean the camera at least once a week
Software Updates
Keep the backup camera system software up to date. Updates fix bugs and improve performance. Check the car or camera manual for update instructions.
- Connect your car to Wi-Fi or use a USB drive for updates
- Follow the on-screen prompts to install updates
- Restart the system after updates finish
- Verify the camera works properly after updating
Handling Weather Exposure
Weather affects backup cameras. Protect the camera from extreme conditions to avoid damage. Use covers or park in sheltered areas when possible.
| Weather Condition | Care Tip |
|---|---|
| Rain | Dry the lens to prevent water spots |
| Snow | Remove snow buildup gently with a soft cloth |
| Heat | Avoid direct sunlight for long periods |
| Dust | Clean lens frequently to maintain clear view |

Credit: www.youtube.com
Frequently Asked Questions
How Do I Install A Backup Camera On My Car?
To install a backup camera, first choose a compatible model. Mount it near the license plate. Connect the power to the reverse light. Run the video cable to the dashboard screen. Test the camera to ensure proper view and functionality.
What Tools Are Needed To Install A Backup Camera?
You will need a drill, screwdriver, wire stripper, electrical tape, and zip ties. A multimeter can help check electrical connections. These tools make installation easier and ensure a secure setup for your backup camera system.
Can I Install A Backup Camera Myself At Home?
Yes, most backup cameras are designed for DIY installation. Follow the instructions carefully. Basic wiring and mounting skills are required. If unsure, consult a professional to avoid damage or improper installation.
How Much Does It Cost To Add A Backup Camera?
Backup camera kits range from $30 to $200. Professional installation adds $100 to $300. DIY installation can save money but requires time and effort. Prices vary based on camera quality and vehicle type.
Conclusion
Adding a backup camera to your car improves safety and convenience. It helps you see blind spots clearly while reversing. Installation takes some time but is doable with basic tools. Follow steps carefully to avoid mistakes and ensure proper setup.
Regularly check the camera and connections for good performance. A backup camera makes parking and driving easier and safer. Consider this upgrade for peace of mind on the road.