Are you tired of constantly adjusting your air conditioner and still not feeling comfortable? Installing the right thermostat can change everything.
It gives you control over your home’s temperature, saves energy, and lowers your bills. But how do you install a thermostat for your air conditioner without calling a pro? You’re in the right place. This guide will walk you through simple, clear steps to get your thermostat up and running quickly.
Keep reading, and you’ll learn how to make your home cooler, smarter, and more efficient today.
Tools And Materials Needed
Installing a thermostat for your air conditioner needs the right tools and materials. This helps you do the job safely and correctly.
Gather everything before you start. It makes the process faster and easier.
Basic Tools
You need some common tools for the installation. These help you handle wires and mount the thermostat.
- Screwdriver set (flathead and Phillips)
- Wire stripper
- Drill with drill bits
- Level tool
- Voltage tester
- Measuring tape
Materials For Installation
Besides tools, you need some materials to complete the setup. These include wiring and mounting parts.
| Material | Purpose |
| Thermostat unit | Controls air conditioner temperature |
| Thermostat base plate | Mounting surface for the thermostat |
| Wire connectors | Join electrical wires securely |
| Electrical tape | Insulate wire connections |
| Mounting screws | Fix thermostat base to the wall |
| Wall anchors | Support screws on drywall |
Safety Equipment
Using safety gear protects you during installation. Always check your tools before use.
- Insulated gloves to avoid electric shock
- Safety glasses to protect your eyes
- Dust mask if drilling into walls
Choosing The Right Thermostat
Installing a thermostat for your air conditioner can improve comfort and save energy. It’s important to choose the right thermostat that matches your needs and AC system.
There are several factors to consider, such as the type of thermostat, its compatibility with your AC, and any smart features you may want.
Types Of Thermostats
Thermostats come in different types, each with its own benefits. Understanding the differences can help you make the best choice for your home.
- Manual thermostats require you to set the temperature yourself.
- Programmable thermostats let you schedule temperatures for different times.
- Smart thermostats connect to your phone and learn your habits.
Compatibility With Your Ac
Not all thermostats work with every air conditioner. It’s important to check if the thermostat is compatible with your system.
Look at the wiring and features of your current thermostat. Match these with the new thermostat to ensure proper function.
Smart Features To Consider
Smart thermostats offer extra features that can enhance convenience and efficiency. These features can make managing your home’s temperature easier.
- Remote control lets you adjust settings from your phone.
- Learning capability adapts to your schedule automatically.
- Energy reports help track usage and save on bills.
Preparing For Installation
Installing a new thermostat for your air conditioner needs some preparation. It helps make the process safe and easy.
Follow these steps carefully before starting the installation. This will keep you safe and protect your system.
Turning Off Power
Always turn off the power before working on your thermostat. This stops electric shocks and damage to your system.
Find the breaker box and switch off the circuit that controls your air conditioner and thermostat.
- Locate your home’s electrical panel
- Identify the breaker for the air conditioner
- Switch the breaker to the off position
- Use a voltage tester to confirm power is off
Removing The Old Thermostat
Remove the old thermostat carefully to avoid damage. This helps you reuse the wiring for the new unit.
Start by taking off the thermostat cover. Then unscrew the base from the wall.
- Pull off the thermostat faceplate gently
- Unscrew the mounting screws
- Keep screws and parts safe for reuse
- Do not pull on wires while removing
Labeling Wires
Label each wire before disconnecting them. This makes wiring the new thermostat easier and prevents mistakes.
Use small pieces of tape or stickers to mark the wires. Write down the labels to keep track.
- Identify each wire by its color and terminal
- Attach a label to each wire
- Note down the labels and terminals
- Take a picture of the wire setup for reference
Wiring The New Thermostat
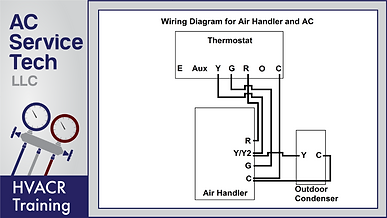
Wiring a new thermostat for your air conditioner requires careful attention. This ensures the system works safely and efficiently.
Follow these steps to connect the wires correctly and secure them properly in the terminals.
Matching Wire Colors
Thermostat wires usually come in standard colors. Matching these colors helps connect each wire to the right terminal.
- Red (R or Rh/Rc)– Power from the transformer
- White (W)– Heat signal
- Green (G)– Fan control
- Yellow (Y)– Cooling signal
- Blue or Black (C)– Common wire for continuous power
Connecting Wires To Terminals
Connect each wire to the matching terminal on the thermostat base. Check the labels carefully.
| Wire Color | Terminal Label | Function |
| Red | R or Rh/Rc | Power |
| White | W | Heat |
| Green | G | Fan |
| Yellow | Y | Cool |
| Blue or Black | C | Common |
Use a screwdriver to tighten the terminal screws. Make sure wires do not touch each other.
Securing The Wiring
After connecting, secure the wires to avoid loose connections or damage.
- Use wire clamps or cable ties to bundle wires neatly.
- Check that no bare wire is exposed outside terminals.
- Ensure wires are not pinched when attaching the thermostat to the wall.
- Double-check all connections before powering the system.
Mounting The Thermostat
Mounting the thermostat correctly ensures your air conditioner works well. A good mount helps the thermostat read the room temperature accurately.
Follow these steps to position and attach the thermostat on your wall properly.
Positioning On The Wall
Choose a spot on the wall that is away from direct sunlight. Avoid places near drafts, windows, or heat sources.
Place the thermostat about 5 feet above the floor. This height helps it measure the room temperature well.
- Pick an inside wall, not an outside one
- Keep it away from doors and windows
- Avoid spots near lamps or appliances
- Place it at eye level or slightly higher
Attaching The Thermostat Base
Hold the thermostat base against the wall in your chosen spot. Use a pencil to mark the screw holes on the wall.
Drill holes at the marks if needed. Insert anchors for better support. Screw the base securely to the wall.
- Make sure the base is level
- Use screws and anchors provided
- Do not overtighten screws to avoid damage
- Check that the base does not wobble
Installing The Thermostat Faceplate
After mounting the base, attach the thermostat faceplate. Align it carefully with the base to avoid damage.
Press the faceplate gently until it clicks or fits snugly. Do not force it or use tools to avoid breaking the parts.
- Check that the faceplate is flush with the wall
- Make sure all buttons and display are visible
- Test the thermostat to confirm proper installation

Credit: www.youtube.com
Configuring And Testing
After installing your thermostat for the air conditioner, you need to configure it. Proper setup ensures your AC runs efficiently.
Testing the thermostat confirms it works well with the air conditioner. This guide shows how to do both steps.
Powering On The System
First, turn on the main power to your air conditioner. Then, switch on the thermostat to start the connection.
Check the thermostat screen to see if it lights up. This shows it has power and is ready to use.
Setting Temperature And Modes
Use the thermostat buttons to set your desired temperature. Choose a cool temperature for hot days.
- Select “Cool” mode to activate the air conditioning
- Choose “Auto” mode to let the system adjust itself
- Set the fan to “Auto” or “On” based on your needs
Always save your settings before exiting the menu. This keeps your preferences active.
Verifying Ac Response
After setting temperature and mode, check if the air conditioner responds. You should feel cool air within a few minutes.
Listen for the AC unit to turn on. If it does not respond, recheck your thermostat settings or power supply.
- Confirm the thermostat display shows the correct temperature
- Ensure the AC fan runs smoothly without unusual noises
- Verify the room temperature drops after some time
Troubleshooting Common Issues
Installing a thermostat for your air conditioner is simple, but issues can happen. These problems stop your AC from working properly.
This guide explains common thermostat problems and how to fix them. Follow these tips to get your system running well.
Thermostat Not Turning On
If your thermostat does not turn on, it may be a power or wiring issue. Check the following points to solve this problem quickly.
- Ensure the thermostat has fresh batteries if it uses any.
- Check the circuit breaker to see if it has tripped.
- Inspect wiring connections for loose or damaged wires.
- Make sure the thermostat is properly mounted on the wall.
- Reset the thermostat by turning off power and turning it back on after a minute.
Incorrect Temperature Readings
Wrong temperature readings cause your AC to run too much or too little. This wastes energy and makes your room uncomfortable.
| Cause | Solution |
| Thermostat near heat sources | Move thermostat away from direct sunlight or lamps |
| Dirty thermostat sensor | Clean sensor gently with a soft cloth |
| Incorrect thermostat placement | Place thermostat on an interior wall at eye level |
| Calibration error | Calibrate thermostat according to manufacturer instructions |
Ac Not Responding To Thermostat
The air conditioner may not react when you change thermostat settings. This can be due to communication or hardware problems.
- Check if the thermostat is set to the correct mode (cooling or auto).
- Make sure the temperature setting is below the room temperature.
- Inspect the wiring between the thermostat and AC unit for damage.
- Test the thermostat by replacing it with a known working one.
- Look for blown fuses or tripped breakers in your AC system.

Credit: www.doityourself.com
Maintenance Tips
Maintaining your air conditioner thermostat helps it work well and last longer. Simple care keeps your home comfortable.
Follow these tips to keep your thermostat clean, powered, and updated. This prevents problems and saves energy.
Regular Cleaning
Dust and dirt can affect your thermostat’s sensors and buttons. Clean it often to avoid errors and poor performance.
- Turn off the power before cleaning
- Use a soft, dry cloth to wipe the surface
- Clean vents and openings gently with a small brush
- Avoid water or cleaning sprays directly on the thermostat
Battery Replacement
Check the batteries regularly if your thermostat uses them. Weak batteries cause the thermostat to stop working or lose settings.
| Battery Type | Replacement Frequency | Signs to Replace |
| AA or AAA | Every 6-12 months | Screen fades, thermostat resets |
| Button Cell | Every 1-2 years | Unresponsive buttons, no display |
| Rechargeable | Check manual | Low power warnings |
Software Updates For Smart Thermostats
Smart thermostats need updates to fix bugs and add features. Updates keep the system secure and efficient.
To update your smart thermostat:
- Connect the thermostat to Wi-Fi.
- Go to the settings menu.
- Select “Software Update” or “Check for Updates.”
- Follow on-screen instructions to install.
- Restart the thermostat if needed.
Credit: www.diychatroom.com
Frequently Asked Questions
What Tools Are Needed To Install An Ac Thermostat?
You need a screwdriver, wire stripper, voltage tester, and drill. These tools help safely connect and mount the thermostat to your wall.
Can I Install An Ac Thermostat Myself?
Yes, if you follow instructions carefully and turn off power first. DIY installation saves money but ensure you understand wiring basics.
How Do I Connect Thermostat Wires Correctly?
Match each wire to its terminal based on color and labels. Double-check connections to avoid errors and ensure proper AC functioning.
Where Should I Place The Thermostat For Best Results?
Install the thermostat on an interior wall away from sunlight or drafts. This placement ensures accurate temperature readings and efficient cooling control.
Conclusion
Installing a thermostat for your air conditioner can save energy and money. Follow the steps carefully to ensure proper setup. Test the thermostat to confirm it controls your AC well. Choose the right model for your system and needs. Regularly check and maintain the thermostat for best performance.
Enjoy a comfortable home with easy temperature control. Simple actions can make a big difference in cooling efficiency. Take your time and stay safe during installation. Your home will feel cooler and more comfortable soon.