Are you wondering how to charge your central air conditioner but feel unsure where to start? Knowing the right way to charge your AC can save you money and keep your home cool all summer long.
If your unit isn’t cooling like it used to, the problem might be low refrigerant levels. But don’t worry—this guide will walk you through the essential steps to safely and effectively charge your central air conditioner. By the end, you’ll feel confident in maintaining your system and avoiding costly repairs.
Keep reading to discover exactly what you need to know!
Tools Needed
Charging a central air conditioner requires specific tools to ensure safety and accuracy. Using the right tools helps prevent damage and keeps the system running efficiently.
Below are the essential tools you need before starting the charging process on your air conditioner.
Manifold Gauge Set
A manifold gauge set measures the pressure of the refrigerant in the air conditioner. It helps you know when to add or remove refrigerant to reach the correct level.
Refrigerant Cylinder
This cylinder contains the refrigerant that you will add to the air conditioner. Make sure the type of refrigerant matches your system’s specifications.
Vacuum Pump
A vacuum pump removes air and moisture from the air conditioner lines before charging. This step is important to keep the system clean and efficient.
Thermometer
A thermometer helps check the temperature of the air coming from the vents. It ensures the system cools properly after charging.
Safety Gear
Wearing safety gear protects you from refrigerant exposure and electrical hazards. Gloves and safety glasses are must-haves.
- Protective gloves
- Safety glasses
- Long-sleeve clothing
- Closed-toe shoes
Leak Detector
A leak detector helps find any leaks in the system before charging. Fixing leaks prevents refrigerant loss and damage.
Charging Hose
The charging hose connects the refrigerant cylinder to the air conditioner. Use a hose rated for the refrigerant type and pressure.
| Tool | Purpose |
| Manifold Gauge Set | Measures refrigerant pressure |
| Refrigerant Cylinder | Supplies refrigerant |
| Vacuum Pump | Removes air and moisture |
| Thermometer | Checks vent temperature |
| Safety Gear | Protects user from hazards |
| Leak Detector | Finds system leaks |
| Charging Hose | Connects refrigerant to system |
Credit: facilio.com
Safety Precautions
Charging a central air conditioner requires care and attention. Safety is key to prevent accidents or damage. Knowing the right precautions can make the process smooth and secure.
Before starting, ensure you have the necessary safety gear. This includes gloves, goggles, and insulated tools. Keep children and pets away from the area.
Wear Protective Gear
Protective gear shields you from electrical hazards and refrigerants. Gloves and goggles are essential for safety.
- Wear rubber gloves to prevent electric shock
- Use safety goggles to protect eyes from refrigerant
- Insulated tools can minimize risks
Ensure Power Is Off
Turning off the power is crucial before working on the unit. This step prevents electrical accidents.
Locate the main power switch or circuit breaker for the air conditioner. Flip it to the off position to cut power.
Refrigerant leaks can be dangerous. Inspect the unit carefully for any signs of leaks before proceeding.
| Sign | Action |
| Hissing sound | Stop immediately |
| Frost build-up | Consult a professional |
| Oil stains | Check connections |
Check System Specifications
Charging a central air conditioner requires understanding its specifications. This helps ensure the system runs efficiently and safely.
Before adding refrigerant, check the unit’s details. These include model type, refrigerant type, and capacity.
Locate The Manufacturer’s Label
The label on your AC unit shows important information. It usually includes the model number and refrigerant type.
This label is often on the outdoor condenser or inside the service panel. Reading it accurately guides the charging process.
Identify The Correct Refrigerant Type
Central air conditioners use different refrigerants. Common types are R-22 and R-410A. Using the wrong refrigerant can damage the system.
- Check the label for the refrigerant code.
- Do not mix refrigerants.
- Use only the type specified by the manufacturer.
Understand Cooling Capacity
Cooling capacity is measured in tons or BTUs per hour. This number helps determine how much refrigerant to add.
| Unit Size | BTUs per Hour | Approximate Tons |
| Small | 12,000 | 1 Ton |
| Medium | 24,000 | 2 Tons |
| Large | 36,000 | 3 Tons |
Check The System’s Pressure Ratings
Pressure ratings guide safe refrigerant charging. These values are often on the service valve or in the manual.
Locate Service Ports
To charge a central air conditioner, you need to find the service ports first. These ports allow access to the refrigerant system.
Service ports are usually on the outdoor unit. They let you connect gauges and add refrigerant safely.
Find The Outdoor Unit
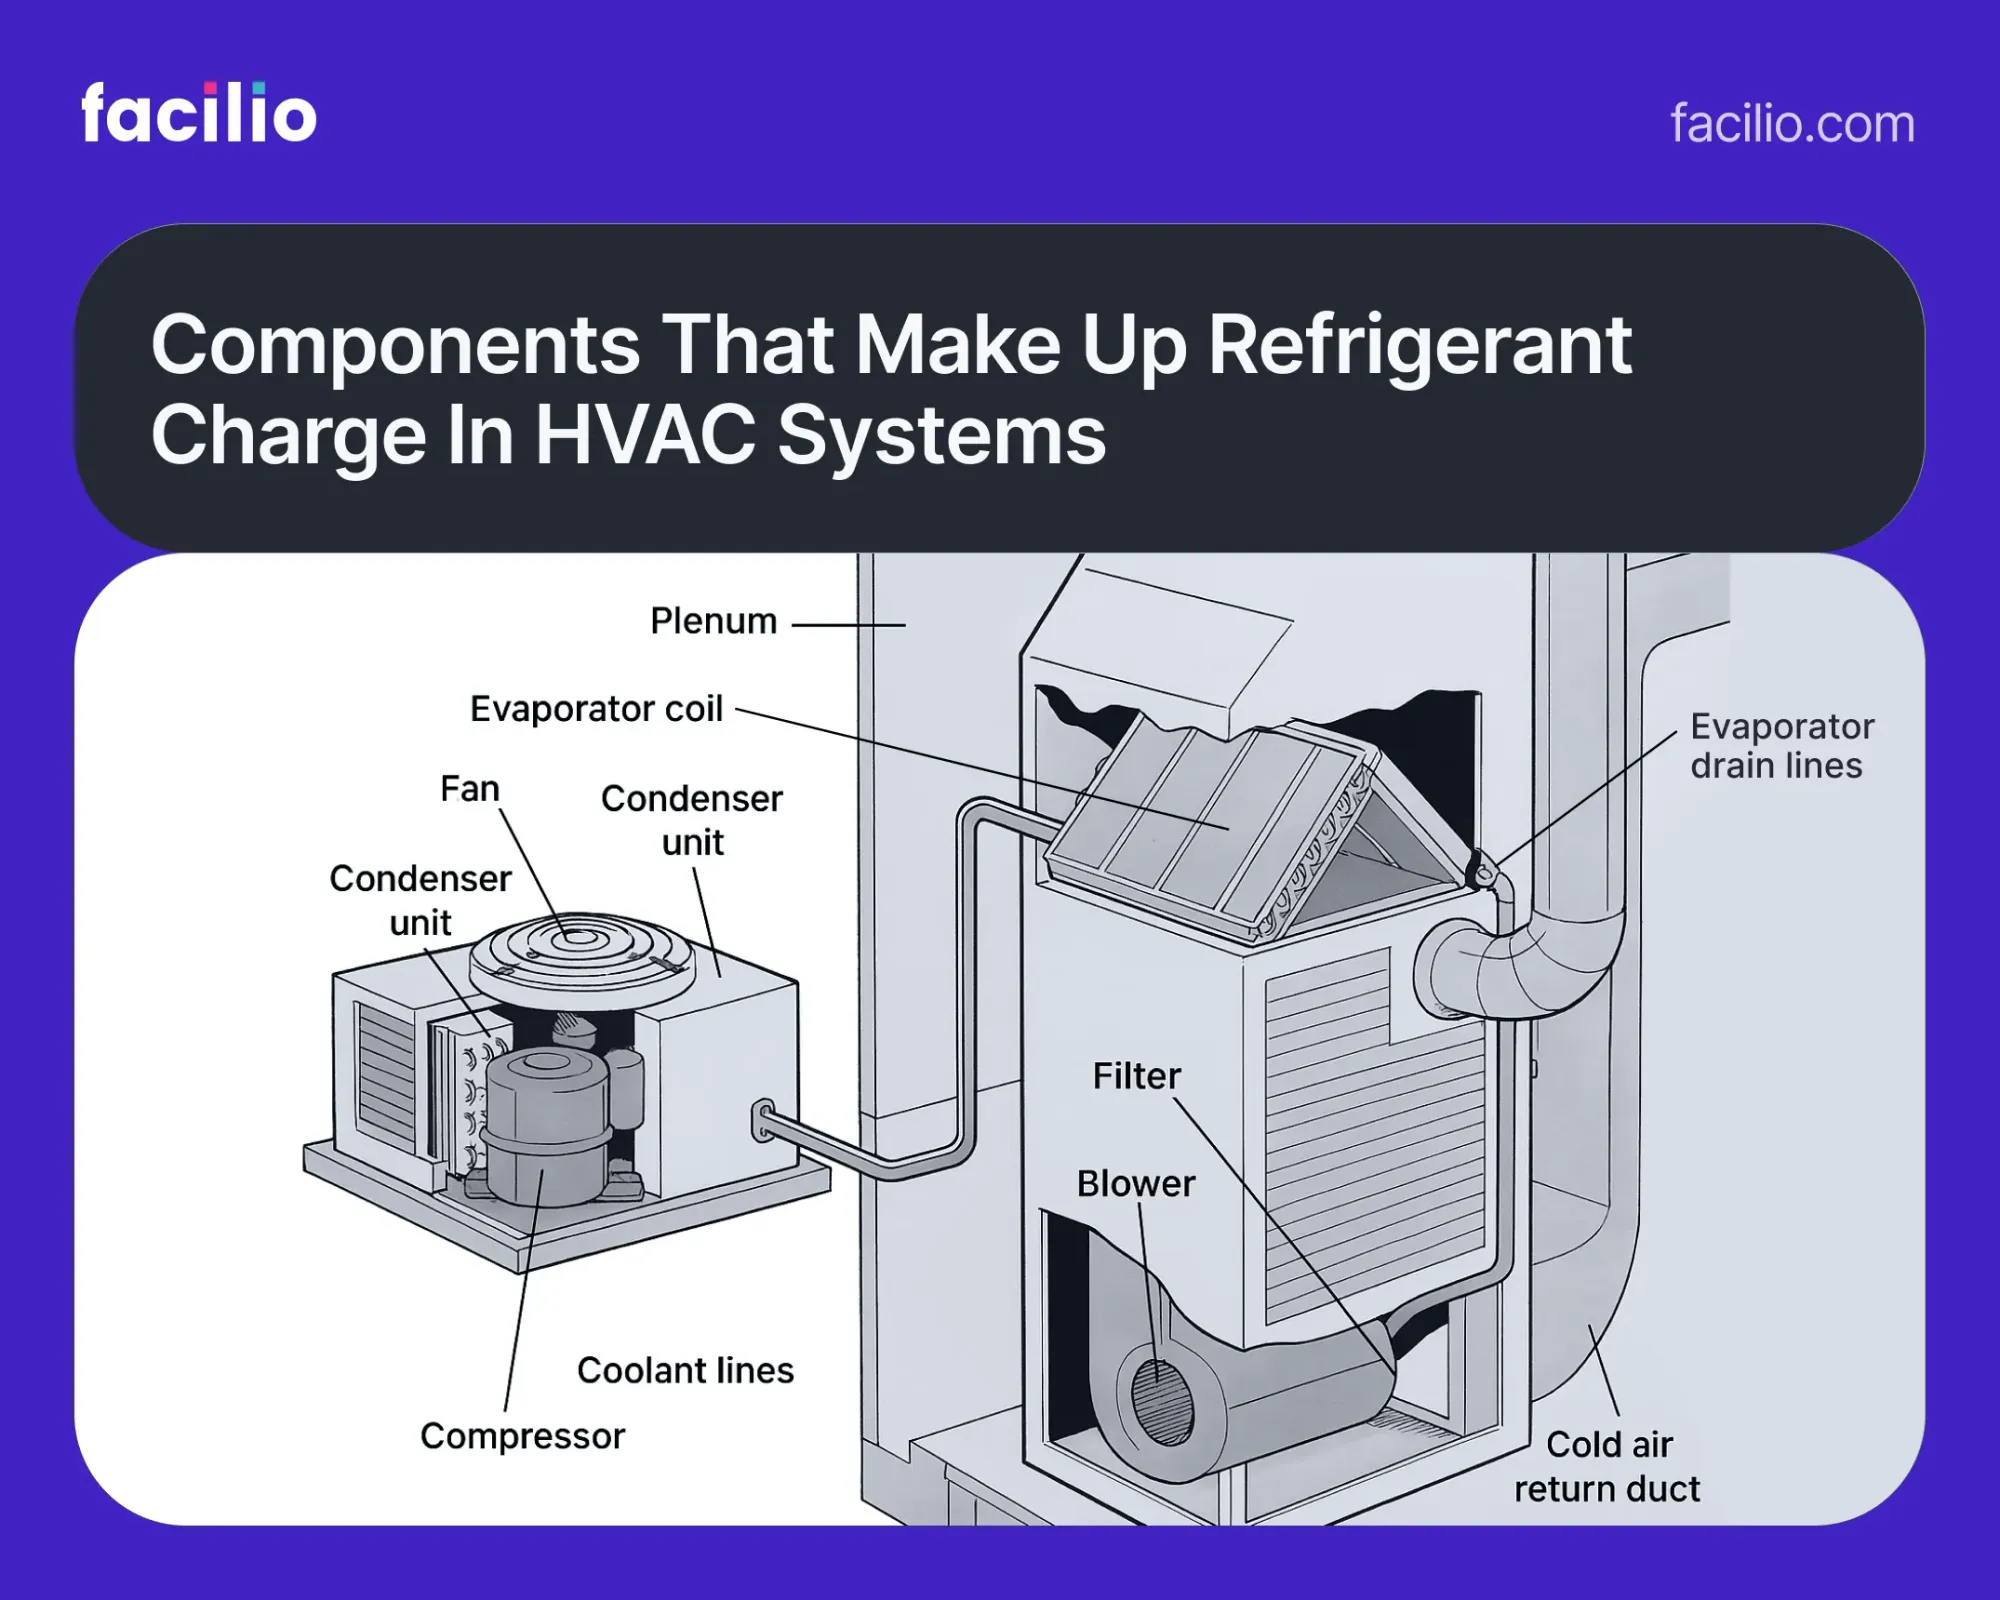
The outdoor unit holds the compressor and condenser coil. It is often a large metal box near the house.
Look for the unit in your backyard or side yard. It should have a fan on top or front.
Look For Two Service Ports
There are two service ports on the refrigerant lines. One is for low pressure, the other for high pressure.
The low-pressure port is larger and usually on the bigger line. The high-pressure port is smaller and on the smaller line.
- Low-pressure port: Connects to the larger suction line
- High-pressure port: Connects to the smaller liquid line
Identify The Service Port Caps
Service ports have plastic caps to protect them. The caps may be colored or plain.
Remove the caps carefully before attaching gauges or hoses. Keep the caps to seal the ports after charging.
Attach Gauges And Hoses
Charging a central air conditioner requires careful attachment of gauges and hoses. These tools help measure pressure and add refrigerant safely.
Using the right process prevents damage and ensures the system works efficiently. Follow the steps below to connect the gauges and hoses properly.
Gather Your Tools
You need a manifold gauge set, hoses, and safety equipment before starting. Check that all parts are clean and free of damage.
- Manifold gauge set with high and low-pressure sides
- Three color-coded hoses (usually red, blue, and yellow)
- Protective gloves and goggles
- Refrigerant approved for your system
Find the low and high-pressure service ports on your air conditioning unit. These ports are usually capped and labeled.
Make sure the system is off before removing the caps. Keep the caps in a safe place for later use.
Connect Hoses To Gauges And Ports
Attach the hoses to the correct gauge and service port. The color codes help match each hose to the right connection.
| Hose Color | Gauge Side | Service Port |
|---|---|---|
| Blue | Low-pressure gauge | Low-pressure port |
| Red | High-pressure gauge | High-pressure port |
| Yellow | Center gauge (for refrigerant) | Refrigerant tank or vacuum pump |
Firmly tighten all connections to avoid leaks. Double-check that hoses are not twisted or damaged.
Evacuate Air And Moisture
Removing air and moisture is a key part of charging a central air conditioner. These unwanted elements can damage the system and reduce efficiency.
Proper evacuation ensures the refrigerant flows well and the air conditioner cools effectively.
Why Evacuate Air And Moisture?
Air in the system causes pressure problems and lowers cooling performance. Moisture can freeze and block refrigerant flow or cause corrosion inside the unit.
Tools Needed For Evacuation
- Vacuum pump to remove air and moisture
- Manifold gauge set to monitor pressure
- Hoses to connect gauges and pump
- Micron gauge to check vacuum level
Steps To Evacuate Air And Moisture
- Connect manifold gauges to service ports
- Attach vacuum pump to manifold and open valves
- Run vacuum pump until pressure reaches 500 microns or less
- Close valves and monitor pressure for 10 minutes
- If pressure rises, repeat evacuation until stable
- Close all valves and disconnect equipment carefully
Vacuum Level And Time
| Vacuum Level (Microns) | Recommended Time |
| 500 or below | 15 to 30 minutes |
| Above 500 | Continue evacuation |
Signs Of Improper Evacuation
- Hissing sounds or pressure drop in the system
- Ice formation on refrigerant lines
- Reduced cooling efficiency
- Corrosion inside the air conditioner components
Add Refrigerant
Charging a central air conditioner means adding refrigerant to the system. Refrigerant helps cool the air inside your home.
Too little refrigerant makes the unit work harder and cool less. Adding the right amount keeps the system efficient.
Check The Refrigerant Type
Find out what type of refrigerant your air conditioner uses. Look at the label on the outdoor unit.
Using the wrong refrigerant can damage the system or cause leaks.
Use Proper Safety Gear
Wear gloves and safety glasses before handling refrigerant. It can cause frostbite or eye injury.
Work in a well-ventilated area to avoid breathing fumes.
Connect The Gauges Correctly
Attach the refrigerant gauges to the service ports on the outdoor unit. The low-pressure side is usually blue, the high-pressure side is red.
Make sure connections are tight to avoid leaks during charging.
Add Refrigerant Slowly
Open the valve on the refrigerant can slowly. Let refrigerant flow into the system.
- Watch the pressure gauges to avoid overcharging
- Stop adding refrigerant if pressures are too high
- Close the valve when the correct level is reached
Check System Operation
Turn on the air conditioner and check if it cools properly. Listen for unusual noises.
If the system runs smoothly, the refrigerant charge is likely correct.
Monitor Pressure Levels
Charging a central air conditioner needs careful pressure checks. Monitoring pressure levels helps keep the system safe and efficient.
Understanding pressure readings can show if the refrigerant needs more or less. Always use the right tools to measure pressure accurately.
Use A Manifold Gauge Set
A manifold gauge set connects to the air conditioner’s service ports. It measures both high and low pressure in the system.
These readings help determine if the refrigerant charge is correct or if adjustments are needed.
- Attach hoses to high and low-pressure ports
- Read pressure values on gauges
- Compare readings to manufacturer’s specs
Check Low-pressure Side
The low-pressure side shows the refrigerant entering the evaporator coil. Normal pressure means proper refrigerant flow.
If the pressure is too low, the system may be low on refrigerant or have a leak.
- Low pressure can cause poor cooling
- Check for leaks if pressure is low
- Recharge refrigerant if needed
Check High-pressure Side
The high-pressure side shows the refrigerant after it leaves the compressor. This pressure should be within safe limits.
Too high pressure can damage the system or reduce efficiency.
- High pressure may mean a dirty condenser coil
- Check for blockages or fan problems
- Reduce refrigerant if pressure is too high
Compare Pressure To Temperature
Pressure readings alone do not tell the full story. Compare pressure with the outdoor temperature for accuracy.
Use pressure-temperature charts to find the correct refrigerant charge.
| Outdoor Temp (°F) | Low Side Pressure (PSI) | High Side Pressure (PSI) |
|---|---|---|
| 75 | 68-72 | 230-250 |
| 85 | 75-79 | 260-280 |
| 95 | 82-86 | 290-310 |
Check For Leaks
Checking for leaks is crucial when charging a central air conditioner. Leaks can cause efficiency issues and higher energy bills.
Regular maintenance can help spot leaks early. This can prevent costly repairs and keep your system running smoothly.
Identify Potential Leak Areas
Begin by identifying areas where leaks are common. Pay attention to joints, connections, and seals in your system.
- Check around the compressor unit
- Inspect the evaporator coils
- Look at the refrigerant lines
Use Leak Detection Tools
Use tools to detect leaks accurately. These tools help in identifying even small leaks that are not visible.
| Tool Type | Usage |
| Electronic Leak Detector | Detects gas leaks |
| Ultraviolet Dye | Shows leaks with UV light |
| Soap Solution | Bubbles at leak sites |
Seal The Leaks
Once detected, sealing leaks is necessary. Use appropriate sealants or call a professional for larger leaks.
Test System Performance
Testing the performance of your central air conditioner is important. It helps ensure the system cools your home efficiently.
You can check different parts of the system to see if it works well after charging.
Check Airflow
Good airflow means the system moves enough air through the vents. Low airflow can show a problem with the fan or filters.
Measure Temperature Difference
Measure the temperature of the air at the return and the supply vents. The difference should be between 15 and 20 degrees Fahrenheit.
Inspect Refrigerant Pressure
Use a gauge to check refrigerant pressure. Proper pressure means the system is charged correctly and works well.
- Connect the gauge to the service port
- Turn on the air conditioner
- Read the pressure on the gauge
- Compare with manufacturer’s recommended values
Listen For Unusual Noises
Strange sounds can mean parts are loose or damaged. Check the compressor and fan for any noise during operation.
Check Electrical Components
| Component | What to Check | Signs of Issues |
|---|---|---|
| Capacitors | Charge level and condition | Swelling or leaking |
| Contactors | Clean contacts | Burn marks or pitting |
| Wiring | Connections and insulation | Loose or frayed wires |
Disconnect Equipment
Charging a central air conditioner requires careful handling of the disconnect equipment. This equipment ensures safety by cutting off power before you work on the system.
Understanding the disconnect equipment helps you avoid accidents and damage to the air conditioner.
Locate The Disconnect Box
The disconnect box is usually near the outdoor unit of the air conditioner. It contains a switch or pull-out fuse that stops electricity flow.
Turn Off The Power
Before charging, switch off the power at the disconnect box. This step prevents electric shock and protects the system.
- Open the disconnect box cover carefully
- Identify the switch or fuse inside
- Flip the switch to the OFF position or pull out the fuse
- Double-check that power is off using a voltage tester
Use Lockout/tagout Devices
Lockout/tagout devices keep the disconnect switch in the OFF position. This prevents others from turning the power back on by mistake.
Examples of lockout/tagout steps:
- Place a lock on the disconnect switch handle
- Attach a tag with your name and date
- Inform others about the maintenance work
Check For Proper Disconnection
Verify the power is fully disconnected before starting to charge the air conditioner. Use a multimeter or voltage tester to confirm no electricity flows to the unit.
| Tool | Purpose |
| Voltage Tester | Checks if power is off |
| Multimeter | Measures electrical voltage |
| Lockout Device | Keeps power switch off |

Credit: m.youtube.com
Maintenance Tips
Charging a central air conditioner keeps it running well and cools your home efficiently. Regular maintenance helps avoid costly repairs and improves performance.
Check your air conditioner often to find problems early. Use these tips to keep your system charged and working smoothly.
Check Refrigerant Levels
Refrigerant is the fluid that cools the air in your system. Low levels can cause poor cooling and damage the compressor.
Use a gauge to measure the refrigerant pressure. If it is low, add the correct type and amount of refrigerant according to the manufacturer’s instructions.
Clean Or Replace Air Filters
Dirty air filters reduce airflow and make the system work harder. This can lower efficiency and cause refrigerant issues.
Clean or replace filters every 1 to 3 months during the cooling season. This keeps air flowing well and protects the system.
Inspect And Clean Coils
Evaporator and condenser coils can collect dirt. Dirt reduces heat transfer and cooling power.
Clean coils gently with a soft brush or coil cleaner yearly. Make sure the outdoor unit is free of leaves and debris.
Refrigerant leaks cause low pressure and poor cooling. They can also harm the environment.
Look for oily spots or listen for hissing sounds near coils and connections. Call a professional to fix leaks and recharge refrigerant.
Maintain The Condensate Drain
The condensate drain removes moisture from your home. A clogged drain can cause water damage and affect cooling.
Check the drain line and clear any blockages. Use a wet-dry vacuum or a pipe cleaner to keep it open.
Schedule Professional Tune-ups
A trained technician can check refrigerant levels, clean parts, and test system performance. This helps catch problems early.
Schedule a tune-up once a year to keep your air conditioner running efficiently and extend its life.

Credit: atlasacrepair.com
Frequently Asked Questions
How Do You Properly Charge A Central Air Conditioner?
To charge a central air conditioner, connect a manifold gauge set to the service ports. Check refrigerant levels and add the correct type slowly. Ensure the system runs and pressures match manufacturer specifications. Avoid overcharging, as it can damage the compressor and reduce efficiency.
What Tools Are Needed To Charge A Central Ac?
You need a manifold gauge set, refrigerant canister, and a vacuum pump. Safety goggles and gloves are also essential. These tools help measure pressure, add refrigerant, and maintain system safety during charging.
How Often Should You Charge Your Central Air Conditioner?
You only charge your AC when refrigerant levels are low or after repairs. Regular maintenance checks can identify leaks or low refrigerant. Overcharging or unnecessary charging can harm the system and increase energy costs.
Can I Charge A Central Air Conditioner Myself?
Charging a central AC requires knowledge and safety precautions. Incorrect charging can cause damage or harm. It’s best to hire a certified HVAC technician unless you have proper training and equipment.
Conclusion
Charging a central air conditioner requires care and the right tools. Check your system’s pressure and temperature to find the right charge. Too little or too much refrigerant can harm your AC’s performance. Always follow safety steps to avoid damage or injury.
If unsure, call a professional for help. Proper charging keeps your home cool and your system running longer. Taking time to do it right saves money and energy. Your comfort depends on a well-charged air conditioner.