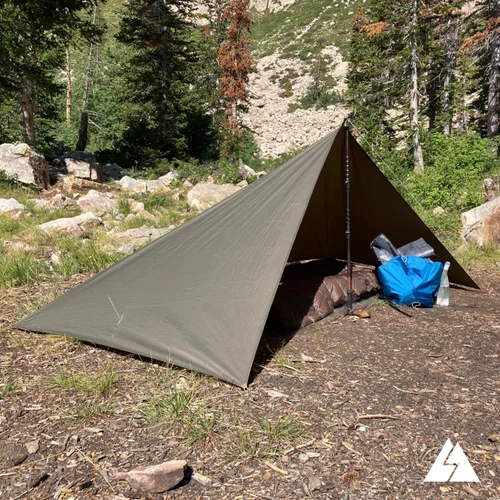
Are you ready to create a simple, strong shelter using just a tarp? Whether you’re camping, hiking, or facing an unexpected situation, knowing how to make a tent with a tarp can save you time and keep you safe.
Imagine having a lightweight, quick-to-set-up shelter that protects you from rain, wind, and sun—all with gear you probably already have. In this guide, you’ll discover easy steps and clever tips to build your own tarp tent, even if you’ve never done it before.
Keep reading, and you’ll be prepared to turn a basic tarp into your next reliable shelter.
Choosing The Right Tarp
Making a tent with a tarp is a smart way to stay dry and protected outside. Picking the right tarp is key to a good shelter.
The right tarp keeps you safe from rain, wind, and sun. It also fits your needs for size and weight.
Material Types
Tarp materials vary in strength and weight. Some are better for heavy rain, while others are lighter for easy carrying.
Common materials include polyethylene, nylon, and canvas. Each has its own pros and cons.
- Polyethylene:Waterproof and cheap but heavier.
- Nylon:Lightweight and strong but less waterproof.
- Canvas:Durable and breathable but heavier and costs more.
Size And Weight
Choose a tarp size that fits your tent space and gear. Too small, and you won’t get enough cover. Too big, and it adds extra weight.
Weight matters if you carry your tarp on hikes. Lighter tarps are easier to carry but may be less durable.
- Small tarps (6×8 feet) are good for solo campers.
- Medium tarps (8×10 feet) fit two people.
- Large tarps (10×12 feet or more) cover groups or gear.
Weather Resistance
Check if the tarp can handle the weather you expect. Waterproof tarps keep rain out. Windproof tarps block strong gusts.
UV resistance helps protect the tarp from sun damage. Some tarps also resist mildew for wet climates.
- Waterproof rating shows how well it stops rain.
- Windproof tarps use strong fabric and tight weaves.
- UV resistance extends tarp life in sunny areas.
- Mildew resistance keeps the tarp clean and safe.

Credit: www.youtube.com
Essential Tools And Gear
Building a tent with a tarp is easy if you have the right tools. You need to know the gear that makes the process smooth and effective.
Having the correct items ensures your tarp tent is stable and safe. Let’s explore the essential tools and gear you need.
Ropes And Paracord
Ropes and paracord are vital for securing your tarp. They help in tying the tarp to trees or stakes.
Choose strong, weather-resistant ropes. Paracord is lightweight yet very durable, making it an excellent choice.
- Ensure ropes are at least 50 feet long
- Pick paracord with a minimum strength of 550 pounds
- Carry extra lengths for emergencies
Tent Stakes And Poles
Tent stakes and poles provide the structure for your tarp tent. They keep it upright and stable.
Use metal stakes for firm ground. Poles should be adjustable to fit different tarp sizes.
- Select stakes that are rust-resistant
- Opt for lightweight poles for easy transport
- Include extra stakes for securing all corners
Additional Accessories
Additional accessories make your tarp tent more comfortable. These items can enhance your camping experience.
Consider items like a groundsheet, bungee cords, and clips. They add extra protection and convenience.
- A groundsheet keeps your space dry and clean
- Bungee cords provide flexibility in securing the tarp
- Clips help in adjusting the tarp tension easily
Selecting The Perfect Campsite
Choosing the right spot for your tarp tent makes your camping trip safe and comfortable. The campsite affects how well your shelter holds up and how much you enjoy your stay.
Look closely at the land, weather, and safety before setting up your tarp tent. These factors help you pick the best location.
Terrain And Ground Conditions
Find flat, dry ground to pitch your tarp tent. Avoid rocky or uneven areas that can hurt your sleeping pad or make you uncomfortable.
- Check for soft soil to stake your tarp firmly.
- Avoid slopes to prevent sliding or water pooling.
- Stay away from low spots that collect water during rain.
- Clear away sharp sticks and stones before setting up.
Wind And Sun Exposure
Look for natural windbreaks like trees or hills to protect your tarp. Face the tarp opening away from strong winds to keep rain out.
| Exposure Factor | What to Look For |
| Wind | Natural barriers to block strong gusts |
| Sun | Shade during midday to stay cool |
| Open Sky | Clear view for stargazing at night |
Safety Considerations
Keep your campsite safe by avoiding hazards and following rules. Think about wildlife, fire risk, and emergency access.
- Camp away from animal trails and nests.
- Keep your site clean to avoid attracting animals.
- Choose spots away from dead trees or loose branches.
- Know the nearest exit or road in case of emergency.
- Follow local fire regulations and keep a safe distance from campfires.

Credit: www.reddit.com
Basic Tarp Tent Designs
Making a tent with a tarp is a simple way to stay dry and protected outdoors. You can use a tarp to build different shelter shapes. Each design uses basic knots and natural supports.
Here are three easy tarp tent designs. They work well for camping, hiking, or emergency shelter.
A-frame Shelter
The A-Frame Shelter looks like a triangle from the side. It uses a rope tied between two trees as a ridge line. The tarp is draped over the rope and staked down on both sides.
This design keeps rain off and allows good airflow. It works well in places with strong winds.
- Tie rope between two trees at head height
- Drape tarp over the rope evenly
- Stake down tarp edges tightly
- Leave space near the ground for air
Lean-to Shelter
The Lean-To Shelter uses one anchor point, like a tree or pole. One side of the tarp is tied to the anchor. The other side is staked to the ground at an angle.
This design is quick to build and good for blocking wind or sun from one direction. It offers easy access.
- Secure one tarp edge to a tree or pole
- Pull the opposite edge down and stake it
- Adjust angle for wind or sun protection
- Use extra stakes for more stability
Pyramid Shelter
The Pyramid Shelter stands tall and covers a wide area. It uses one central pole or stick in the middle. The tarp is pulled up over the pole and staked in four or more places.
This shape sheds rain well and offers good headroom inside. It is stable in many weather conditions.
- Place a strong stick or pole upright in the center
- Drape tarp over the pole evenly
- Stake down all corners and sides
- Tighten tarp to remove slack
Step-by-step Setup Guide
Making a tent with a tarp is a simple and practical way to stay dry and protected outdoors. This guide will walk you through the basic steps to set it up quickly.
Follow these instructions to prepare your tarp, secure anchor points, and adjust tension for a stable shelter.
Preparing The Tarp
Start by choosing a tarp that is large enough for your needs. Lay it flat on the ground and inspect it for any holes or weak spots. Fold the edges slightly to create clean lines for tying ropes.
Securing Anchor Points
Find strong anchor points like trees, poles, or stakes to hold the tarp. Use durable ropes or cords to tie the tarp corners to these points. Make sure the anchors are secure and spread out enough to create a good shelter shape.
- Tie one corner of the tarp to the first anchor point.
- Stretch the tarp and tie the opposite corner to the second anchor point.
- Attach the remaining corners to other anchors or use stakes on the ground.
- Ensure the tarp is taut but not overstretched.
Adjusting Tension And Stability
Check the tarp’s tension to avoid sagging or flapping. Adjust ropes by tightening or loosening them. Use additional stakes or guy lines to improve stability if needed.
| Tip | Purpose |
| Tighten ropes | Prevent sagging and water pooling |
| Loosen ropes slightly | Avoid tearing the tarp in strong wind |
| Add extra stakes | Increase overall shelter stability |
| Use guy lines | Provide side support against wind |
Tips For Enhancing Comfort
Making a tent with a tarp can be simple and useful. Comfort is key to enjoy your shelter.
This guide shares tips to keep your tarp tent cozy and safe from weather problems.
Ground Insulation
Insulating the ground helps keep warmth inside your tent. It stops cold from the earth.
- Use foam pads or sleeping mats to create a soft base.
- Lay leaves, pine needles, or dry grass under your mat for extra warmth.
- Place a plastic sheet under your insulation to block moisture.
Ventilation Techniques
Good air flow stops inside air from getting too hot or damp. It keeps the tent fresh.
| Method | Description |
| Open Sides | Leave one or two sides open for fresh air. |
| Raise Edges | Lift tarp edges to let air pass under and through. |
| Use Mesh | Add a mesh layer to keep bugs out while allowing air. |
Weatherproofing Tricks
Protect your tarp tent from rain and wind to stay dry and safe.
- Tighten all ropes and stakes to hold the tarp firm.
- Angle the tarp so rain runs off easily, not pooling on top.
- Use waterproof spray on the tarp for extra water resistance.
- Build a small drip line with paracord to stop water from running inside.
Common Mistakes To Avoid
Making a tent with a tarp is a simple skill. Many people try it, but some make common errors. These mistakes can cause your shelter to fail or be uncomfortable.
Here are key mistakes to watch out for. Avoid them to build a stronger and safer tarp tent.
Improper Tarp Placement
Placing the tarp the wrong way can lead to leaks and poor shelter. If the tarp is too flat, rain can pool and cause damage. Too steep, and the wind can catch and tear it.
- Always angle the tarp so water runs off easily.
- Place the tarp high enough for air to flow underneath.
- Make sure the tarp covers your sleeping area fully.
- Avoid placing the tarp under tree branches that may drip sap or fall.
Loose Knots And Anchors
Loose knots or weak anchors can cause your tarp to collapse. This can happen in strong wind or rain. Secure knots and firm anchors keep the tarp stable.
| Common Knot Mistakes | How to Fix |
| Using simple knots that slip | Use reliable knots like the taut-line hitch |
| Not tightening knots enough | Pull knots tight and test tension |
| Anchoring in loose soil | Find firm ground or use stakes with good grip |
| Using weak anchor points | Choose strong trees or rocks for anchor points |
Ignoring Environmental Factors
Ignoring the environment can cause trouble. Wind, rain, sun, and bugs all affect your tarp tent. Plan your setup to fit the conditions.
- Check the wind direction and place tarp to block strong gusts.
- Set up away from low spots that collect water.
- Consider sun position for shade during the day.
- Use bug netting or close tarp edges to keep insects out.

Credit: www.youtube.com
Frequently Asked Questions
How Do You Set Up A Tarp Tent Quickly?
To set up a tarp tent quickly, choose a flat spot and secure the tarp with stakes. Use ropes to tie the tarp to nearby trees or poles. Adjust the tarp’s angle for rain runoff and ventilation. Practice makes the process faster and easier.
What Materials Are Best For Making A Tarp Tent?
The best materials for a tarp tent include waterproof tarps made of polyethylene or ripstop nylon. Durable ropes or paracords and sturdy stakes are also essential. These materials ensure your tent is weather-resistant, lightweight, and easy to carry for camping or hiking trips.
How Can I Make A Tarp Tent Waterproof?
To make a tarp tent waterproof, use a high-quality waterproof tarp with sealed seams. Apply a waterproof spray or seam sealer if needed. Ensure the tarp is pitched at an angle to allow water runoff. Proper setup prevents leaks and keeps the interior dry.
What Is The Best Tarp Tent Shape For Camping?
The best tarp tent shape for camping is the A-frame or lean-to. These shapes provide good ventilation, stability, and protection from rain and wind. They are simple to set up and use minimal materials, making them ideal for quick shelter in the outdoors.
Conclusion
Making a tent with a tarp is simple and useful. It saves money and space while camping. You only need a few tools and some practice. Try different setups to find what suits you best. This skill helps in many outdoor situations.
Always check the weather before setting up your tarp tent. With patience, you can create a strong shelter easily. Enjoy nature with your tarp tent ready for any trip.