Are you planning a camping trip and feeling a bit daunted by the thought of setting up your tent? You’re not alone.
Many campers find the process tricky, especially when aiming to do it efficiently and correctly. But what if you could master the art of laying down a tent in just 76 seconds? Imagine the extra time you’d have to explore, relax, and enjoy the great outdoors.
This guide is designed to help you achieve just that. By the end of this article, you’ll have the confidence and know-how to set up your tent swiftly and securely, ensuring a stress-free start to your adventure. Get ready to impress your fellow campers and make the most of your time under the stars!
Choosing The Right Spot
Picking the perfect place to set your tent is important for a good camping experience. A good spot keeps you safe and comfortable during the night.
Look carefully at the area before you start pitching your tent. This helps you avoid problems later on.
Check The Terrain
Flat ground is the best for your tent. It keeps you stable and helps the rainwater run off. Avoid rocky or uneven surfaces that can make sleeping hard.
- Look for soft soil or grass
- Avoid slopes or hills
- Check for sharp rocks or sticks
- Clear away debris before setting up
Consider Wind Direction
Wind can make your tent cold and noisy. Set your tent so the smallest side faces the wind. This reduces wind impact and keeps you warmer.
| Wind Direction | Best Tent Orientation |
| North | Face tent entrance south |
| East | Face tent entrance west |
| South | Face tent entrance north |
| West | Face tent entrance east |
Avoid Hazards
Check the spot for dangers before you set up. Avoid areas near dead trees, steep cliffs, or water that can rise quickly.
- Stay away from dead or loose branches
- Do not camp near rivers or lakes that may flood
- Avoid areas with animal signs or insect nests
- Watch out for fire risks like dry grass

Credit: www.amazon.ca
Preparing Your Gear
Setting up a tent starts with good preparation. Getting your gear ready helps you camp without stress.
Check your equipment carefully before you go. This saves time and keeps you safe outdoors.
Unpack The Tent Components
Take everything out of the bag. Lay the parts flat on the ground to see them all.
- Tent body
- Rainfly
- Poles
- Stakes
- Guy lines
- Carry bag
Inspect For Damage
Look closely at each part for tears or breaks. Make sure poles are straight and not cracked.
Check the tent fabric for holes or worn spots. Confirm stakes are not bent or rusty.
- Check pole joints and connectors
- Inspect zippers and seams
- Look for holes in the tent floor
- Test stakes for strength
Organize Accessories
Sort out all the small items you will need. Keep them in one place for easy access.
- Place stakes and guy lines in a small bag
- Keep repair kit handy
- Have a mallet or hammer ready
- Gather any extra clips or hooks
Setting Up The Tent Base
Setting up the tent base is important for a comfortable and stable camp. A good base keeps the tent clean and dry.
This guide shows how to lay the groundsheet, position the tent footprint, and secure the base properly.
Lay The Groundsheet
Start by spreading the groundsheet flat on the chosen spot. It protects the tent floor from dirt and moisture.
Make sure the groundsheet is slightly smaller than the tent floor to avoid water pooling under the tent.
Position The Tent Footprint
Place the tent footprint directly on top of the groundsheet. This adds an extra layer of protection and durability.
Align the footprint so it matches the tent shape and size exactly. This helps keep the tent floor safe.
Secure The Base
Use stakes or pegs to secure the groundsheet and footprint. This stops them from moving during setup and use.
Make sure the base is tight but not stretched too much. This keeps the tent stable and comfortable.
- Place stakes at each corner of the groundsheet and footprint
- Check that the base is flat and smooth
- Tighten any loose edges carefully
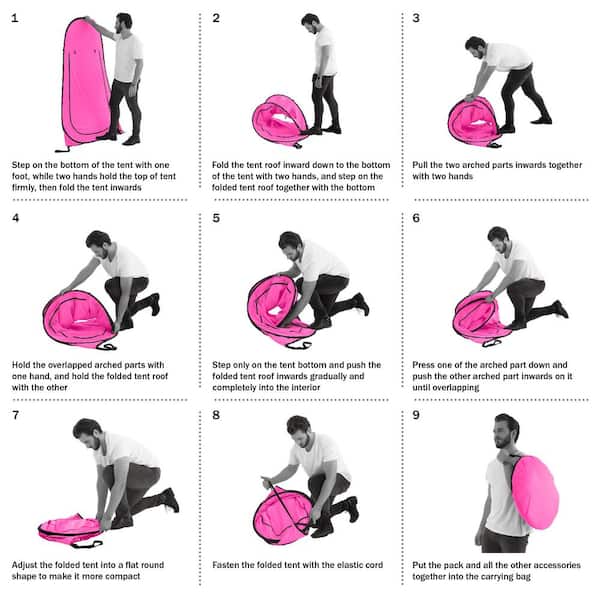
Credit: www.homedepot.com
Assembling The Tent Poles
Setting up your tent starts with assembling the poles. Proper pole assembly makes pitching easier. Take your time to avoid mistakes.
Follow the steps carefully to ensure the tent stands strong and stable. Each part has a role in the tent frame.
Connect Poles Correctly
Most tent poles come in sections that fit together like puzzle pieces. Connect each pole by sliding the ends firmly into one another. Avoid forcing the poles to prevent damage.
- Lay out all pole sections on flat ground.
- Match the color-coded or numbered ends.
- Insert one end into the next until fully connected.
- Check that each joint is secure but not bent.
- Repeat for all poles required for your tent.
Attach Poles To Tent
After assembling the poles, attach them to the tent fabric. Most tents use clips, sleeves, or hooks to connect poles.
| Attachment Type | How to Attach |
| Clips | Snap clips onto poles at marked spots |
| Sleeves | Slide poles through fabric sleeves carefully |
| Hooks | Hook poles into loops sewn on the tent |
Raise The Tent Frame
With poles attached, you can now lift the tent frame. Do this gently to avoid tearing fabric or bending poles. Work with a partner if possible.
Tips for raising the frame:
- Start by lifting one end of the tent.
- Keep poles straight as you raise the structure.
- Secure the frame to the ground with stakes after standing it up.
- Adjust poles if the tent feels loose or uneven.
Securing The Tent
Securing your tent is key to a safe and comfortable camping experience. It keeps the tent stable during wind and weather.
Follow simple steps to make sure your tent stays in place all night long.
Stake Down The Corners
Start by placing stakes at each corner of the tent. Push them into the ground at a 45-degree angle away from the tent.
This angle helps hold the tent tight and prevents the stakes from pulling out easily.
- Use strong stakes for hard or rocky ground
- Make sure the tent fabric is pulled tight before staking
- Check that stakes are fully pushed into the ground
Tighten The Guy Lines
Guy lines add extra support to your tent. Attach them to the loops on the tent’s outside.
Pull each guy line tight and secure it with a stake. This keeps your tent steady in wind.
- Adjust the lines evenly on all sides
- Use tensioners if your guy lines have them
- Check lines after strong wind to retighten if needed
Check Stability
After staking and tightening, press on the tent walls to test stability. The tent should not move much.
If you feel loose spots, tighten stakes or guy lines again. A stable tent is safer and more comfortable.
- Look for loose fabric or sagging areas
- Make sure all stakes are secure in the ground
- Retighten guy lines if the tent shifts or moves
Adding The Rainfly
The rainfly is an important part of your tent. It protects you from rain and wind. Adding it correctly keeps you dry and comfortable inside the tent.
Follow these steps to place the rainfly securely. Each step helps make your shelter strong and safe in bad weather.
Position The Rainfly
First, unfold the rainfly over the tent. Make sure it covers the entire top and sides. Align the rainfly so the doors and windows match the tent’s openings.
Attach Clips And Velcro
Secure the rainfly to the tent frame with clips and Velcro strips. This keeps the rainfly tight and stops it from moving in the wind.
- Clip each corner of the rainfly to the tent poles
- Fasten Velcro strips along the tent walls
- Check that the rainfly is pulled tight without sagging
Secure With Stakes
Use stakes to anchor the rainfly to the ground. This adds extra stability and prevents water from pooling.
| Stake Location | Purpose |
| Front corners | Hold rainfly tight over door |
| Back corners | Prevent rainfly from lifting |
| Sides | Keep rainfly flush to tent walls |
Final Adjustments
After setting up your tent in 76, making final adjustments ensures a safe and comfortable stay. These steps help improve airflow, space use, and comfort inside.
Take time to check each detail before settling in. Small fixes make a big difference for your camping experience.
Ventilation Setup
Good ventilation stops moisture and keeps air fresh inside the tent. Open vents or windows to allow airflow.
If your tent has adjustable vents, position them to catch light breezes. Avoid blocking airflow with gear or walls.
- Open mesh panels or vents at tent top
- Keep doors slightly unzipped if safe
- Clear any objects blocking vents
Organize Inside Space
Arrange your belongings neatly inside the tent. Keep important items within reach and create a clear sleeping area.
Use storage pockets or bags to reduce clutter. This helps maximize space and keeps the tent tidy.
- Store food away from sleeping zone
- Place gear near tent entrance
- Keep floor area clear for sleeping
Inspect For Comfort
Check your tent’s floor and sleeping area for comfort. Look for rocks or sticks under your sleeping pad.
Adjust your sleeping arrangement as needed. Make sure the tent is secure and all stakes are tight.
- Feel the ground for sharp objects
- Adjust sleeping bag and pad placement
- Tighten tent ropes and stakes

Credit: www.lifeintents.com
Maintenance Tips
Keeping your tent in good shape helps it last for many camping trips. Regular care stops damage and makes setup easier.
Follow simple steps to clean, store, and repair your tent. These tips save time and money over time.
Clean After Use
Always clean your tent after camping. Dirt and moisture can cause mold and weaken the fabric.
- Shake out dirt and debris before packing
- Use a soft brush to remove stuck mud or leaves
- Spot clean stains with mild soap and water
- Let the tent dry completely before storing
Store Properly
Correct storage keeps your tent safe from damage and moisture. Avoid folding it the same way every time.
| Storage Tip | Why It Matters |
|---|---|
| Keep tent in a cool, dry place | Prevents mold and fabric decay |
| Store loosely in a large bag | Protects fabric and coatings |
| Avoid direct sunlight | Stops color fading and material weakening |
| Check tent before long storage | Fix small problems early |
Repair Minor Damage
Fix small tears or broken parts quickly. This keeps the tent strong and waterproof.
- Patch small holes with repair tape or patches
- Replace missing or broken zippers and clips
- Check seams and reseal if needed
- Use a needle and thread for small fabric tears
Frequently Asked Questions
How Do I Prepare The Ground Before Laying A Tent?
Clear debris, level the ground, and remove sharp objects. This ensures comfort and prevents damage to the tent floor.
What Are The Essential Steps To Set Up A Tent?
Lay the tent flat, stake corners, assemble poles, and secure rainfly. Follow manufacturer instructions for best results.
How Can I Secure My Tent Against Strong Winds?
Use sturdy stakes, guy lines, and anchor points. Position the tent facing away from the wind for stability.
What Tools Or Equipment Are Needed To Lay Down A Tent?
You need tent stakes, mallet, poles, and guy lines. A footprint or groundsheet is also helpful.
Conclusion
Laying down a tent in 76 is simple with the right steps. Start by choosing a flat spot and clear debris. Unfold your tent carefully and spread it out. Secure the corners with stakes to keep it steady. Attach the poles and raise the tent frame.
Check all sides for tightness and adjust as needed. This process ensures a safe and comfortable shelter. Practice helps you set up faster each time. Enjoy your outdoor experience with confidence and ease. Ready for your next camping trip?