Are you tired of your fishing line slipping or breaking just when the big catch is on the hook? Knowing how to connect your fishing line properly can make all the difference between a frustrating day and a successful one on the water.
In this guide, you’ll discover simple, reliable methods to tie your line like a pro—no complicated knots or confusing steps. By the time you finish reading, you’ll have the confidence to set up your gear quickly and fish with peace of mind.
Let’s dive in and make sure your next fishing trip is your best yet!
Credit: fishhunted.com
Choosing The Right Fishing Line
Choosing the right fishing line is important for a good fishing experience. The line connects your rod and lure to the fish.
Using the correct line helps you catch fish more easily and prevents breaks or tangles.
Types Of Fishing Lines
There are three main types of fishing lines: monofilament, fluorocarbon, and braided. Each has different features.
- Monofilament:Flexible and easy to handle. Good for beginners.
- Fluorocarbon:Nearly invisible underwater. Great for clear water fishing.
- Braided:Very strong and thin. Good for heavy cover or large fish.
Selecting Line Strength
Line strength is measured in pounds. It shows how much weight the line can hold before breaking.
| Fish Type | Recommended Line Strength (lbs) |
| Small Panfish | 2-6 |
| Trout and Bass | 6-12 |
| Walleye and Pike | 12-20 |
| Large Saltwater Fish | 20-50+ |
Considerations For Different Fish
Different fish need different lines. Consider the fish’s size, strength, and where it lives.
- Small fish:Use light and thin lines for better sensitivity.
- Strong fish:Use thicker, stronger lines to avoid breaks.
- Clear water:Use lines that are less visible, like fluorocarbon.
- Heavy cover:Use braided lines to resist abrasion from plants and rocks.

Credit: www.reddit.com
Essential Knot Types
Fishing knots keep your line strong and secure. Choosing the right knot helps catch fish easily.
Below are some common knots used by anglers. Each has a special use and method.
Improved Clinch Knot
The Improved Clinch Knot is popular for tying the line to a hook or lure. It is strong and easy to tie.
- Pass the line through the hook eye
- Wrap the tag end around the standing line 5-7 times
- Thread the tag end through the small loop near the eye
- Pass the tag end through the big loop
- Moisten the knot and pull tight
Palomar Knot
The Palomar Knot is very strong and simple. It works well with braided and monofilament lines.
To tie the Palomar Knot:
- Double about 6 inches of line and pass it through the hook eye
- Tie a loose overhand knot with the doubled line
- Pass the hook through the loop
- Moisten the knot and pull both ends to tighten
Uni Knot
The Uni Knot works great for attaching the line to a hook or joining two lines. It is easy to adjust before tightening.
Steps to tie a Uni Knot:
- Pass the line through the hook eye and double back
- Make a loop by laying the tag end alongside the doubled line
- Twist the tag end around the doubled line 5-6 times
- Pull the tag end to tighten the coils against the eye
- Slide the knot down and pull the standing line to secure
Loop Knot
The Loop Knot gives the lure more action in the water. It creates a strong loop that lets the lure move freely.
| Loop Knot Type | Best Use | Strength |
|---|---|---|
| Non-Slip Loop Knot | Big lures and baits | High |
| Perfection Loop Knot | Light lines and small lures | Medium |
Preparing The Line
Preparing your fishing line is an important step before connecting it to your reel or hook. This helps ensure strong knots and smooth casting. Taking time to prepare the line can prevent breaks and tangles.
Two key tasks for preparing the line are trimming and cleaning, and moistening the line. Both improve the line’s performance and durability.
Trimming And Cleaning
Start by cutting off any damaged or frayed parts of the line. Use sharp scissors or a line cutter for a clean cut. Next, clean the line to remove dirt, salt, or debris that can weaken it.
- Inspect the line closely for nicks or abrasions
- Trim the damaged section with sharp scissors
- Wipe the line with a damp cloth to remove dirt
- Let the line dry completely before tying knots
Moistening The Line
Before tying knots, moisten the line slightly. This reduces friction and heat when tightening knots. It helps the knot hold better and prevents the line from weakening.
| Moistening Method | Purpose |
| Use water or saliva | Lubricate the line for smooth knot tightening |
| Apply a light mist spray | Keep the line flexible and reduce breakage |
| Wipe off excess moisture | Prevent dirt sticking to the line |
Step-by-step Knot Tying
Connecting a fishing line securely is key for a good catch. Tying knots correctly keeps your line strong and safe. Below are easy ways to tie three popular fishing knots.
Tying The Improved Clinch Knot
The Improved Clinch Knot is a common choice for attaching line to a hook. It is strong and simple to tie. Follow these steps carefully.
- Thread the line through the hook eye.
- Wrap the tag end around the standing line five times.
- Pass the tag end through the small loop near the eye.
- Bring the tag end back through the big loop just formed.
- Wet the knot and pull both ends to tighten.
- Trim the excess tag end close to the knot.
Tying The Palomar Knot
The Palomar Knot is strong and works well with braided lines. It keeps the line from slipping. Use these simple steps to tie it.
- Double about six inches of line and pass it through the hook eye.
- Tie a loose overhand knot with the doubled line.
- Pass the hook through the loop of the overhand knot.
- Pull the loop over the hook.
- Wet the knot and pull on both the tag and standing lines to tighten.
- Cut the tag end close to the knot.
Tying The Uni Knot
The Uni Knot is versatile and easy to adjust. It works well for attaching hooks or joining lines. Here is how to tie it.
| Action | Description |
|---|---|
| Pass line through eye | Thread the tag end through the hook eye, then double back. |
| Form a loop | Create a loop by laying the tag end alongside the standing line. |
| Wrap the tag end | Make five turns with the tag end around both the standing line and loop. |
| Pull tag end | Feed the tag end back through the loop near the eye. |
| Tighten knot | Wet the knot and pull the standing line to close it tight. |
| Trim excess | Cut the tag end close to the knot. |
Testing Knot Strength
Testing your fishing knot’s strength is very important. It helps ensure the knot will hold when you catch a fish.
By checking the knot, you avoid losing fish and gear. A strong knot means a better fishing experience.
Pulling Techniques
Pull the line slowly and steadily to test the knot. Avoid quick, sharp pulls that may give false results.
Try pulling the line in different directions to check how well the knot holds under stress.
- Hold the line near the knot with one hand.
- Pull the free end slowly with the other hand.
- Apply steady pressure until you feel resistance.
- Check if the knot slips or loosens.
Signs Of Weak Knots
A weak knot can slip, loosen, or look uneven. These signs show the knot may fail when fishing.
Look for frayed line near the knot or gaps in the wraps. These problems weaken the knot’s hold.
- The knot slides under pressure.
- The line twists or bends oddly near the knot.
- The knot looks loose or uneven.
- Line fibers are damaged or frayed.

Credit: m.youtube.com
Tips For Maintaining Knots
Keeping your fishing knots strong helps you catch more fish. Weak knots can break and lose your catch.
Simple care and checks can keep your knots reliable for every fishing trip.
Regular Inspection
Check your knots often for any signs of wear or damage. Look for frays, looseness, or slipping lines.
Inspect knots before and after each fishing trip to avoid surprises in the water.
- Look for worn spots on the line near the knot
- Test knot tightness by pulling gently
- Replace knots showing any weakness
Replacing Old Knots
Old knots lose strength over time. Replace them to keep your line secure.
Cut the old knot and tie a new one using a strong, tested fishing knot.
- Use fresh line if the old one looks worn
- Wet the knot before tightening to prevent damage
- Trim excess line close to the knot
Frequently Asked Questions
How Do I Tie A Fishing Line To A Hook?
To tie a fishing line to a hook, use the improved clinch knot. Thread the line through the hook eye, wrap it five times, pass the tag end through the loop, and pull tight. This knot is strong and reliable for most fishing situations.
What Is The Best Knot For Connecting Fishing Lines?
The Palomar knot is the best for connecting fishing lines. It is simple, strong, and easy to tie. Double the line, pass it through the hook eye, tie a loose overhand knot, pass the loop over the hook, and tighten securely.
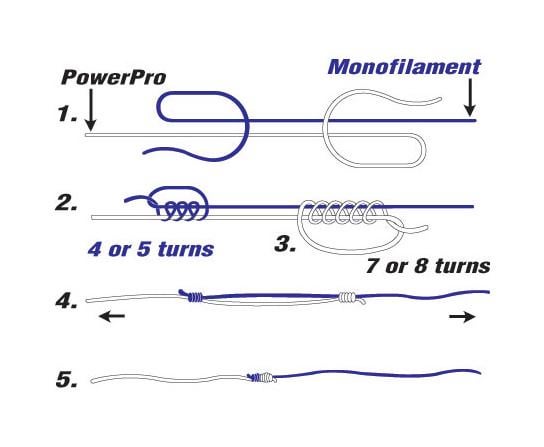
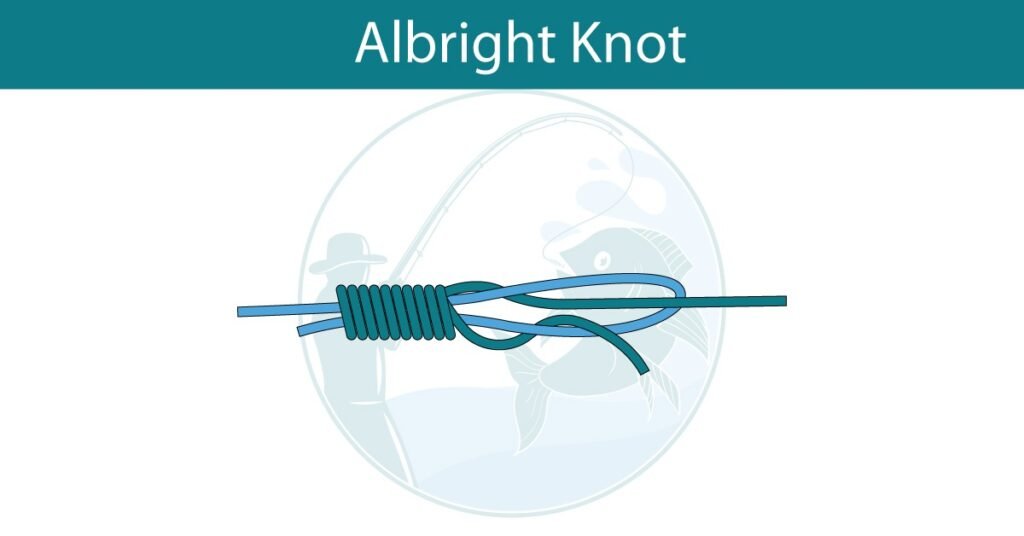
How Can I Join Two Fishing Lines Together?
To join two fishing lines, use the blood knot or double uni knot. Overlap the lines, wrap each around the other five times, and pull the knots tight. These knots ensure a strong, smooth connection suitable for different line types.
When Should I Replace My Fishing Line?
Replace your fishing line after visible damage, frequent use, or every season. Old lines lose strength and increase the risk of snapping. Regular inspection and replacement improve fishing success and prevent lost catches.
Conclusion
Connecting a fishing line is simple with practice. Follow the steps carefully. Tie knots tightly to avoid slipping. Always check your gear before fishing. Secure connections ensure a successful fishing trip. With these tips, you can cast confidently. Enjoy your time by the water.
Fishing is fun and relaxing. Remember to be patient and persistent. Happy fishing!