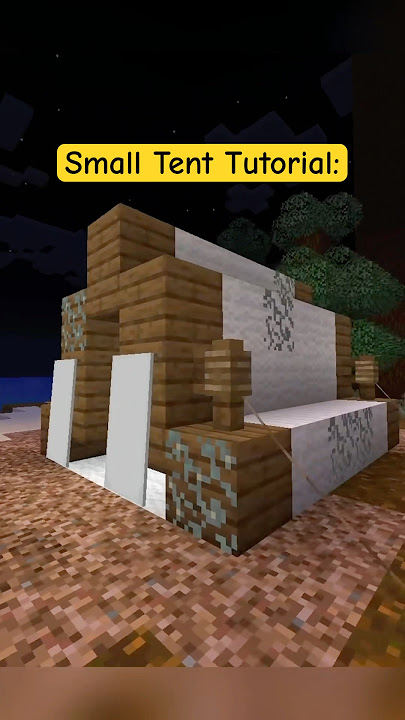
Are you looking for a simple way to create a cozy shelter in Minecraft? Making a tent is one of the best ways to stay safe and feel at home while exploring your world.
Whether you’re new to the game or want to add a cool new feature to your base, this guide will show you exactly how to build a tent step by step. By the end, you’ll have a stylish, practical tent that fits your style and keeps you protected.
Ready to start crafting your perfect Minecraft tent? Let’s dive in!
Materials Needed
Building a tent in Minecraft needs some simple materials. You will gather wood, sticks, and wool for the tent fabric.
These items help you create a basic and functional tent for shelter in the game.
Gathering Wood And Sticks
Wood is the main material for your tent’s frame. You get wood by chopping trees. Sticks come from wood and are used to make the tent’s structure.
Collect enough wood blocks and craft them into planks. Then, turn some planks into sticks using the crafting menu.
- Chop tree logs with an axe or by hand
- Convert logs to wooden planks in crafting
- Make sticks by crafting two wooden planks vertically
Collecting Wool For Tent Fabric
Wool makes the fabric part of the tent. You get wool from sheep. Use shears to collect wool without hurting the sheep.
Wool can be white or dyed different colors. White wool is easiest to find and use for your tent fabric.
- Find sheep in plains or forest biomes
- Use shears on sheep to collect wool
- Collect multiple wool blocks for a bigger tent
Additional Useful Items
Some extra items help improve your tent. Torches add light inside the tent. A crafting table helps build parts faster.
You can also use fences or slabs to create a better-looking tent. These items add detail and protection.
- Torches for lighting inside and around the tent
- Crafting table for making all tent parts
- Fences or slabs for decoration and structure

Credit: www.reddit.com
Choosing A Campsite
Building a tent in Minecraft starts with picking the right campsite. A good spot keeps you safe and helps you survive.
Think about the land, safety, and resources near the place where you want to build.
Finding A Flat Area
Look for flat ground to place your tent. Flat areas make building easier and faster.
Avoid hills or uneven land. You need space to build and move around your tent.
- Check the land for smooth, even blocks
- Clear tall grass or flowers before building
- Use tools like a shovel to level the ground if needed
Safe Location From Mobs
Choose a spot where mobs cannot easily reach you. Safety is very important at night.
Avoid building near dark caves or dense forests where monsters spawn often.
- Build near well-lit areas or place torches around your tent
- Stay away from places with many mob spawns
- Consider building walls or fences to block mobs
Nearby Resources
Pick a campsite close to resources like wood, water, and food. It helps you survive longer.
Having resources nearby means less travel time and less danger from mobs.
- Find trees for wood to build and craft
- Look for water sources to fish or farm
- Check for animals or farms to get food
Basic Tent Structure
Building a tent in Minecraft gives you shelter and style. You can create a simple tent with basic materials. This guide shows you how to build a basic tent structure step by step.
The tent has three main parts: the frame, the walls, and the roof. Each part is important for a complete build.
Building The Frame
Start by making the frame of your tent. Use wood logs or sticks to create a rectangle on the ground. This will be the base of the tent.
- Place four vertical logs at the corners.
- Connect the tops with horizontal logs to form a box shape.
- Make sure the frame is tall enough for a player to enter.
Adding The Tent Walls
After the frame is ready, add walls to give your tent shape and protection. Wool blocks are a good choice for walls.
- Fill the spaces between the frame logs with wool blocks.
- Leave an opening for the door.
- You can use different colors for a creative look.
Creating The Tent Roof
The roof keeps the tent covered and looks nice. You can use stairs or slabs for a sloped roof.
| Material | Purpose |
| Wooden Stairs | Create angled roof edges |
| Wool Blocks | Fill roof center |
| Wooden Slabs | Add extra roof layers |

Credit: m.youtube.com
Decorating Your Tent
Making a tent in Minecraft is fun, but decorating it makes it feel like home. You can add details to make it look cozy and useful.
Simple decorations help your tent stand out and improve your camping experience in the game.
Adding A Doorway
A doorway gives your tent a clear entrance and keeps mobs out. You can use fences, gates, or trapdoors to create one.
Place blocks on the sides and leave space for your door. Adding a door helps protect you from monsters at night.
- Use fence gates for a simple wooden door
- Trapdoors can make a small, low entrance
- Make the doorway wide enough to walk through easily
Setting Up A Campfire
A campfire adds light and warmth near your tent. It also creates smoke, which can be seen from far away.
Place the campfire outside your tent but close enough to enjoy the light and smoke signals.
- Craft a campfire using sticks, wood, and coal
- Set it on a flat block near the tent entrance
- Keep space around it to avoid fire damage
Placing Beds And Storage
Beds let you sleep and set your spawn point inside the tent. Storage blocks keep your items safe and organized.
Put the bed and chests inside the tent, making sure there is enough room to move around.
- Use a bed to sleep through the night
- Place chests to store tools, food, and resources
- Arrange items so you can find them quickly
Advanced Tent Designs
Creating tents in Minecraft can be simple or complex. Advanced designs offer more space and style.
This guide covers multi-room tents, using different materials, and adding lighting effects.
Multi-room Tents
Multi-room tents provide extra space for storage and crafting. You can connect several smaller tents to form one large shelter.
- Build a main tent as the center room.
- Attach smaller tents on the sides for beds and chests.
- Use wooden fences or wool blocks to separate rooms.
- Make doorways with trapdoors or gates.
- Keep pathways clear for easy movement.
Using Different Materials
Choosing materials affects the tent’s look and durability. Wool and wood are common, but you can mix others for style.
| Material | Advantages | Drawbacks |
| Wool | Easy to find, colorful | Flammable |
| Wood Planks | Strong and natural look | Can catch fire |
| Terracotta | Variety of colors, non-flammable | Harder to collect |
| Concrete | Bright colors, solid | Requires crafting |
Incorporating Lighting
Lighting makes tents safer and more welcoming. Use light sources to avoid mob spawns inside.
Try these lighting options:
- Torch blocks on tent walls
- Lanterns hanging from the ceiling
- Glowstone or sea lanterns embedded in the floor
- Redstone lamps with switches for control
Tips For Tent Maintenance
Building a tent in Minecraft is fun, but keeping it in good shape is important. A well-maintained tent lasts longer and looks better.
Here are some simple tips to help you care for your Minecraft tent and keep it safe.
Protecting From Weather
Weather can harm your tent by causing damage or making it less useful. Protect your tent from rain, snow, and wind.
Place your tent near trees or hills to block strong winds. Use blocks like glass or fences to create a windbreak.
- Build a roof extension to keep rain off your tent
- Use wool or carpets inside to keep the floor dry
- Avoid low places where water can collect
Repairs After Damage
Tents can get broken by mobs or accidents. Fix your tent quickly to keep it safe and useful.
Carry extra materials like wood, wool, and string to replace broken parts fast. Check your tent often for damage.
- Replace torn wool blocks to keep the tent waterproof
- Fix broken doors or trapdoors to keep mobs out
- Repair or rebuild supports like fences or logs
Expanding Your Camp
As you explore, you may want to grow your camp. Expanding your tent space helps you store more items and rest easier.
Add new rooms or tents close to your original one. Connect them with paths or fences to keep everything organized.
- Add storage rooms with chests for supplies
- Build extra sleeping areas with beds
- Create cooking or crafting spots near your tent

Credit: www.youtube.com
Frequently Asked Questions
How Do You Craft A Basic Tent In Minecraft?
To craft a basic tent, gather wool and wooden sticks. Create wool panels for walls and use sticks for the frame. Place wool blocks in a triangular shape to form a roof. This simple design offers shelter from mobs and weather.
What Materials Are Best For Minecraft Tents?
Wool is best for tent walls due to its easy access and color variety. Wooden planks or sticks work well for the frame. Combining these materials creates a lightweight, durable shelter that blends with the environment.
Can You Make A Portable Tent In Minecraft?
Yes, you can build a portable tent using beds and wool. Craft a small tent frame with wool blocks and place a bed inside. This setup allows quick shelter and respawn points while exploring.
How To Decorate A Minecraft Tent Interior?
Decorate with carpets, torches, and chests for storage. Use paintings and flower pots for aesthetics. Adding furniture like beds and crafting tables improves functionality and comfort inside your tent.
Conclusion
Crafting a tent in Minecraft is simple and fun. Gather wood and wool. Arrange the blocks as a shelter. Experiment with shapes and sizes. Make it cozy with beds and chests. Add torches for light. Your tent becomes a safe home.
Get creative with colors and designs. Enjoy the adventure in your new Minecraft world. Building offers endless possibilities. The tent is just the start. Keep exploring and expanding. Minecraft encourages imagination and creativity. Dive into your virtual landscape. Have fun creating and survive the wilds.
Your journey in Minecraft has only just begun.