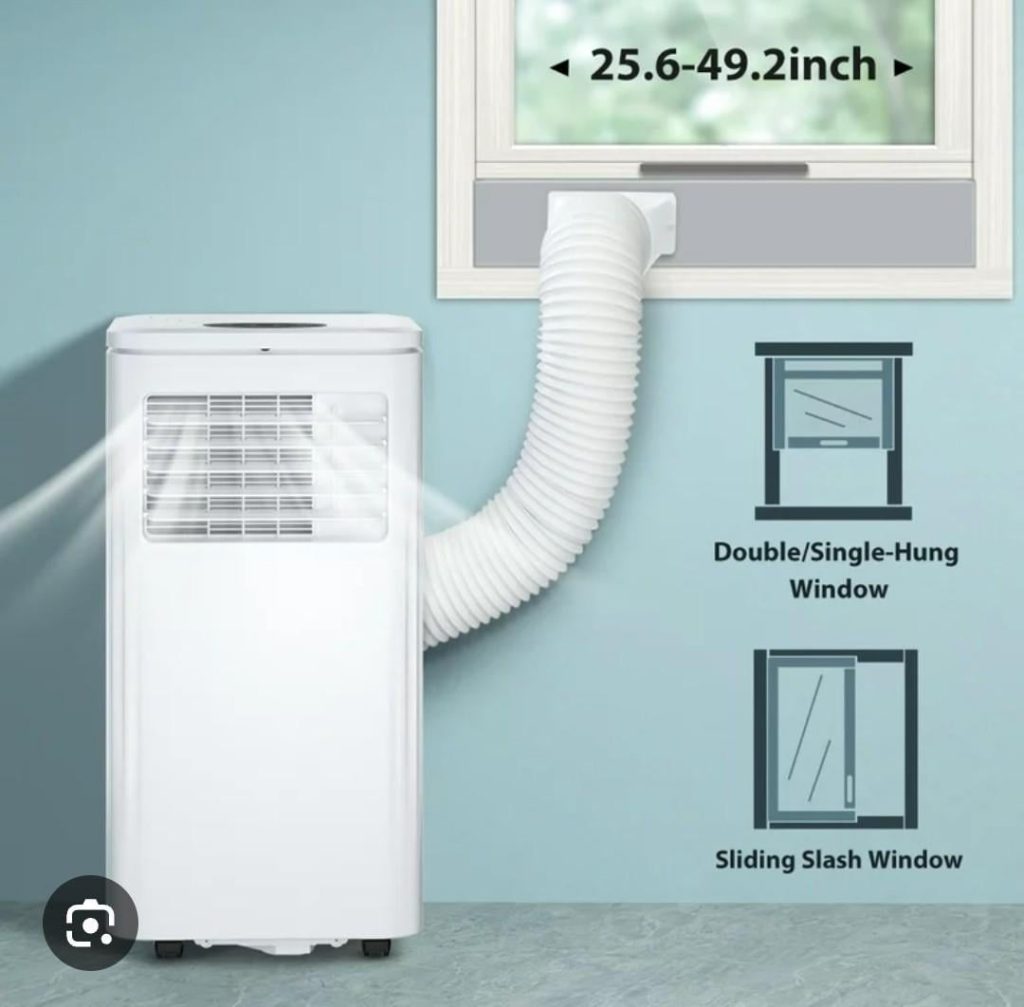
Are you struggling to keep your room cool without making a big mess? Installing a portable air conditioner in your window might be the simple solution you need.
But how exactly do you put it there securely and efficiently? This guide will walk you through easy steps to set up your portable air conditioner, so you can enjoy cool, fresh air without any hassle. Keep reading, and you’ll learn how to make your space comfortable fast—no stress, no confusion.
Choose The Right Window
Picking the right window is key to installing a portable air conditioner. The window must fit the unit well and hold it securely.
Check your window carefully before buying or setting up the air conditioner. This saves time and avoids problems.
Measure Window Dimensions
Measure the width and height of your window opening. This tells you if the air conditioner will fit.
Use a tape measure and write down the size in inches. Measure both sides and the middle to be sure.
- Measure the width at the top, middle, and bottom
- Measure the height on both sides
- Note the smallest width and height measurements
Check Window Type
Look at how your window opens. Portable air conditioners usually work best with sliding or double-hung windows.
Some windows do not hold the unit safely or allow proper venting. Know your window type before installation.
- Sliding windows open sideways and are easy to seal
- Double-hung windows slide up and down
- Casement windows open outward and may need extra support
- Awning windows usually do not fit portable ACs well
Consider Power Source Location
Check where your electrical outlets are near the window. The air conditioner needs to plug in safely.
Make sure the power cord reaches the outlet without stretching or causing hazards.
- Locate the nearest outlet to your window
- Avoid using long extension cords
- Ensure the outlet can handle the air conditioner’s power needs
- Keep the cord away from water and foot traffic
Prepare The Window Area
Before installing a portable air conditioner in your window, you need to prepare the area properly. This helps the unit fit well and work efficiently.
Focus on cleaning and clearing the window space. A tidy area makes the installation easier and safer.
Clean The Window Frame
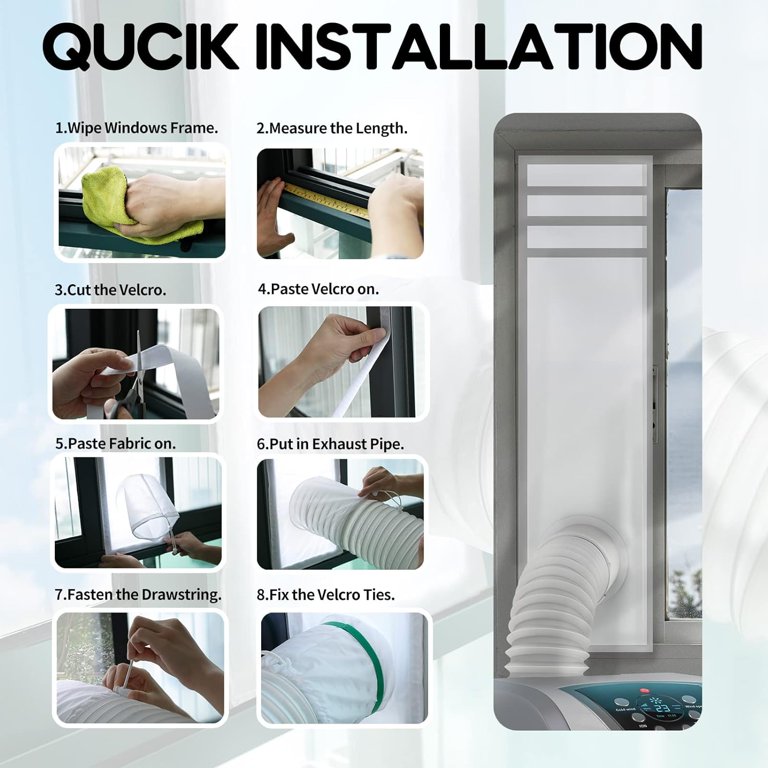
Start by wiping down the window frame. Remove dust, dirt, and old paint to ensure a smooth surface.
Check for any damage or gaps in the frame. Fix these issues before placing the air conditioner.
- Use a damp cloth to clean the frame
- Scrape off peeling paint or debris
- Seal any cracks or holes with weatherproof sealant
Clear Obstacles Around Window
Remove objects near the window that block access or airflow. This includes curtains, blinds, or furniture.
Make sure there is enough space outside the window for the unit’s exhaust hose to fit properly.
- Move curtains or blinds away from the window
- Clear furniture or decorations near the window
- Check outside for plants or items blocking the window
Assemble The Air Conditioner Kit
Putting your portable air conditioner in the window starts with assembling the kit. This process prepares the unit for installation.
Follow simple steps to unpack the parts, attach the exhaust hose, and install the window slider kit correctly.
Unpack Components
Remove all parts from the box carefully. Check for any damage or missing pieces before starting assembly.
- Portable air conditioner unit
- Exhaust hose
- Window slider kit (panels and seals)
- Screws and connectors
- User manual
Attach Exhaust Hose
Connect the exhaust hose to the air conditioner’s vent outlet. This hose will carry hot air outside.
Make sure the hose fits tightly to avoid air leaks. Use the clamps or connectors included in the kit.
| Part | Description |
| Exhaust Hose | Flexible tube that vents hot air |
| Clamp | Secures hose to air conditioner and window kit |
| Connector | Joins hose sections or attaches to window panel |
Install Window Slider Kit
Place the window slider panel into the open window. Adjust the panel length to fit your window width.
- Extend the panel to fit the window frame.
- Lock the panel in place using the included screws.
- Attach the exhaust hose connector to the panel opening.
- Seal any gaps with weather strips to block air leaks.

Credit: www.dreo.com
Install The Air Conditioner
Installing a portable air conditioner in a window is simple. It helps cool your room efficiently. Follow these steps carefully to ensure proper installation.
Make sure you have all parts ready before starting. This guide covers placing the unit, securing it, and sealing gaps.
Place Unit On Window Sill
First, open the window wide enough to fit the air conditioner. Lift the unit carefully and place it on the window sill. The exhaust hose should face outside.
Secure Unit With Brackets
Use the brackets provided with your air conditioner to hold it in place. These prevent the unit from moving or falling.
- Attach the brackets to the sides of the air conditioner.
- Align the brackets with the window frame.
- Screw the brackets into the window frame securely.
- Check that the unit is stable and does not wobble.
Seal Gaps And Openings
After securing the unit, close the window to rest on the top of the air conditioner. Seal all openings to keep air from leaking.
| Material | Purpose |
| Foam Seal | Fill gaps between window and unit |
| Weather Stripping | Seal window edges |
| Plastic Panels | Cover large open areas |
| Adhesive Tape | Secure seals and prevent drafts |
Connect And Test The Unit
After placing your portable air conditioner in the window, you need to connect it properly. Testing the unit ensures it works well and cools your room.
Follow simple steps to plug in, turn on, and check the exhaust hose venting. This helps your air conditioner run safely and efficiently.
Plug In Power Cord
Find the power cord attached to your air conditioner. Plug it into a nearby electrical outlet that matches the unit’s voltage needs.
Avoid using extension cords or power strips. These can cause power issues or safety hazards.
Turn On And Adjust Settings
Press the power button to turn on the air conditioner. Use the control panel or remote to set your preferred temperature.
Adjust fan speed and mode to suit your comfort. Let the unit run for a few minutes to check if it cools properly.
Check Exhaust Hose Venting
Ensure the exhaust hose is connected securely to the back of the unit. The hose must vent hot air outside the window.
Check for any bends or kinks in the hose. A clear and straight hose helps the air conditioner work efficiently.
- Attach hose firmly to the unit and window kit
- Keep hose straight without sharp bends
- Make sure window kit seals the opening well
Credit: www.walmart.com
Maintenance Tips
Keeping your portable air conditioner in good shape helps it work well. Regular care can make it last longer and cool better.
This guide shares easy maintenance tips to keep your window-installed unit running smoothly.
Clean Filters Regularly
Dirty filters reduce cooling power and cause the unit to work harder. Clean filters every two weeks during use.
Remove the filter from the unit and rinse it with warm water. Let it dry completely before putting it back.
- Turn off and unplug the unit before cleaning
- Use a soft brush to remove dust
- Do not use harsh detergents
- Replace filters if damaged or very dirty
Store Unit During Off-season
Proper storage keeps your portable air conditioner safe during cold months. It prevents damage and dirt buildup.
Clean the unit and dry all parts before storing. Cover it with a cloth or plastic to keep dust away.
- Drain all water from the unit
- Clean filters and vents
- Store in a dry, cool place
- Avoid stacking heavy items on top

Credit: www.youtube.com
Frequently Asked Questions
How Do I Install A Portable Ac In A Window?
First, secure the portable AC’s exhaust hose to the window kit. Adjust the window kit to fit the window. Seal gaps with weatherstripping for efficiency. Plug in the AC and turn it on to test cooling.
Can I Use Any Window For Portable Ac Installation?
Most portable ACs fit standard sliding or double-hung windows. Ensure the window can close securely with the window kit installed. Avoid windows that open outward or have irregular shapes for best results.
Do I Need Tools To Install A Portable Ac In A Window?
Basic tools like a screwdriver, tape measure, and scissors are helpful. Some window kits may require a drill or level. Always check the AC manual for specific installation tool requirements before starting.
How To Seal Gaps When Installing A Window Portable Ac?
Use weatherstripping foam or insulation tape around the window kit edges. This prevents hot air and insects from entering. Make sure the seal is tight but allows the window to close properly.
Conclusion
Setting up a portable air conditioner in a window is simple. Follow the steps to ensure a secure fit. Check the seal around the window. This keeps cool air inside. Ensure the exhaust hose is straight. This helps the unit work efficiently.
Regular maintenance keeps it running smoothly. Clean the filters to improve performance. Always read the manual for specific instructions. Enjoy a cooler space during hot months. It’s an easy way to beat the heat.