Is your fishing rod showing signs of wear or damage? Don’t let a broken rod ruin your next fishing trip.
You can fix it yourself with the right steps and tools. Imagine saving money and getting back on the water quickly, without waiting for a repair shop. In this guide, you’ll learn simple, clear methods to repair your fishing rod and keep it in top shape.
Keep reading—you’ll be casting again in no time!
Common Rod Issues
Fishing rods are strong but can get damaged after use. Fixing small problems keeps them working well.
Learn about common rod issues and how to repair them yourself with simple tips.
Broken Guides
Guides help the fishing line run smoothly along the rod. Broken guides can cause line breaks and poor casting.
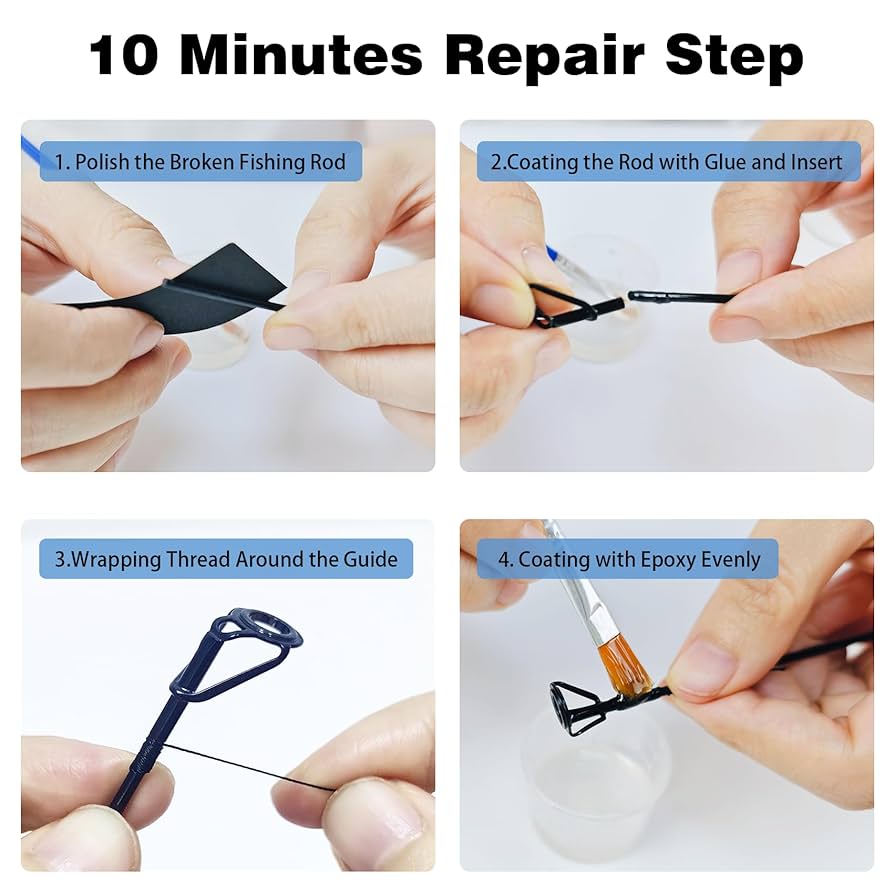
Replace broken guides with new ones. Use a heat source to soften glue and remove the old guide carefully.
- Remove the damaged guide by heating the wrapping
- Clean old glue from the rod
- Place the new guide in the correct position
- Wrap thread tightly around the guide foot
- Apply epoxy to secure the wrapping
Cracked Rod Blank
A cracked rod blank weakens the rod and can break under pressure. Fix cracks early to avoid bigger damage.
| Type of Crack | Repair Method |
|---|---|
| Small surface crack | Use strong epoxy glue and wrap with fiberglass tape |
| Deep crack | Replace the rod blank or consult a professional |
| Hairline crack | Apply clear nail polish or thin epoxy for protection |
Loose Reel Seat
A loose reel seat makes fishing uncomfortable and can cause reel damage. Tighten or fix it to keep the reel steady.
Use the following tips to fix a loose reel seat:
- Remove the reel from the seat
- Check for dirt or debris inside the seat
- Clean the reel seat with rubbing alcohol
- Apply a small amount of waterproof glue or tape
- Reinstall the reel and tighten the seat firmly
Damaged Handle
Handles can wear out or crack from heavy use. Repairing or replacing the handle improves grip and comfort.
Common handle repairs include:
- Replacing cork or foam grips
- Using epoxy putty to fill cracks
- Sanding rough spots smooth
- Wrapping with grip tape for extra comfort

Credit: www.youtube.com
Tools And Materials Needed
Fixing a fishing rod needs the right tools and materials. Using proper items helps you repair the rod correctly.
This guide lists the main tools and parts to have before starting your fishing rod repair.
Essential Repair Tools
You need some basic tools to fix a fishing rod. These tools help you handle small parts and make precise repairs.
- Needle-nose pliers for bending and holding small parts
- Utility knife or razor blade for cutting tape or thread
- Small screwdriver set for loosening screws
- Sandpaper or emery cloth to smooth rough areas
- Heat gun or lighter to shrink heat shrink tubing
- Measuring tape or ruler for accurate sizing
- Clamps or clothespins to hold parts while glue dries
Replacement Parts
Some parts of the fishing rod may need to be replaced. Having these parts ready saves time during repair.
- Rod guides or eyes that direct the fishing line
- Tip tops, the small ring at the rod’s tip
- Handle grips made of cork or foam
- Reel seats to hold the fishing reel firmly
- Thread for wrapping and securing guides
Adhesives And Tapes
Strong adhesives and tapes hold parts together during and after repair. Use the right type to avoid damage.
- Epoxy glue for strong, waterproof bonds
- Super glue for quick fixes on small parts
- Heat shrink tubing to protect and seal joints
- Thread wrapping tape to secure guides tightly
- Electrical tape for temporary holds or insulation
Fixing Broken Guides
Fishing rod guides can break after heavy use or accidental damage. Fixing them yourself saves money and keeps your rod ready to fish. This guide covers removing old guides, picking new ones, and attaching them correctly.
Follow each section carefully to ensure your fishing rod works well again. Use simple tools and take your time for the best results.
Removing Old Guides
Start by removing the damaged guide without hurting the rod blank. Use heat to soften the glue or thread. A lighter or heat gun works well but be careful not to burn the rod.
- Warm the old guide with a lighter or heat gun
- Use tweezers or pliers to gently pull off the guide
- Remove leftover glue and thread with sandpaper or a razor blade
Selecting Replacement Guides
Choose guides that fit your rod and fishing style. Size and material affect rod performance and durability. Check the diameter and frame type before buying.
| Guide Type | Best Use | Material |
| Single-foot | Light rods | Stainless steel |
| Double-foot | Heavy rods | Aluminum oxide |
| Spinning | Spinning rods | Ceramic inserts |
Attaching New Guides
Fix the new guides firmly using thread wrapping and epoxy. Proper alignment is key to smooth casting and line flow.
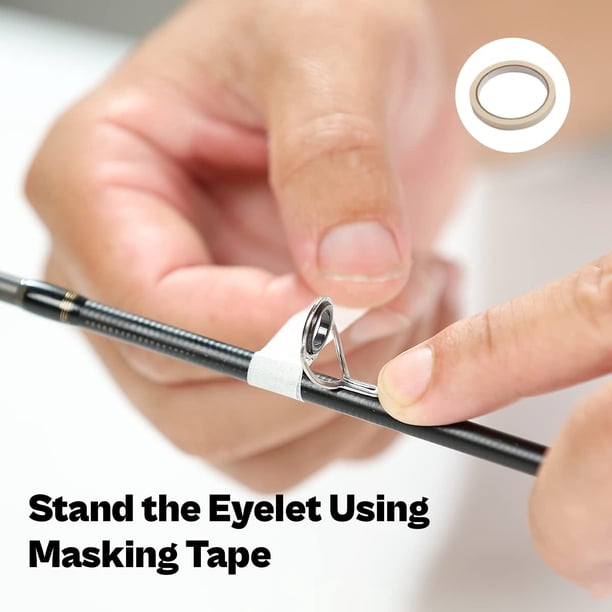
- Position the new guide on the rod blank
- Wrap the guide foot tightly with rod wrapping thread
- Apply epoxy over the thread to secure and protect it
- Let the epoxy cure for 24 hours before use
Repairing Cracks In Rod Blank
Fishing rods can crack from heavy use or accidental drops. Fixing cracks early keeps the rod strong. This guide covers how to repair cracks in the rod blank safely.
Use simple tools and materials like epoxy resin and fiberglass tape. Follow these steps to restore your rod’s performance.
Assessing The Damage
Look closely at the crack to see how deep and long it is. Some cracks may only affect the surface. Others can go through the rod blank.
- Clean the rod blank and dry it well.
- Use a magnifying glass to check crack edges.
- Press gently to test if the rod feels weak.
- Mark the crack length with a pencil.
- Decide if repair is possible or if replacement is needed.
Applying Epoxy Resin
Epoxy resin seals the crack and binds the material. Use a slow hardening epoxy for better strength. Mix the resin as per instructions.
- Smooth the crack edges with fine sandpaper.
- Apply epoxy resin evenly over the crack.
- Use a small brush to push resin inside the crack.
- Remove air bubbles with a toothpick or pin.
- Let the resin cure for the time recommended.
Reinforcing With Fiberglass Tape
Fiberglass tape adds strength and prevents the crack from growing. Wrap the tape tightly around the rod blank after the epoxy has cured.
| Material | Purpose | Notes |
| Fiberglass Tape | Reinforces the crack area | Use thin tape for better flexibility |
| Epoxy Resin | Seals and bonds the crack | Choose slow curing type |
| Sandpaper (Fine) | Prepares surface for resin | Use 400-600 grit |
After wrapping, apply a thin coat of epoxy over the tape. Let it dry fully before using the rod again.
Securing A Loose Reel Seat
A loose reel seat can make fishing difficult and unsafe. It can cause the reel to wobble or even fall off. Fixing it is simple and saves money.
Follow these steps to identify the problem and secure your reel seat properly. This will improve your fishing experience.
Identifying The Cause
First, check why the reel seat feels loose. It can be due to worn threads, dirt, or damage. Look closely at the reel seat and rod.
- Inspect the threads on the reel seat for wear or damage.
- Check for dirt or debris inside the reel seat.
- Look for cracks or breaks on the reel seat or rod.
- Test if the reel tightens fully without slipping.
Tightening Techniques
Use these methods to tighten the reel seat securely. Be careful not to overtighten and damage the rod.
- Remove the reel and clean the reel seat threads.
- Apply a small amount of grip tape or thread tape around the reel seat threads.
- Replace the reel and screw the reel seat firmly but gently.
- Test by holding the reel and rod to ensure no movement.
Using Thread Sealant
Thread sealant helps keep the reel seat tight and prevents loosening from vibrations.
| Type | Use | Drying Time |
| Rubber-based | Easy to remove later | 10-15 minutes |
| Permanent Threadlocker | Strong hold, not removable | 24 hours |
| Silicone Sealant | Waterproof and flexible | 30 minutes |
Apply a small drop to the threads, then tighten the reel seat. Let the sealant dry as per instructions. This will keep the reel seat secure.
Replacing Or Fixing Handles
Fixing or replacing a fishing rod handle can make your rod feel new again. A good handle improves grip and comfort while fishing.
This guide shows how to remove an old handle, choose new materials, and install a new handle on your rod.
Removing Old Handle
Take off the old handle carefully to avoid damage to the rod blank. Use tools and techniques to loosen and remove it.
- Heat the handle area with a heat gun or hair dryer to soften the glue.
- Gently twist and pull the old handle off the rod blank.
- Clean any leftover glue or residue from the rod with sandpaper.
Choosing Handle Materials
Pick a handle material that suits your fishing style and comfort needs. Different materials offer various benefits.
| Material | Advantages | Disadvantages |
| Cork | Lightweight, good grip | Can wear out quickly |
| EVA Foam | Durable, soft | Heavier than cork |
| Wood | Classic look, sturdy | Can be slippery when wet |
Installing New Handle
Attach the new handle firmly to the rod blank. Use proper adhesives and secure fitting for best results.
Follow these tips for installation:
- Apply a thin layer of epoxy glue inside the handle.
- Slide the handle onto the rod blank with a twisting motion.
- Wipe off excess glue before it hardens.
- Let the glue dry fully, usually 24 hours.
Preventive Care Tips
Taking care of your fishing rod helps it last longer and work better. Simple habits can stop damage before it starts.
Regular care saves money and keeps your rod ready for fishing trips. Learn easy ways to protect your gear.
Regular Inspections
Check your fishing rod often for signs of wear or damage. Look closely at the guides, reel seat, and rod blank.
- Look for cracks or breaks in the rod blank
- Make sure guides are not bent or loose
- Check reel seat for tightness and corrosion
- Inspect handle for damage or wear
Proper Storage Methods
Store your fishing rod in a dry, cool place away from sunlight. Proper storage prevents warping and damage.
| Storage Method | Benefit |
| Use rod racks or holders | Keeps rod straight and safe |
| Store horizontally or vertically | Prevents bending or warping |
| Avoid damp or hot areas | Stops rust and material decay |
| Keep away from direct sunlight | Protects rod finish and strength |
Routine Maintenance
Clean your rod and reel after each use. Regular maintenance keeps your rod smooth and working well.
- Rinse rod with fresh water after fishing
- Dry thoroughly before storing
- Apply light oil on metal parts to prevent rust
- Tighten any loose parts or screws
- Replace worn-out guides or handles as needed
Credit: www.walmart.ca

Credit: www.youtube.com
Frequently Asked Questions
How Do I Fix A Broken Fishing Rod Tip?
To fix a broken tip, first remove the damaged section. Then, use epoxy glue to attach a new tip guide. Let it dry completely before use. This repair restores rod performance without professional help.
What Tools Are Needed For Fishing Rod Repair?
Basic tools include epoxy glue, replacement guides, sandpaper, and a rod tip repair kit. Tweezers and a small knife also help. Having these tools ensures precise and effective repairs.
Can I Repair Fishing Rod Guides Myself?
Yes, you can replace damaged guides by removing old ones carefully. Attach new guides with epoxy glue and align them properly. This DIY method saves money and extends your rod’s life.
How To Fix Fishing Rod Line Guides Alignment?
To fix guide alignment, first loosen the epoxy around guides. Adjust each guide in a straight line. Reapply epoxy and allow it to cure fully. Proper alignment improves casting accuracy and line flow.
Conclusion
Repairing your fishing rod can feel rewarding. Simple steps make it achievable. Start by identifying the problem. Then, gather necessary tools and materials. Follow each step carefully. Practice patience; it’s key to success. Seek help from tutorials if needed. Regular maintenance prevents future issues.
Keep your gear in top condition. Enjoy your fishing trips even more. A well-repaired rod boosts confidence. Remember, practice makes perfect. With time, rod repair gets easier. You’ll save money and learn valuable skills. Now, you’re ready to tackle any rod challenge!