Choosing the right trowel size for your penny tile project can make all the difference between a smooth installation and a frustrating mess. If you want your tiles to stick perfectly and stay in place for years, understanding which trowel to use is key.
You might be wondering, “What size trowel should I pick for penny tiles? ” This guide will clear up the confusion and help you get the job done right the first time. Keep reading to discover the simple tip that can save you time, money, and a lot of headaches.
Choosing The Right Trowel
Picking the correct trowel size is important for installing penny tile. It helps spread the adhesive evenly. This ensures the tile sticks well and looks good.
Using the wrong trowel can cause problems. Tiles may not stick or grout lines may be uneven. It is best to know what trowel size to use.
Factors Influencing Trowel Size
The size of the penny tile affects the trowel you need. Penny tiles are small, so you need a smaller notch size. The type of adhesive also matters. Thicker adhesives need larger notches.
Surface texture and tile backing can change how much adhesive you need. Rough surfaces or mesh backing require more adhesive. This means a bigger trowel notch size may be needed.
- Tile size and shape
- Type of adhesive used
- Surface texture of the area
- Tile backing material
Trowel Types For Penny Tile
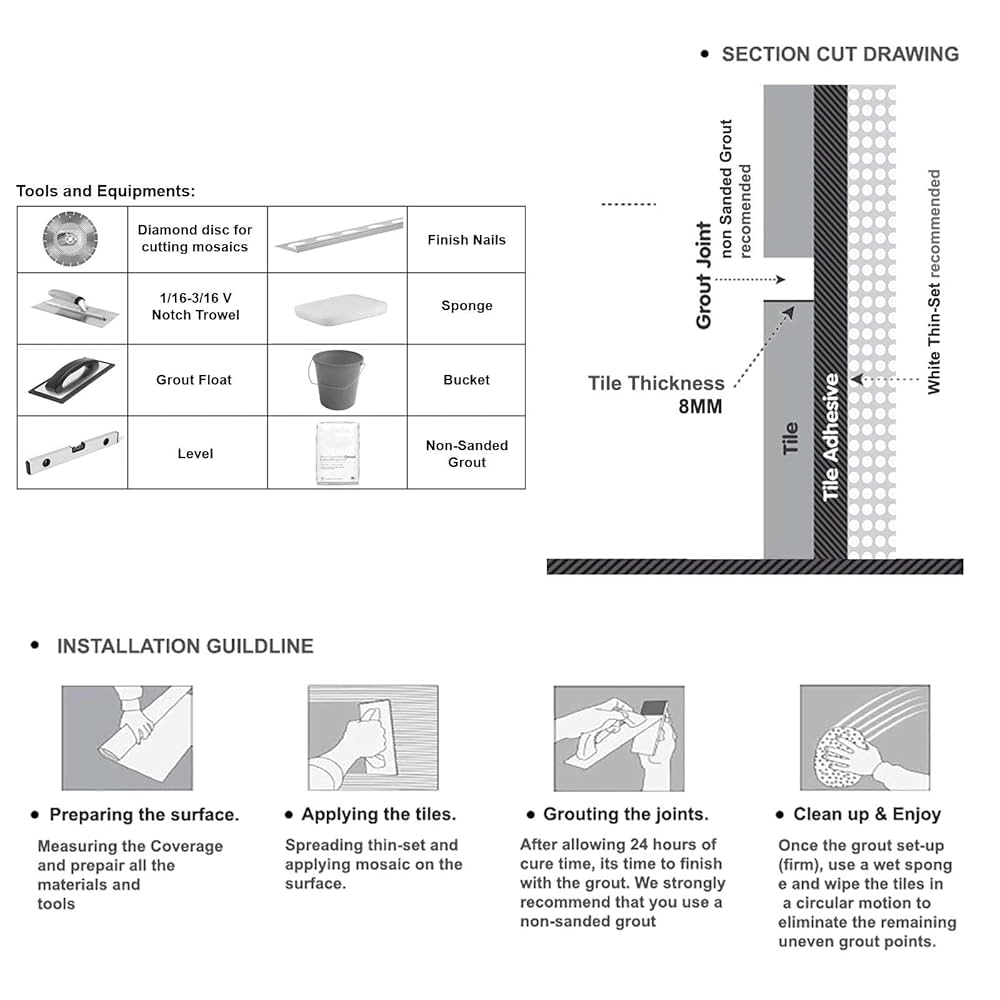
Notched trowels are the best for penny tile installation. A 1/8 inch x 1/8 inch square notch trowel works well. This size spreads adhesive evenly under small tiles.
Some installers use a V-notch trowel for penny tile. This helps control adhesive thickness better. Always check the tile and adhesive instructions before choosing.
- 1/8 inch x 1/8 inch square notch trowel
- 1/8 inch V-notch trowel (optional)
- Flat trowel for spreading adhesive before notching

Credit: www.lowes.com
Recommended Trowel Sizes
Choosing the right trowel size is important for installing penny tiles. It helps spread adhesive evenly under the tiles.
Using the correct trowel size prevents tiles from slipping and ensures a strong bond to the surface.
Standard Sizes For Penny Tiles
Penny tiles are small, round tiles often about 3/4 inch in diameter. For these tiles, a small notched trowel works best.
The common recommended trowel size is 1/8 inch by 1/8 inch square notch. This size provides the right amount of adhesive.
- 1/8 inch x 1/8 inch square notch trowel
- Spreads adhesive thinly and evenly
- Prevents excess adhesive from oozing out
- Keeps penny tiles stable during installation
Adjusting Size For Tile Thickness
Thicker penny tiles may need a slightly larger trowel notch. This helps hold more adhesive under the tile.
If tiles are thinner, use a smaller notch to avoid too much glue and uneven surfaces.
| Tile Thickness | Recommended Trowel Size |
|---|---|
| Thin (about 3/16 inch) | 1/8 inch x 1/8 inch square notch |
| Medium (about 1/4 inch) | 1/8 inch x 1/4 inch square notch |
| Thick (over 1/4 inch) | 1/4 inch x 1/4 inch square notch |
Impact Of Trowel Size On Installation
Choosing the right trowel size is key for a smooth penny tile installation. The trowel controls how much adhesive spreads under the tile.
The right size helps the tile stick well and keeps the surface even. Too small or too large a trowel can cause problems.
Adhesive Coverage And Bond Strength
Using the correct trowel size ensures enough adhesive covers the back of each penny tile. This coverage creates a strong bond that holds the tile in place.
- A 1/8 inch notch trowel is often ideal for penny tiles.
- It provides a thin, even layer of adhesive.
- Too large a notch wastes adhesive and causes uneven bonding.
- Too small a notch may not cover the tile fully, weakening adhesion.
Preventing Tile Lippage
Tile lippage happens when edges of adjacent tiles are uneven. The right trowel size helps prevent this by creating a uniform adhesive bed.
| Trowel Notch Size | Effect on Lippage |
| 1/8 inch | Good coverage, reduces lippage risk |
| 1/4 inch | May cause uneven adhesive, higher lippage |
| 3/16 inch | Balanced coverage, moderate lippage risk |

Credit: apollotile.com
Tips For Applying Thinset With Penny Tiles
Penny tiles are small and round, so applying thinset needs care. Using the right trowel size helps the tiles stick well.
Thinset spread evenly creates a strong hold and prevents uneven surfaces. Let’s explore tips to spread thinset and avoid mistakes.
Spreading Techniques
Use a 1/8 inch square-notched trowel for penny tiles. This size spreads thinset in thin, even layers perfect for small tiles.
Hold the trowel at a 45-degree angle. Spread thinset in straight lines, then comb it again in one direction for even ridges.
- Apply thinset smoothly to avoid lumps
- Work on small sections to keep thinset fresh
- Press tiles firmly to ensure good contact
- Check for full coverage under each tile
Avoiding Common Mistakes
Do not use too large a trowel; it applies too much thinset. This causes tiles to float or slide out of place.
Avoid spreading thinset too thick. Thick layers can dry slowly and weaken the bond with the tile.
- Never let thinset dry before placing tiles
- Don’t skip pressing tiles into thinset
- Clean excess thinset from tile edges right away
- Do not use a trowel with rounded notches
Tools And Materials To Complement Trowel Choice
Choosing the right trowel for penny tile is important. It helps spread adhesive evenly and holds tiles well.
Other tools and materials work with the trowel. They help make the tile installation smooth and strong.
Choosing The Right Thinset
Thinset is the glue that holds penny tiles in place. Use a thinset that matches your tile and surface type.
For penny tile, use a white, flexible thinset. It shows better with light-colored tiles and handles movement well.
- Choose white thinset for light or clear penny tiles
- Use flexible thinset for floors or surfaces that move
- Check product instructions to match tile and surface
Additional Installation Tools
Besides the trowel and thinset, other tools help with penny tile installation. They ensure precise and clean work.
- Tile spacers keep tiles evenly spaced
- A rubber float helps press tiles into thinset
- A sponge cleans excess thinset from tile surfaces
- A level checks tile alignment and flatness
- A tape measure helps with layout and cuts
- Tile nippers trim penny tiles if needed
Troubleshooting Installation Issues
Installing penny tile can be tricky if the surface is not right or the adhesive is weak. Knowing how to fix common problems helps the process go smoothly.
This guide covers how to deal with uneven surfaces and how to fix adhesive problems during penny tile installation.
Dealing With Uneven Surfaces
Uneven surfaces cause tiles to sit poorly and can lead to cracks or loose tiles. Prepare the surface before starting the installation.
- Use a leveling compound to smooth out bumps and dips.
- Check the surface with a level tool to find high and low spots.
- Sand down any high areas to make the surface flat.
- Fill low spots with patching material and let it dry fully.
- Clean the surface from dust and debris before applying adhesive.
Fixing Adhesive Problems
Adhesive troubles can cause tiles to fall off or not stick well. Choose the right trowel size and fix issues quickly.
| Problem | Cause | Solution |
| Tiles not sticking | Too little adhesive applied | Use a 1/8 inch notched trowel for penny tiles to spread evenly |
| Adhesive drying too fast | Working in hot or dry conditions | Work in small sections and keep adhesive covered when not in use |
| Uneven adhesive layer | Incorrect trowel angle or size | Hold trowel at 45-degree angle and use recommended size |
| Tiles sliding out of place | Adhesive too wet or surface not clean | Wait for adhesive to become tacky before placing tiles |

Credit: www.lowes.com
Frequently Asked Questions
What Size Trowel Is Best For Penny Tile?
For penny tile, a 3/16 x 5/32 inch V-notch trowel is ideal. This size ensures proper adhesive coverage without excess. It’s crucial for a smooth installation and helps to prevent tile lippage. Always check the manufacturer’s recommendations for specific guidance on your project.
Can I Use A Larger Trowel Size For Penny Tile?
Using a larger trowel is not recommended for penny tile. It may apply too much adhesive, causing issues. Excess adhesive can seep through the grout lines, leading to a messy finish. Stick to a smaller trowel for best results and clean installation.
How Does Trowel Size Affect Penny Tile Installation?
Trowel size determines adhesive coverage and tile adherence. A proper size ensures even spread and stability. Incorrect size can lead to poor adhesion and uneven tiles. Choosing the right trowel is crucial for a durable and professional-looking installation.
What Happens If I Use The Wrong Trowel?
Using the wrong trowel can cause uneven adhesive application. This may result in tile lippage or poor bonding. It can also lead to grout issues and an unsightly finish. Always select the correct trowel size for the specific tile to ensure quality results.
Conclusion
Choosing the right trowel size makes penny tile installation easier. A 1/8-inch square notch trowel fits most penny tiles well. It helps spread the adhesive evenly and keeps tiles secure. Using the correct trowel saves time and prevents mistakes. Remember, small tiles need thin, even layers of adhesive.
This simple step improves your tile’s look and durability. Follow this advice for a smooth, professional finish. Your penny tile project will look great and last longer.