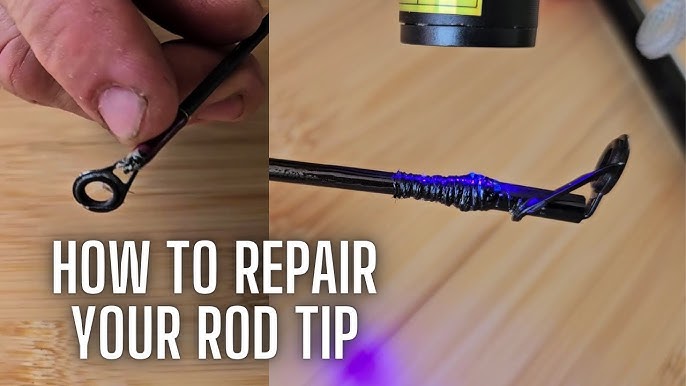
Have you ever felt the frustration of a broken fishing rod just when you’re ready to cast your line? It’s a common problem that can ruin your day on the water.
But here’s the good news: you don’t have to throw your rod away or rush to buy a new one. With a few simple steps, you can fix your fishing rod yourself and get back to enjoying your favorite hobby.
You’ll discover easy, practical tips to repair your broken fishing rod quickly and effectively. Keep reading, and you’ll save time, money, and the joy of fishing.
Identify Common Rod Breaks
Fishing rods can break in different ways. Knowing the type of damage helps you fix them properly.
This guide explains common rod breaks and what tools you need to check your rod carefully.
Types Of Damage
Fishing rods usually break in one of these ways. Each type needs a different repair method.
- Tip Break:The thin top part snaps or bends badly.
- Blank Crack:The main rod body has a visible crack or split.
- Guide Damage:The rings or guides that hold the line are bent or missing.
- Handle Damage:The grip or reel seat is cracked or loose.
- Joint Failure:Multi-piece rods may have loose or broken joints.
Tools Needed For Inspection
Use these tools to inspect your fishing rod carefully. They help you find hidden damage.
| Tool | Purpose |
|---|---|
| Bright Light | Shines through the rod to find cracks or splits |
| Magnifying Glass | Helps see small cracks and guide damage |
| Soft Cloth | Wipes dirt and helps check for surface damage |
| Flexible Ruler | Measures rod length and checks for bends |
| Small Mirror | Views hard-to-see areas under guides or joints |

Credit: www.amazon.ca
Gather Essential Repair Materials
Fixing a broken fishing rod needs the right materials. These tools help make your rod strong again.
Gathering supplies before you start saves time. It also makes the repair process easier and better.
Epoxy And Glue Options
Epoxy and glue hold the broken parts of your fishing rod. Choose a type that works well with rod materials.
Two common choices are epoxy resin and super glue. Epoxy is strong and waterproof. Super glue dries fast but may be less flexible.
- Clear two-part epoxy resin for strong bonding
- Waterproof super glue for quick fixes
- Flexible adhesive for rod sections that bend
Replacement Parts And Tools
Some broken parts may need replacing. Having spare parts and the right tools helps you fix the rod correctly.
Common replacement parts include rod tips and guides. Tools like sandpaper and clamps help prepare and hold parts while drying.
- Replacement rod tips and guides
- Fine-grit sandpaper to smooth surfaces
- Small clamps or tape to hold pieces
- Utility knife or scissors for trimming
- Mixing sticks and containers for epoxy
Fixing A Broken Rod Blank
Repairing a broken fishing rod can save you money. It’s a straightforward process if done carefully.
This guide covers fixing a broken rod blank using simple tools. Follow these steps to bring your fishing rod back to life.
Cleaning And Preparing The Area
Before starting the repair, clean the broken area. Remove any dirt and debris using a damp cloth.
- Inspect the break for any splinters.
- Use sandpaper to smooth out rough edges.
- Ensure the area is completely dry before proceeding.
Applying Epoxy For A Strong Bond
Epoxy glue is essential for a sturdy repair. Mix the epoxy according to the instructions.
Press the pieces together firmly. Wipe off any excess epoxy with a cloth.
Reinforcing The Repair
Reinforcement helps the rod withstand stress. Use fiberglass cloth for added strength.
| Material | Purpose |
| Fiberglass cloth | Reinforcement |
| Epoxy | Bonding |
| Sandpaper | Smoothing edges |
Wrap the fiberglass cloth around the break. Apply another layer of epoxy over the cloth.
Let the rod sit for 24 hours to cure. Once cured, test the rod to ensure it is strong.

Credit: www.amazon.ca
Repairing Broken Guides
Fishing rod guides help control the line and improve casting. Broken guides affect performance and need fixing. Repairing them can save your rod and make it work well again.
This guide explains how to remove damaged guides and attach new ones securely. Follow the steps carefully for best results.
Removing Damaged Guides
Start by cutting off the thread wraps that hold the damaged guide. Use a sharp blade to avoid damaging the rod blank. Remove all thread and finish coat around the guide foot.
- Use a sharp hobby knife or razor blade.
- Cut the thread wraps carefully.
- Peel off any leftover epoxy or finish.
- Clean the rod surface with rubbing alcohol.
Attaching New Guides Securely
Place the new guide in the correct position on the rod. Wrap the thread tightly around the guide foot to hold it firmly. Use even wraps to avoid gaps or loose areas.
| Step | Action | Tip |
|---|---|---|
| 1 | Align the guide on the rod blank | Check the guide’s angle matches other guides |
| 2 | Start wrapping the thread at the foot | Keep the thread tight and neat |
| 3 | Wrap around the entire guide foot several times | Cover the foot fully for strength |
| 4 | Secure the thread end with a knot or loop | Trim excess thread close to the wraps |
| 5 | Apply epoxy finish over the wraps | Use thin coats for smooth, strong finish |
Fixing Reel Seat And Handle Issues
Fishing rods sometimes have problems with the reel seat or handle. These parts need to be secure and comfortable. Fixing them can make your rod feel new again.
This guide shows how to secure loose reel seats and replace damaged handles. You can do these repairs at home with simple tools.
Securing Loose Reel Seats
A loose reel seat can make fishing hard and unsafe. Tightening it will keep the reel steady. First, check if the seat moves or spins on the rod.
If it is loose, clean the area with rubbing alcohol. Then apply a small amount of epoxy or strong glue inside the seat. Slide the reel seat back on and hold it tight. Let the glue dry for at least 24 hours before using.
- Remove reel from the rod
- Clean the reel seat and rod area
- Apply epoxy inside the reel seat
- Press reel seat firmly on the rod
- Wipe extra glue and let it dry
Replacing Damaged Handles
Handle damage can make holding the rod uncomfortable. Replacing the handle improves grip and control. Remove the old handle by cutting or pulling it off carefully.
Choose a new handle that fits your rod size. Slide it on and use strong adhesive to fix it in place. Let it dry fully before using the rod. Sand any rough edges for a smooth finish.
- Remove old handle carefully
- Select the right size replacement handle
- Apply adhesive inside the handle
- Slide the handle onto the rod
- Allow adhesive to dry completely
- Sand edges for comfort
Tips For Drying And Curing Repairs
Fixing a broken fishing rod needs careful drying and curing. Proper handling helps the repair last long and stay strong.
This guide explains the best conditions and timing to dry and cure your rod after repair.
Optimal Conditions
Keep the repaired rod in a clean, dry place away from direct sunlight. Moderate temperature and low humidity help the materials set well.
- Room temperature around 70°F (21°C) is ideal
- Avoid damp or humid areas that slow drying
- Do not expose the repair to direct sunlight or heat sources
- Place the rod on a flat surface to keep it steady
- Good air circulation speeds up curing
Timing For Best Results
Drying and curing take time. Rushing can weaken the fix. Follow these timing guidelines to get the best strength.
| Repair Material | Drying Time | Curing Time |
| Epoxy Resin | 4-6 hours | 24-48 hours |
| Super Glue (Cyanoacrylate) | 10-30 minutes | 24 hours |
| Fiberglass Tape with Resin | 6-8 hours | 48 hours |
Testing And Maintaining Your Rod
Keeping your fishing rod in good shape helps it last longer. Regular checks stop small problems from becoming big breaks.
After fixing a rod, test its strength carefully. Also, follow simple maintenance steps to avoid damage in the future.
Checking Repair Strength
Test your rod’s repair by gently bending it. Do not use too much force. Watch for cracks or weak spots near the fix.
- Hold the rod firmly near the repaired area.
- Bend it slowly to about 30 degrees.
- Listen and feel for any unusual sounds or movement.
- If it feels weak, add another layer of glue or tape.
- Let the repair dry fully before using again.
Routine Maintenance To Prevent Breaks
Regular care keeps your rod strong. Clean it after every trip and store it safely. Check guides and wraps for damage.
| Maintenance Task | Frequency | Tips |
| Clean rod with fresh water | After each use | Use a soft cloth to remove dirt |
| Inspect guides and wraps | Monthly | Look for cracks or loose parts |
| Apply rod wax or protectant | Every 3 months | Protect from sun and salt damage |
| Store rod in a case | Always | Keep away from heavy objects and heat |

Credit: www.youtube.com
Frequently Asked Questions
How Can I Fix A Broken Fishing Rod Tip?
To fix a broken fishing rod tip, first remove the damaged tip. Measure and buy a replacement tip. Heat the old tip gently to slide it off. Slide the new tip on and secure it with glue or epoxy for durability.
What Materials Are Needed To Repair A Fishing Rod?
You need replacement rod tips, epoxy glue, sandpaper, a heat source, and a cutting tool. These materials help you remove damaged parts and attach new components securely. Proper tools ensure a strong, lasting repair.
Is It Possible To Repair A Snapped Fishing Rod Blank?
Yes, you can repair a snapped rod blank using a rod repair kit or by splicing. Clean and align the break, then wrap with fiberglass tape and apply epoxy. Let it cure fully before use for a strong fix.
How Long Does Fishing Rod Repair Usually Take?
Repairing a fishing rod typically takes 1 to 3 hours. This includes cleaning, fitting new parts, and letting glue or epoxy cure. Time depends on the damage extent and drying times for adhesives.
Conclusion
Repairing a broken fishing rod saves money and keeps you fishing. Small cracks and breaks can be fixed with simple tools. Take your time and follow the steps carefully. A strong rod means better fishing trips ahead. Don’t throw away your favorite rod too soon.
With patience, you can enjoy many more fishing adventures. Try these tips next time your rod breaks. Fishing stays fun when your gear stays ready.