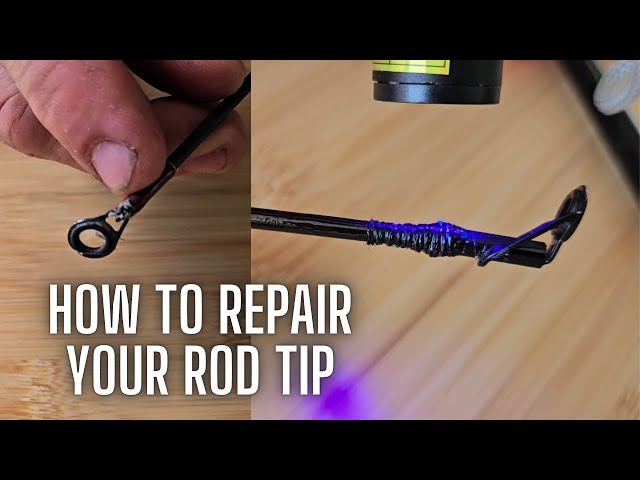
Have you ever been out fishing, only to feel your rod’s tip snap or bend just when the big catch is on the line? It’s frustrating, but don’t worry—fixing the tip of your fishing rod is easier than you think.
Whether you’re a beginner or a seasoned angler, knowing how to repair your rod quickly can save your day on the water and keep your gear in top shape. In this guide, you’ll discover simple, step-by-step methods to restore your rod so you can get back to fishing with confidence.
Keep reading to learn how to fix your fishing rod’s tip and never miss a catch again.
Identify The Damage
Fixing the tip of a fishing rod starts with finding the problem. Look closely at the tip to see what is wrong.
Knowing the exact damage helps you choose the right fix. Take your time and check carefully.
Check For Cracks And Breaks
Look along the rod tip for any cracks or breaks. Small cracks can get worse if not fixed.
Hold the rod up to light to spot thin cracks. Gently press the tip to feel for weak spots.
- Check the rod tip from all sides
- Look for lines or splits in the material
- Test for softness or bending where it should be firm
Assess The Tip Top Guide
The tip top guide is the small ring at the rod’s very end. It helps the line move smoothly.
Check if the guide is loose, bent, or missing. A damaged guide can cut your fishing line.
- Look for cracks or breaks in the guide frame
- Check if the ring inside the guide is smooth and not chipped
- Make sure the guide is firmly attached to the rod tip

Credit: www.reddit.com
Gather Repair Materials
Fixing the tip of a fishing rod starts with collecting the right materials. This saves time and ensures a smooth repair.
Knowing what tools and parts to gather helps you prepare well before starting the repair process.
Essential Tools And Supplies
Gather these tools and supplies before you begin fixing the rod tip. Having everything ready avoids interruptions.
- Replacement rod tip
- Rod glue or epoxy
- Sandpaper (fine grit)
- Heat source (like a lighter or heat gun)
- Pliers or tweezers
- Cleaning cloth
- Masking tape
Choosing The Right Replacement Tip
Select a replacement tip that matches the size and style of your broken tip. This ensures proper balance and performance.
| Tip Size | Measurement | Match To |
| Small | 1-2 mm diameter | Light spinning rods |
| Medium | 2-3 mm diameter | Medium action rods |
| Large | 3-4 mm diameter | Heavy casting rods |
Remove The Broken Tip
Fixing the tip of your fishing rod is simpler than you might think. The first step is to safely remove the broken tip.
Follow these steps to ensure you do not damage the rest of the rod. Taking your time will make the process easier.
Soften The Adhesive
The adhesive holding the tip to the rod needs to be softened before removal. This can be done with heat.
- Use a hairdryer to apply heat to the broken tip.
- Hold the hairdryer at a safe distance to avoid overheating.
- Gently rotate the rod to evenly distribute the heat.
Safely Detach The Damaged Tip
Once the adhesive is softened, you can remove the damaged tip with care. Ensure you have a firm grip on the rod.
Consider using a pair of pliers to gently twist and pull off the tip. Avoid using excessive force.
| Tool | Purpose |
| Hairdryer | Soften adhesive |
| Pliers | Remove tip |
Prepare The Rod Tip
Fixing the tip of a fishing rod starts with good preparation. This step helps the repair last longer.
Cleaning and smoothing the rod tip are important before attaching any new parts.
Clean The Rod End
Remove dirt and old glue from the rod end. Use a clean cloth or fine sandpaper to wipe it well.
Make sure there is no loose material that can stop the new tip from sticking properly.
Smooth The Surface For Attachment
Use fine sandpaper to smooth the rod end surface. This helps the glue hold better.
Work gently to avoid damaging the rod while making the surface even and clean.
Attach The New Tip
Fixing the tip of your fishing rod needs care and the right method. Attaching the new tip properly helps keep your rod strong and ready for fishing.
Follow these steps to apply adhesive and secure the tip to your fishing rod safely and firmly.
Apply Adhesive Properly
Use a strong adhesive made for fishing rods or similar materials. Apply a small amount inside the new tip’s base. Avoid too much glue; it can make the tip hard to fit.
- Clean the rod end before applying glue.
- Put a thin, even layer of adhesive inside the new tip.
- Check that the glue covers the entire inner surface.
- Use a toothpick or small brush to spread adhesive if needed.
- Act quickly before the glue starts to set.
Position And Secure The Tip
Fit the new tip onto the rod’s end straight and tight. Hold it steady to avoid slipping while the adhesive dries.
| Tip Positioning | How to Secure |
|---|---|
| Align the new tip with the rod’s line guides | Press firmly and twist slightly for a tight fit |
| Check the tip’s straightness from different angles | Hold the tip in place for at least 5 minutes |
| Remove excess adhesive quickly | Use masking tape to keep the tip steady if needed |

Credit: www.youtube.com
Allow Time To Cure
Fixing the tip of a fishing rod needs patience. The repair must dry fully before use.
Giving enough time to cure helps the repair become strong and last longer.
Recommended Drying Period
The drying time depends on the glue or epoxy used. Check the product instructions for exact times.
- Epoxy usually needs 24 to 48 hours to dry.
- Super glue can take 10 to 30 minutes but needs more time to cure fully.
- Some adhesives need up to 72 hours for full strength.
- Keep the rod tip in a warm, dry place during drying.
Avoiding Early Stress On The Repair
| Action | Why Avoid |
|---|---|
| Bending the rod tip too soon | Can cause the glue to break before it sets |
| Using the rod before cure time | Reduces repair strength and may cause failure |
| Exposing the repair to water early | Weakens adhesive and slows curing |
| Applying stress or pressure | Can crack or dislodge the repaired tip |
Wait at least the full drying period before testing or using the rod tip again.
Test The Repair
After fixing the tip of your fishing rod, you must check if the repair holds well. Testing helps you avoid rod failure during fishing.
Two key checks are stability and alignment, and performing a gentle flex test. Both show if your repair is strong and safe to use.
Check Stability And Alignment
Look closely at the repaired tip to see if it is steady and straight. The tip should line up perfectly with the rest of the rod.
- Hold the rod upright and watch the tip for any wobble.
- Compare the tip’s angle to the rod’s original curve.
- Make sure the glue or tape is holding the parts firmly.
- Check that no gaps or cracks remain at the joint.
Perform A Gentle Flex Test
Bend the rod slowly and carefully to test the repaired tip’s strength. The tip should bend smoothly without breaking or loosening.
| Test Action | What to Look For | Result Meaning |
| Slowly bend the rod | Tip moves with rod without gaps | Repair is holding well |
| Apply light pressure on tip | No cracks or movement at repair site | Strong and stable repair |
| Release the bend | Tip returns to normal position | Rod keeps shape and alignment |

Credit: anglersresource.net
Prevent Future Damage
Fixing the tip of a fishing rod is important. To keep it strong, you must avoid future damage.
Taking care of your rod can make it last longer and work better on every trip.
Proper Rod Storage Tips
Store your fishing rod in a dry, cool place away from direct sunlight. This helps keep the rod material strong.
- Use a rod rack or holder to keep rods straight and safe.
- Avoid leaning rods against walls or sharp edges.
- Keep rods in a protective tube or case during transport.
- Do not stack heavy objects on top of stored rods.
- Check rods regularly for cracks or damage before storing.
Handling Precautions On The Water
Handle your fishing rod carefully when fishing. Rough use can cause tips to break or bend.
| Action | Tip |
| Casting | Use smooth, controlled motions to avoid stress on the tip. |
| Landing Fish | Keep the rod tip up and avoid bending it too much. |
| Transporting | Secure the rod safely in a holder or rack on the boat. |
| Cleaning | Wipe the rod gently with a soft cloth after use to remove salt and dirt. |
Frequently Asked Questions
How Do I Repair A Broken Fishing Rod Tip?
To repair a broken rod tip, remove the damaged tip first. Use a replacement tip of the correct size. Secure it with rod tip glue or epoxy. Allow it to dry fully before using the rod again. This restores functionality without replacing the whole rod.
What Tools Are Needed To Fix A Fishing Rod Tip?
Essential tools include replacement rod tips, rod tip glue or epoxy, sandpaper, and scissors. You might also need a lighter to heat shrink tubing. These tools help you securely attach and protect the new tip, ensuring a durable repair.
Can I Fix A Fishing Rod Tip Without Professional Help?
Yes, many fishing rod tips can be repaired at home. Follow simple steps carefully, like removing the broken tip and gluing a new one. With proper tools and patience, you can restore your rod’s tip effectively and save repair costs.
How Long Does It Take To Fix A Fishing Rod Tip?
Fixing a rod tip typically takes 15 to 30 minutes. Drying time for glue or epoxy may add several hours. Plan to let the adhesive cure fully for the best strength before using the rod again.
Conclusion
Fixing the tip of a fishing rod can save your gear and money. Small tools and careful steps make the repair easy. Take your time and follow each step closely. A well-fixed rod works like new for many trips. Enjoy fishing without worry about broken tips again.
Keep your rod ready for the next catch. Simple fixes keep your fishing fun and stress-free. Try these tips and see how your rod performs.