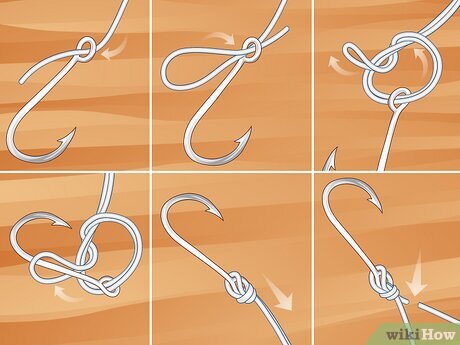
Tying the hook on your fishing line might seem simple, but doing it the right way can make all the difference between a great catch and losing your prize fish. If you want to make sure your hook stays secure and your fishing game stays strong, you need to know the best techniques.
You’ll learn easy, step-by-step methods to tie your hook quickly and reliably. By the time you finish reading, you’ll feel confident and ready to fish like a pro. Keep going—your next big catch is just a knot away!
Choosing The Right Hook
Choosing the right hook is important for good fishing. The hook must fit the fish and the bait.
A wrong hook can make the fish escape or spoil the bait. Learn about hook types and sizes.
Hook Types And Sizes
Hooks come in many shapes and sizes. Each type suits different fishing needs.
Size numbers may seem backward. Smaller numbers mean bigger hooks, and bigger numbers mean smaller hooks.
- J-Hooks: Classic shape, good for many fish.
- Circle Hooks: Help catch fish without deep hooking.
- Treble Hooks: Three points, used for lures.
- Siwash Hooks: Long shank, good for artificial baits.
- Size 1: Large hook for big fish.
- Size 8: Medium hook for average fish.
- Size 14: Small hook for small fish.
Matching Hook To Fish Species
Pick a hook size and type based on the fish you want. Different fish need different hooks.
Smaller hooks work for small fish. Bigger hooks are best for strong, big fish.
| Fish Species | Recommended Hook Type | Recommended Hook Size |
|---|---|---|
| Trout | J-Hook | 12 to 16 |
| Bass | Circle Hook | 2 to 6 |
| Catfish | Circle or J-Hook | 2/0 to 5/0 |
| Panfish | J-Hook or Siwash | 10 to 14 |
Selecting The Fishing Line
Choosing the right fishing line is important before tying the hook. The line affects how you cast and catch fish.
There are different types of fishing lines. Each has unique features for certain fishing needs.
Line Materials
Fishing lines come in various materials. The three main types are monofilament, fluorocarbon, and braided lines.
Monofilament is stretchy and easy to handle. Fluorocarbon is less visible underwater. Braided lines are strong and thin.
- Monofilament: Good for beginners and general use
- Fluorocarbon: Hard to see and sinks fast
- Braided: Very strong and sensitive
Line Strength And Thickness
Line strength is measured in pounds. It shows how much weight the line can hold before breaking.
Thickness affects casting and fish detection. Thinner lines cast further but may be weaker.
| Strength (lbs) | Thickness | Use |
|---|---|---|
| 2-6 | Thin | Small fish and light tackle |
| 8-12 | Medium | Most freshwater fishing |
| 15-30 | Thick | Large fish and heavy cover |
Preparing The Line And Hook
Learning to tie a hook on a fishing line is essential for fishing success. Proper preparation ensures your line is strong and secure.
This guide will help you get your fishing line and hook ready. Follow these steps to avoid losing your catch.
Trimming The Line
Trimming the line is an important step in preparing your fishing setup. It helps in reducing tangles and ensuring a clean knot.
- Use sharp scissors for a clean cut.
- Trim the line to the desired length.
- Leave enough extra line for knot tying.
Moistening The Knot Area
Moistening the knot area is crucial. It reduces friction and prevents the line from weakening when tightened.
To moisten the knot area, you can use water or saliva. This simple step can make a big difference in the knot’s strength.

Credit: www.ohero.com
Simple Knot Techniques
Tying the hook on a fishing line is an important skill. Using the right knot keeps your hook secure and strong.
Simple knots are easy to learn and work well for most fishing situations. Here are three common knots you can use.
Improved Clinch Knot
The Improved Clinch Knot is popular for tying hooks. It is strong and easy to tie with monofilament lines.
To tie it, thread the line through the hook eye. Wrap the tag end around the main line five times. Pass the tag end through the small loop near the eye. Then, pass it through the big loop you made. Pull tight and trim the excess.
- Thread line through hook eye
- Wrap tag end 5 times around main line
- Pass tag end through small loop near eye
- Pass tag end through big loop
- Pull tight and trim excess
Palomar Knot
The Palomar Knot is very strong and simple. It works well with braided and monofilament lines.
Double about six inches of line and pass it through the hook eye. Tie a loose overhand knot with the doubled line. Pass the hook through the loop. Pull both ends to tighten the knot. Cut the extra tag end.
- Double 6 inches of line
- Pass loop through hook eye
- Tie a loose overhand knot
- Pass hook through loop
- Pull ends to tighten and trim
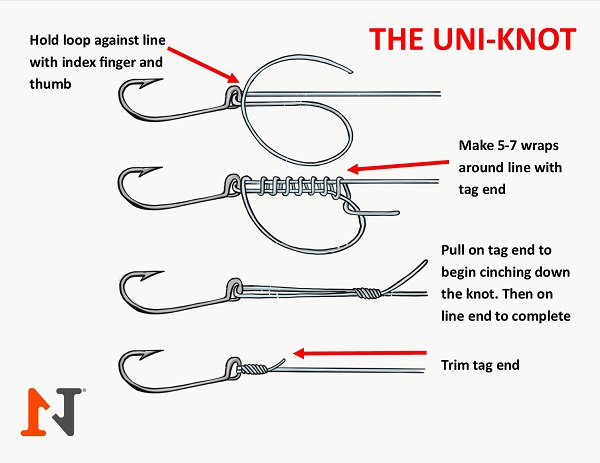
Uni Knot
The Uni Knot is versatile and easy to tie. It holds well and is good for many fishing lines.
Pass the line through the hook eye and double back. Make a loop alongside the main line. Wrap the tag end around both lines five times. Pull the tag end to tighten the coils. Slide the knot to the hook eye and pull tight. Trim the tag end.
- Pass line through hook eye and double back
- Make loop beside main line
- Wrap tag end 5 times around both lines
- Pull tag end to tighten coils
- Slide knot to hook eye and pull tight
- Trim tag end
Step-by-step Knot Tying
Tying a hook to a fishing line is a key fishing skill. A strong knot keeps the hook secure.
This guide shows how to tie the hook step-by-step. Follow each step carefully for best results.
Threading The Hook
Start by threading the end of your fishing line through the hook eye. Pull about 6 inches of line through.
Make sure the line passes cleanly and does not fray. Hold the hook steady with one hand.
Wrapping The Line
Wrap the tag end of the line around the main line five to seven times. Wrap tightly but not too tight.
Keep the coils close together. This helps create a strong and neat knot.
- Hold the hook steady
- Wrap the tag end around the main line
- Count five to seven wraps
- Keep wraps tight and close
Securing The Knot
Pass the tag end back through the small loop near the hook eye. Pull it slowly to tighten.
Wet the knot with water or saliva before pulling tight. This reduces friction and helps the knot hold.
- Pass tag end through the loop
- Wet the knot lightly
- Pull main line and tag end to tighten
Trimming Excess Line
After tightening, trim the tag end close to the knot. Leave about 1/8 inch to prevent slipping.
Use sharp scissors or nail clippers for a clean cut. Avoid cutting too close to the knot.
- Trim tag end near the knot
- Leave a small tail (1/8 inch)
- Use sharp cutting tool

Credit: greensafaris.com
Testing Knot Strength
After tying a hook to your fishing line, you must check the knot’s strength. A strong knot keeps the hook secure while fishing.
Testing the knot helps avoid losing fish and gear. Use simple ways to check how well your knot holds.
Tug Test
The tug test is a quick way to check knot strength. Pull the line hard near the knot to see if it slips or breaks.
If the knot stays tight and the line does not break, your knot is strong. Repeat the test a few times to be sure.
- Hold the hook firmly in one hand.
- Pull the line sharply with the other hand.
- Look for any movement in the knot.
- Stop if the line feels weak or slips.
Visual Inspection
Look closely at the knot to find any flaws. Check for loose wraps or uneven tightening.
A good knot appears neat and tight. Frayed or twisted line near the knot can cause failure.
- Ensure all loops are snug and uniform.
- Check that the tag end is trimmed close.
- Look for any damage to the fishing line.
- Replace the knot if it looks weak or messy.
Tips For Knot Durability
Tying a hook on a fishing line is important for a strong catch. A good knot lasts longer and holds tight.
Here are two important tips to help your knot stay durable and reliable during fishing.
Avoiding Over-tightening
Pull the knot tight but do not over-tighten it. Too much pressure can weaken the line or knot.
Over-tightening may cause small cuts or damage that can break easily under stress.
- Pull the knot firmly but gently
- Stop tightening when the knot feels secure
- Check the line for any damage after tying
Regular Knot Checks
Check your knots often while fishing. Knots can loosen or weaken over time.
Re-tie any knot that feels loose or looks worn to avoid losing your catch.
- Inspect knots before casting
- Retie knots if you see any damage
- Keep spare hooks and line ready for quick repairs
Credit: n1outdoors.com
Frequently Asked Questions
How Do You Tie A Hook To A Fishing Line?
To tie a hook, thread the line through the hook eye, wrap it around the shank 5-7 times, then pass the tag end through the loop near the eye. Pull tight and trim the excess line. This creates a strong, secure knot.
What Is The Best Knot For Fishing Hooks?
The improved clinch knot is the best for tying hooks. It is strong, reliable, and easy to tie. It holds well under tension and works with most fishing lines and hook sizes, making it a favorite among anglers.
How Tight Should The Knot Be When Tying A Hook?
The knot should be pulled tight enough to prevent slipping but not so tight that the line weakens. A snug knot ensures the hook stays secure and maintains the line’s strength during casting and fish fights.
Can I Use Any Fishing Line To Tie A Hook?
Yes, you can use monofilament, fluorocarbon, or braided lines to tie hooks. Each line type may require slight adjustments in knot technique for best strength and security.
Conclusion
Tying a hook on a fishing line is simple with practice. Use the steps shared to tie strong knots every time. A good knot keeps the hook secure while fishing. Try different knots to find what works best for you.
Remember, patience helps improve your fishing skills. Enjoy your time by the water and catch more fish! Keep practicing, and soon it will feel natural. Fishing becomes more fun when you trust your gear and skills.