Setting up a canopy tent might seem tricky at first, but once you know the right steps, it becomes quick and easy. Imagine having your own shaded space ready in minutes, perfect for outdoor parties, camping trips, or relaxing in your backyard.
In this guide, you’ll discover simple, clear instructions that save you time and frustration. By the end, you’ll feel confident setting up your canopy tent like a pro, making your outdoor experience more enjoyable. Ready to get started? Let’s dive in!
Choosing The Right Canopy Tent
Picking the right canopy tent is important for your outdoor needs. A good tent offers shelter, comfort, and fits your space.
Think about where you will use it and how many people need to fit inside. This helps you choose the best type and size.
Types Of Canopy Tents
Canopy tents come in many styles. Each style fits different uses and budgets.
- Pop-up Tents:Easy to set up and take down. Good for quick use.
- Frame Tents:Strong metal frames. Good for longer events.
- Wall Tents:Have sides for more protection from wind and rain.
- Event Tents:Large tents for big gatherings and parties.
Size And Capacity
Choose a tent size that fits your group and activities. Too small tents feel crowded. Too big tents are hard to manage.
Check how many people the tent can hold. Also, think about space for chairs, tables, or gear.
- Small tents: fit 2 to 4 people, good for camping
- Medium tents: hold 5 to 8 people, good for family events
- Large tents: fit 10 or more, good for parties or markets
Material And Durability
Look for strong materials that last long and resist weather. The tent fabric and frame both matter.
Polyester and nylon are common fabrics. Steel and aluminum are popular frame metals.
- Polyester:Water resistant and light
- Nylon:Strong and dries quickly
- Steel frame:Very strong but heavier
- Aluminum frame:Light and rust resistant
Preparing For Assembly
Setting up a canopy tent can be simple if you prepare well. Follow these steps to ensure a smooth assembly process.
Preparation is key to making sure your tent stands firm and offers shade or shelter as needed.
Selecting A Location
Choose a flat, open space for your canopy tent. This makes setup easier and ensures stability.
- Check for overhead obstructions like tree branches.
- Avoid areas with uneven ground.
- Ensure the space is large enough for your tent size.
Checking Weather Conditions
Weather can impact the stability of your tent. Always check the forecast before setting up.
| Weather Condition | Action |
| Sunny | Proceed with setup |
| Windy | Secure with extra weights or stakes |
| Rainy | Consider adding sidewalls |
Gathering Necessary Tools
Having the right tools on hand makes the setup process efficient and stress-free.
- Hammer for securing stakes
- Measuring tape to check space dimensions
- Extra stakes and weights for stability
Step-by-step Setup
Setting up a canopy tent is easy with clear instructions. Follow each step carefully to ensure safety and stability.
This guide breaks down the setup into simple parts. Each section covers one main task.
Unpacking And Inspecting Parts
Start by removing the tent from its bag. Lay out all parts on a flat surface. Check for any damage or missing pieces before assembly.
- Canopy cover
- Frame sections
- Leg poles
- Ropes and stakes
- Connector joints
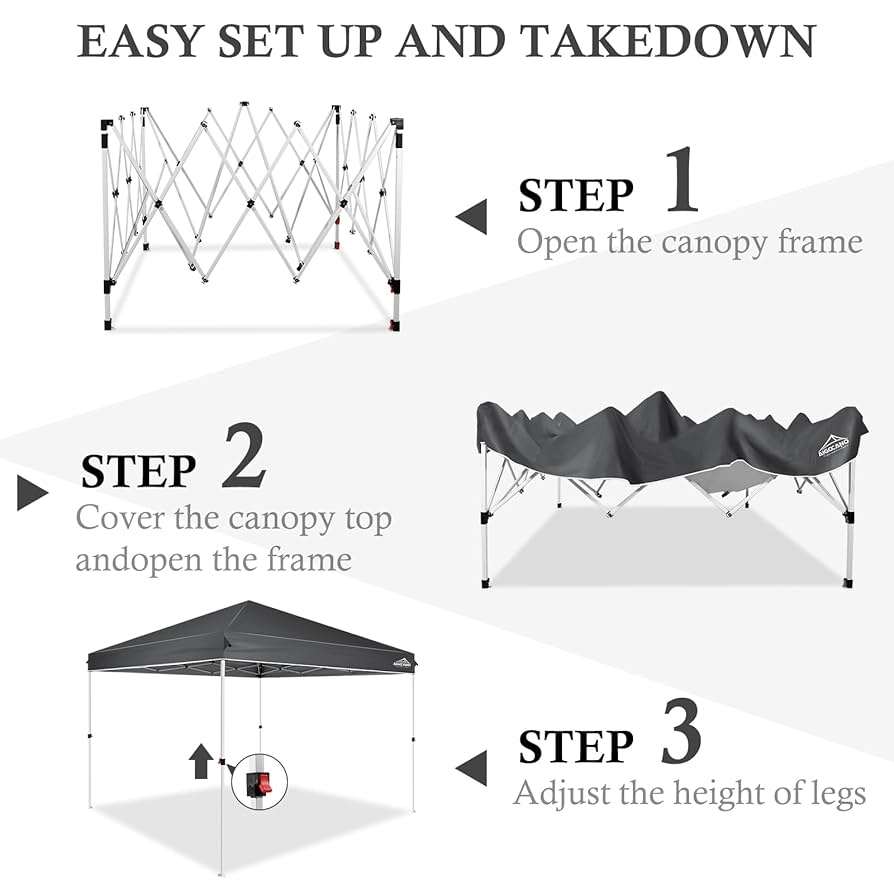
Extending The Frame
Lift the frame and begin to extend it slowly. Pull the legs outward until the frame clicks into place. Make sure all locks are secure.
| Frame Part | Action |
| Main Frame | Pull outward evenly |
| Leg Poles | Extend to desired height |
| Locks | Engage securely |
Securing The Canopy Cover
Place the canopy cover over the frame. Align the corners with the frame legs. Use straps or Velcro to fasten the cover tightly.
- Drape cover evenly over the frame
- Attach corner straps to leg hooks
- Secure sides with Velcro or ties
- Check for any loose areas
Adjusting Height And Tension
Adjust the tent height by sliding leg poles to the needed level. Lock each leg securely. Tighten the canopy cover by pulling on the tension cords.
- Raise legs evenly on all sides
- Use stakes to anchor ropes firmly
- Check tension to prevent sagging

Credit: www.eaglepeak.com
Securing The Tent
Setting up a canopy tent is not complete until it is well secured. This keeps the tent safe during wind and rain. Proper securing methods help avoid damage and accidents.
Use the right tools and techniques to keep your canopy tent stable. Focus on stakes, weights, and guy lines for the best support.
Using Stakes And Pegs
Stakes and pegs hold the tent legs firmly in the ground. They work best on soft soil, grass, or dirt. Insert them at a 45-degree angle away from the tent for strong grip.
- Choose stakes made of metal or heavy-duty plastic.
- Use a hammer or mallet to drive stakes into the ground.
- Place stakes near each tent leg for balanced support.
- Check stakes regularly to make sure they stay secure.
Adding Weights For Stability
Weights help keep your canopy tent steady on hard surfaces like concrete or asphalt. Use special weight bags or heavy objects to add mass to the tent legs.
| Weight Type | Best Use | Notes |
| Sandbags | Outdoor events on grass or dirt | Easy to carry and refill |
| Water weights | Hard surfaces like concrete | Fill and drain for easy transport |
| Concrete blocks | Heavy-duty stability | Very heavy; use with care |
| Special tent weights | All surfaces | Designed to fit tent legs |
Tying Down Guy Lines
Guy lines add extra support by pulling the tent outward. Attach them to the frame and tie them to solid anchors. This stops the tent from swaying or lifting.
Tips for tying guy lines:
- Use strong ropes or cords.
- Tie knots that won’t slip, like a bowline knot.
- Anchor lines to stakes, trees, or heavy objects.
- Keep the lines tight but not too tight to avoid damage.
Tips For Quick Assembly
Setting up a canopy tent can be fast and easy with the right approach. Planning and teamwork help you save time and avoid frustration.
Use these tips to make your canopy assembly smooth and quick every time.
Working With A Partner
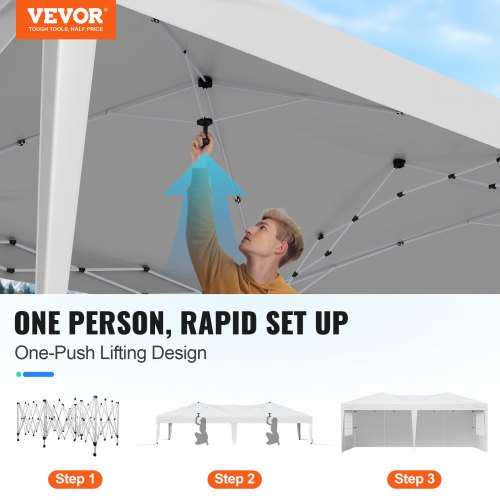
Having a partner makes setting up a canopy tent much faster. Two people can lift the frame and spread the fabric evenly.
Split the tasks: one person can hold the frame while the other secures the corners. This teamwork reduces mistakes and speeds up the process.
Organizing Components
Before you start, lay out all parts of the canopy. Check that nothing is missing or damaged. This saves time hunting for pieces later.
- Sort frame poles by size and type.
- Keep all pins and connectors in one small container.
- Place the canopy fabric on a clean surface nearby.
- Have tools like a mallet or wrench ready if needed.
Practicing Setup Before Use
Try setting up your canopy tent at home before taking it outdoors. Practice helps you learn the steps and find easier ways to assemble.
| Benefit | Details |
| Faster Setup | Know exactly how parts fit together. |
| Less Stress | Build confidence in handling all parts. |
| Problem Spotting | Find missing or broken parts early. |
| Better Teamwork | Coordinate roles with your partner. |
Credit: www.vistaprint.ca
Maintenance And Storage
Keeping your canopy tent in good condition is important. Proper care helps it last longer and stay safe to use. This guide covers cleaning, drying, and folding your tent.
Follow simple steps to store your canopy tent properly. This prevents damage and keeps it ready for your next use.
Cleaning The Canopy
Clean your canopy regularly to remove dirt and stains. Use mild soap and water with a soft brush or cloth. Avoid harsh chemicals that can damage the fabric.
- Remove loose dirt by shaking or brushing
- Mix mild soap with water
- Gently scrub the canopy with a soft brush
- Rinse thoroughly with clean water
- Let it air dry completely before storage
Drying Before Storage
Always dry your canopy tent fully before folding it. Storing it wet can cause mold, mildew, and bad smells. Choose a shaded, well-ventilated area to dry your tent.
| Drying Location | Reason |
| Shaded area | Prevents fabric damage from sun |
| Well-ventilated spot | Allows air to circulate and dry fabric |
| Flat surface | Stops frame from bending or warping |
Proper Folding Techniques
Fold your canopy carefully to avoid creases and damage. Follow these steps to fold it neatly and save space in storage.
- Collapse the frame slowly without forcing it
- Lay the canopy flat on a clean surface
- Fold the fabric evenly along the frame
- Fold the canopy into a compact size
- Store it in a dry bag or container
Credit: www.vevor.ca
Frequently Asked Questions
How Do I Choose The Right Canopy Tent Size?
Select a canopy tent size based on your event’s space and guest count. Measure the area and consider 10-12 sq ft per person. Larger tents offer comfort and flexibility. Choose sizes from 10×10 feet for small gatherings to 20×20 feet for big events.
What Tools Are Needed To Set Up A Canopy Tent?
Most canopy tents require no tools for setup. However, a rubber mallet helps secure stakes firmly. Some models may need a wrench or screwdriver for assembly. Always check the manufacturer’s instructions for specific tools. Having gloves protects your hands during setup.
How Do I Secure A Canopy Tent Safely?
Use stakes or weights to anchor your tent securely. Drive stakes into the ground at each leg if on soft surfaces. On hard surfaces, use heavy weights or sandbags. Ensure all tie-downs are tight. This prevents your tent from blowing away in wind.
How Long Does It Take To Set Up A Canopy Tent?
Setup time varies by size and experience. Small tents can take 5-10 minutes with two people. Larger tents may take 15-30 minutes. Practice setup before your event for efficiency. Reading instructions carefully speeds up the process.
Conclusion
Setting up a canopy tent is easier than it seems. Follow each step with care and patience. Make sure all parts fit well and stay secure. Check the ground for stability before you start. Practice a few times to gain confidence.
This helps you enjoy outdoor events without stress. A well-set canopy offers shade and shelter. Use these tips to create a safe, comfortable space. Now, you can relax under your tent anytime.