Choosing the right trowel for your 12×24 tile project can make all the difference between a smooth, professional finish and a frustrating, uneven mess. You might think any trowel will do, but using the wrong one can cause problems like weak adhesion or uneven grout lines.
If you want your tiles to stay put and look flawless, you need to know exactly which trowel size and type will work best for your tiles. Keep reading, and you’ll discover the simple tool choice that can save you time, money, and headaches on your next tiling job.
Choosing The Right Trowel Size
Choosing the correct trowel size is important when installing large tiles like 12×24 inches. The right size helps the adhesive spread evenly. This makes sure the tile sticks well and stays flat.
Using a trowel that is too small or too large can cause problems. Too small means not enough adhesive, and too large can waste material. Let’s look at why size matters and what notch size to use.
Importance Of Trowel Size For Large Tiles
Large tiles need more adhesive coverage than small tiles. The trowel size controls how much adhesive spreads under the tile. Good coverage avoids air pockets and loose tiles.
- Ensures strong bond between tile and surface
- Prevents tile from cracking or lifting
- Helps keep the tile level and even
- Reduces adhesive waste and mess
Recommended Notch Dimensions For 12×24 Tiles
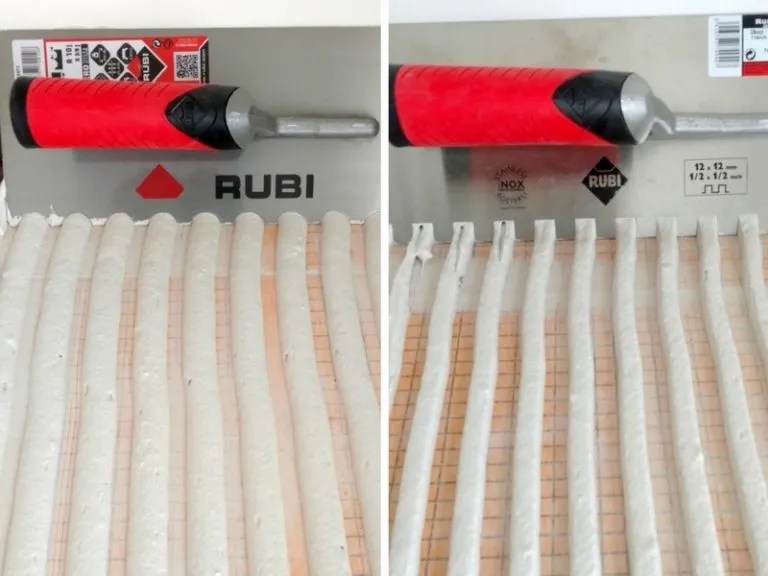
For 12×24 tiles, the trowel notch size is usually larger than for smaller tiles. The size depends on the tile thickness and surface type. Using the right notch helps spread adhesive evenly.
| Trowel Notch Size | Notch Shape | Recommended Tile Thickness | Adhesive Coverage |
|---|---|---|---|
| 1/2 inch x 1/2 inch | Square | 3/8 inch to 1/2 inch | About 95% |
| 1/2 inch x 5/8 inch | Square | Over 1/2 inch | More than 95% |
Credit: www.homehardware.ca
Types Of Trowels For Tile Installation
Trowels are essential tools for tile installation. Choosing the right trowel helps spread adhesive evenly.
Different tiles need different trowel types. This guide explains the main trowel types for 12×24 tiles.
Square-notch Trowels
Square-notch trowels have straight, square-shaped notches. They create uniform ridges in the adhesive.
This trowel is good for large format tiles like 12×24. It helps the tile stick well and stay level.
- Notch size usually ranges from 1/2 inch to 3/4 inch
- Creates strong adhesive coverage
- Easy to clean after use
U-notch Trowels
U-notch trowels have rounded “U” shaped notches. They spread adhesive in smooth, curved lines.
This trowel works well for uneven surfaces. It helps the tile bond without air gaps or weak spots.
- Common notch sizes are 1/4 inch to 1/2 inch
- Good for smaller and medium tiles
- Offers good adhesive control
V-notch Trowels
V-notch trowels have angled “V” shaped notches. They leave thin ridges of adhesive on the surface.
This trowel suits thin and delicate tiles. It gives a smooth finish without too much glue.
- Notch sizes range from 1/8 inch to 3/8 inch
- Helps prevent tile slipping
- Good for wall tile installations
Materials And Build Quality
Choosing the right trowel for 12×24 tile is important. The materials and build quality affect performance.
Trowels come in various designs. Each has unique advantages for tile installation.
Stainless Steel Vs. Plastic Handles
Handles are a key part of a trowel. Stainless steel and plastic are common choices.
Stainless steel handles are strong. They last longer and offer a firm grip.
- Rust-resistant
- Comfortable to hold
- Suitable for heavy use
Plastic handles are lighter. They are often less expensive and easy to handle.
- Lightweight
- Cost-effective
- Easy to clean
Durability And Maintenance Tips
Durability is crucial for a trowel. It ensures the tool can handle tough jobs.
Proper maintenance extends the life of your trowel. Follow these tips to keep it in good shape.
- Clean after each use
- Store in a dry place
- Check for damage regularly
Credit: www.tilemountain.co.uk
Techniques For Applying Adhesive
Using the right technique to apply adhesive ensures strong tile bonding. This is important for 12×24 tiles since they need solid support.
Proper adhesive application helps avoid issues like uneven tiles or weak spots under large tiles.
Spreading Thinset Evenly
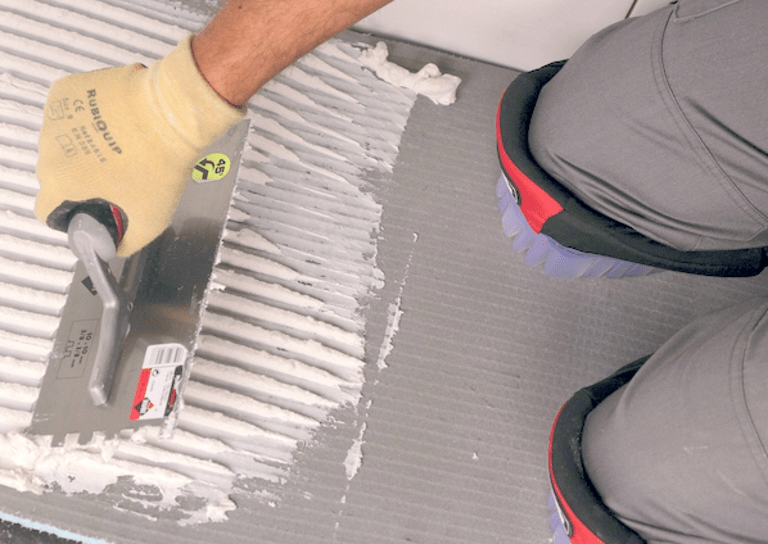
Spread thinset mortar evenly using a notched trowel. This creates a flat surface for the tile to sit on.
- Hold the trowel at a 45-degree angle.
- Apply thinset in straight lines or swirls.
- Keep consistent pressure to avoid thick or thin spots.
- Periodically check for lumps or gaps in the adhesive.
- Use a flat side of the trowel to smooth edges if needed.
Achieving Proper Coverage With Large Tiles
Large 12×24 tiles need full adhesive coverage for support. Partial coverage can cause cracking or hollow spots.
| Coverage Area | Recommended Percentage |
|---|---|
| Back-buttering the tile | 100% |
| Thinset on substrate | 95% or higher |
| Overall adhesive contact | At least 90% |
Common Mistakes To Avoid
Choosing the right trowel for 12×24 tiles is very important. Using the wrong tools can cause problems with tile installation.
Here are two common mistakes that tile installers make and how to avoid them for better results.
Using Incorrect Trowel Size
Using a trowel that is too small or too large can lead to poor adhesive spread. This causes uneven tile placement or weak bonding.
- Small trowels do not hold enough adhesive for large 12×24 tiles.
- Large trowels create too thick a layer, causing tiles to sit unevenly.
- Correct size ensures even coverage and proper tile support.
Insufficient Adhesive Coverage
Not spreading enough adhesive under the tile weakens the bond and may cause tiles to lift or crack later.
| Coverage Type | Effect |
| Full coverage | Strong bond, long-lasting tile hold |
| Partial coverage | Tile movement and possible damage |
| Thin coverage | Adhesive failure and tile lifting |

Credit: alsyedconstruction.com
Expert Tips For Smooth Installation
Choosing the right trowel for 12×24 tiles is important. It helps the tile stick well and stay flat.
Using the correct tools makes your work easier and your tiles look better. These tips will help you install large tiles smoothly.
Back-buttering Large Tiles
Back-buttering means spreading thinset on the back of the tile before placing it. It gives extra grip for large tiles like 12×24.
This step helps fill gaps and prevents hollow spots. Use a trowel with 1/2 inch by 1/2 inch square notches for best results.
- Apply thinset on the floor first with a 1/2 inch x 1/2 inch notch trowel
- Spread thinset on the tile back using the flat side of the trowel
- Use notched side on the floor to create ridges for better grip
- Press tile firmly to squeeze out air and create a tight bond
Using A Level And Spacers Effectively
Check the tile surface with a level to keep tiles flat and even. This prevents lippage, where one tile edge is higher than the next.
Spacers keep consistent gaps between tiles. They make grouting easier and create a clean look.
- Place spacers at each tile corner before pressing tiles fully
- Use a 4-foot level to check flatness across multiple tiles
- Adjust tiles gently if you see any uneven spots
- Remove spacers after thinset sets but before grouting
Frequently Asked Questions
What Size Trowel Is Best For 12×24 Tiles?
A 1/2 inch x 1/2 inch square-notch trowel is ideal for 12×24 tiles. It ensures proper adhesive coverage and even setting.
Can A Notched Trowel Affect Tile Adhesion?
Yes, a notched trowel controls adhesive thickness. It improves bonding and prevents tiles from slipping or hollow spots under larger tiles.
Should I Use A Larger Trowel For Bigger Tiles?
Larger tiles like 12×24 require bigger notches on the trowel. This helps spread enough adhesive evenly for strong tile installation.
How Does Trowel Size Impact Tile Installation Quality?
The right trowel size guarantees correct adhesive depth. This ensures tiles are firmly fixed and reduces installation issues like cracks or loosening.
Conclusion
Choosing the right trowel makes tile installation easier and neater. For 12×24 tiles, a 1/2-inch by 1/2-inch square-notched trowel works best. It helps spread adhesive evenly and supports the tile well. Using the correct trowel saves time and prevents future problems.
Remember, good tools lead to better results. Now, you can install large tiles with confidence and a smooth finish. Simple steps bring great outcomes.