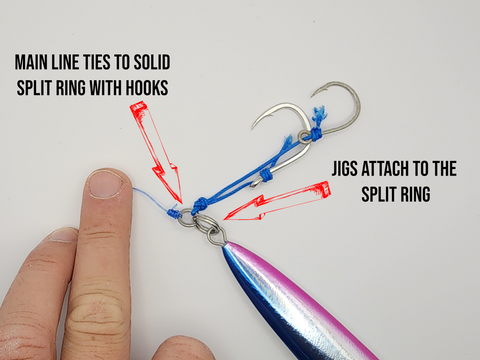
Tying a jig on your fishing line might seem tricky at first, but once you learn the right steps, it becomes quick and easy. Getting this knot right is key to keeping your jig secure and improving your chances of a great catch.
In this guide, you’ll discover simple, clear instructions that anyone can follow. By the end, you’ll have the confidence to tie your jig perfectly every time—and get more bites on the water. Ready to master this essential fishing skill? Let’s dive in.
Choosing The Right Jig And Line
Tying a jig on your fishing line needs the right jig and line choice. These choices help you catch more fish and keep your tackle safe.
Picking the best jig and line depends on your fishing spot and the fish you want. Learn about types of jigs and how to select fishing line.
Types Of Jigs
Jigs come in many shapes and weights. Each type works best in different water and fish types.
- Round Head Jigs: Good for rocky bottoms and strong currents.
- Football Jigs: Stable on uneven ground, good for rocky areas.
- Tube Jigs: Soft plastic bodies for slow, natural movement.
- Grass Jigs: Designed to move easily through weeds and grass.
- Swim Jigs: Made to swim smoothly for active fish.
Selecting Suitable Fishing Line
Choose fishing line based on strength, stretch, and water type. The line must match the jig and fish size.
Strong lines help pull big fish. Clear lines work well in clear water. Use lines with some stretch to avoid breaking on sharp pulls.
- Monofilament: Easy to handle, stretches well, good for beginners.
- Fluorocarbon: Hard to see underwater, sinks fast, good for clear water.
- Braid: Very strong, no stretch, good for heavy cover and big fish.

Credit: wholesalejigs.com.au
Preparing Your Equipment
Tying a jig on your fishing line starts with preparing your equipment correctly. Proper preparation helps the knot hold better and improves your fishing experience.
Focus on trimming and moistening the line before tying the knot. These small steps make a big difference in the strength and durability of your connection.
Trimming The Line
Trim the fishing line end to remove any frays or damage. A clean cut allows the knot to form tightly and prevents slipping.
- Use sharp scissors or a line clipper.
- Cut the line straight across for a neat edge.
- Remove at least half an inch of the line tip.
- Inspect the trimmed end for any rough spots.
Moistening The Line
Moisten the line before tightening the knot. This step reduces friction and helps the knot slide into place more easily.
| Moistening Methods | Details |
| Water | Use fresh or salt water to wet the line slightly. |
| Saliva | Spit lightly on the line for quick moisture. |
| Special Lubricants | Apply a knot lubricant for smoother tightening. |
Step-by-step Knot Techniques
Tying a jig on your fishing line is vital for successful fishing. Different knots offer unique benefits and security. Learn these techniques to improve your fishing skills.
Here, we will explore three effective knots. Each knot serves a specific purpose and is easy to learn.
Improved Clinch Knot
The Improved Clinch Knot is a reliable choice for securing your jig. It is known for its strength and simplicity.
- Thread the line through the eye of the jig.
- Wrap the tag end around the standing line 5-7 times.
- Pass the tag end through the small loop near the eye.
- Pull the tag end through the larger loop you just created.
- Moisten the knot with water and pull tight.
- Trim the excess line.
Palomar Knot
The Palomar Knot is a versatile option for many fishing scenarios. It is praised for its strength and reliability.
- Double about 6 inches of line and pass it through the eye.
- Tie a loose overhand knot with the doubled line.
- Pass the loop over the jig.
- Pull on the standing line to tighten.
- Trim the excess line close to the knot.
Loop Knot
The Loop Knot is useful for allowing the jig to move freely. It is often used for lures that require movement.
- Create a loop about 6 inches from the end of the line.
- Pass the end through the eye of the jig.
- Bring the end back through the loop.
- Tie an overhand knot around the standing line.
- Moisten and pull tight, ensuring the loop is the desired size.
- Trim any excess line.

Credit: www.youtube.com
Testing Knot Strength
Testing the knot strength is important after tying a jig on fishing line. It helps ensure the knot will hold during fishing.
Strong knots prevent losing your jig or fish. Testing is simple and can save you trouble on the water.
Pulling Techniques
Use steady and firm pulls to test the knot strength. Pull the line slowly to check how well the knot holds.
Try pulling the jig and line in different directions to see if the knot slips or loosens.
- Pull the line with steady pressure
- Apply force in various directions
- Hold the jig while pulling the line
- Repeat the test a few times
Signs Of Weakness
Look for any slipping or loosening of the knot. If the knot moves, it means it is not strong enough.
Check for frayed or damaged line near the knot. Weak spots can cause the line to break easily.
- Knot slides under pressure
- Line frays near the knot
- Knot feels loose or uneven
- Line breaks at or near the knot
Tips For Knot Durability
Tying a jig on your fishing line needs a strong knot. A durable knot holds tight and lasts long.
Good knot tying helps catch more fish and prevents losing your jig. Use these tips for better knots.
Avoiding Line Damage
Damaged line weakens the knot and can cause it to break. Always check your line before tying.
Use smooth, clean line to avoid cuts or abrasions. Avoid sharp edges or rough surfaces near the knot.
- Wet the line before tightening the knot to reduce friction.
- Use gentle but firm pulls to snug the knot.
- Trim excess line close to the knot without cutting it.
- Replace damaged line sections to keep knot strength.
Regular Knot Inspection
Check your knots often, especially after catching a fish or snagging the jig. Knots can loosen or weaken.
Look for signs like fraying, slipping, or changes in knot shape. Fix or retie knots when needed.
- Test knot strength by pulling gently before casting.
- Retie knots that look worn or loose.
- Inspect knots after each fishing session.
- Keep spare knots ready for quick changes.

Credit: www.youtube.com
Frequently Asked Questions
How Do You Tie A Jig To Fishing Line?
To tie a jig, thread the line through the eye of the jig. Use a clinch knot by wrapping the tag end around the main line five times. Then, pass the tag end through the loop near the eye and tighten securely.
What Is The Best Knot For Jig Fishing?
The improved clinch knot is best for jig fishing. It holds the jig firmly and is easy to tie. This knot ensures strong connection and prevents slipping during casting or retrieving.
Can I Use Braided Line To Tie A Jig?
Yes, braided line works well for tying jigs. It offers high strength and sensitivity. When using braid, add a small leader to prevent abrasion and improve knot reliability.
How Tight Should The Knot Be When Tying A Jig?
The knot should be tight enough to prevent slipping but not so tight it damages the line. Pull firmly while wetting the knot to reduce friction and secure it properly.
Conclusion
Tying a jig on your fishing line is simple with practice. Use the right knot and tighten it well. A secure knot helps keep your jig from slipping off. Try different knots to find what works best for you. Keep your line smooth and avoid twists.
Soon, tying jigs will feel natural and quick. Enjoy fishing with confidence and better catches. Small steps make a big difference on the water.