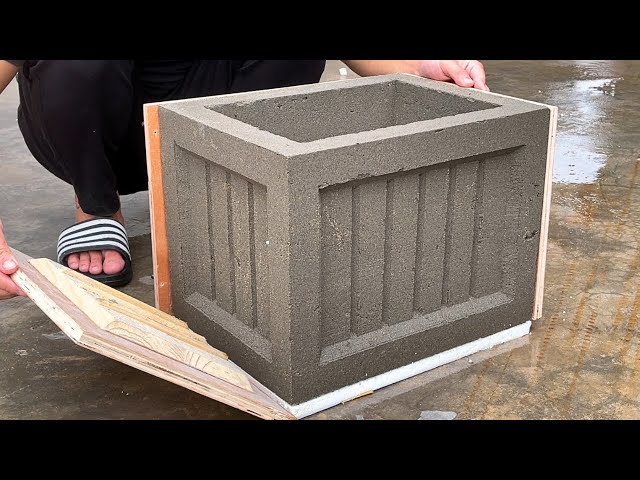
Are you looking to add a personal touch to your garden or home decor? Making concrete planters is easier than you think, and it’s a fun way to create something unique that fits your style.
Imagine having sturdy, stylish planters that you made yourself, perfect for your favorite plants. In this guide, you’ll discover simple steps to craft your own concrete planters with materials you can find easily. Ready to transform your space with your own hands?
Let’s get started!

Credit: www.youtube.com
Materials And Tools
Making concrete planters needs some basic materials and tools. These help you create strong and nice planters.
This guide shows what you need to get started with your concrete planter project.
Essential Supplies
You need a few key supplies to make concrete planters. These include concrete mix, molds, and water.
- Concrete mix (pre-mixed or dry mix)
- Molds or containers for shaping planters
- Water to mix with concrete
- Mixing bucket or container
- Mixing stick or trowel
- Plastic sheets or bags to cover planters
Choosing The Right Concrete
Select concrete that is strong and easy to work with. Look for mixes made for small projects.
Fast-setting concrete helps you finish planters quicker. It is good for simple shapes.
- Use pre-mixed concrete for convenience
- Choose concrete labeled for crafts or small projects
- Consider fast-setting types for quick results
- Avoid heavy-duty concrete meant for large construction
Safety Gear
Wear safety gear to protect yourself while working with concrete. It can irritate your skin and eyes.
Use gloves, masks, and goggles to stay safe during mixing and pouring.
- Rubber or latex gloves to protect hands
- Safety goggles to shield eyes
- Dust mask to avoid breathing cement dust
- Old clothes or apron to protect skin
Design Ideas
Creating concrete planters can be a fun and rewarding project. You have many design options to explore for your garden or home.
Explore different shapes, textures, and molds to make unique planters that suit your style.
Shape And Size Options
The shape and size of your concrete planter can affect its functionality and appearance. Consider where you will place it and what plants you will use.
- Round planters add a soft look to gardens.
- Square and rectangular planters offer a modern feel.
- Small planters are ideal for herbs.
- Large planters accommodate small trees.
Texture And Finishes
Texture and finish can transform the look of your concrete planter. Experiment with different finishes for a custom appearance.
| Texture | Finish |
| Smooth | Painted |
| Rough | Stained |
| Patterned | Natural |
Creative Mold Choices
Choosing a unique mold can set your concrete planter apart. Reuse everyday items or invest in custom molds for innovative shapes.
Preparing The Mold
Making concrete planters starts with a clean and well-prepared mold. A good mold helps shape the concrete and makes it easier to remove the planter later.
This section covers how to select mold materials, clean and seal the mold, and apply release agents for the best results.
Selecting Mold Materials
Choose the right mold material to get the shape and texture you want. Some materials work better with concrete than others.
- Plastic molds are lightweight and easy to use.
- Wood molds give a natural texture but need sealing.
- Silicone molds are flexible and good for detailed shapes.
- Metal molds are strong but can be heavy and expensive.
Cleaning And Sealing
Keep the mold clean to avoid rough surfaces on your planter. Dirt and dust can affect the concrete finish.
| Cleaning Task | Recommended Method |
| Remove dust and debris | Use a dry cloth or soft brush |
| Wash mold | Use mild soap and water, then dry fully |
| Seal porous molds | Apply a water-based sealer and let dry |
Applying Release Agents
Release agents help remove the planter from the mold without damage. They create a thin barrier between the mold and concrete.
Common release agents include:
- Cooking oil or vegetable oil
- Commercial mold release sprays
- Petroleum jelly
Apply a thin, even layer with a cloth or brush before pouring the concrete.

Credit: hamiltonparkhome.com
Mixing Concrete
Mixing concrete is a key step to make strong planters. You need the right mix to hold shape and last long.
Good mixing ensures the concrete is smooth and easy to pour into molds. It also helps prevent cracks.
Proper Ratios
Use the correct ratio of cement, sand, and gravel for strong concrete. Too much water weakens the mix.
A common ratio is 1 part cement, 2 parts sand, and 3 parts gravel. Add water slowly to get a thick paste.
- 1 part cement
- 2 parts sand
- 3 parts gravel
- Water as needed (start small)
Mixing Techniques
Start by mixing dry ingredients well. Then add water slowly while stirring. Keep mixing until smooth.
Use a shovel or a mixing tool. Avoid lumps and dry spots for the best results. The mix should be thick but pourable.
- Mix dry cement, sand, and gravel first
- Add water little by little
- Stir continuously for even texture
- Check consistency: thick but not dry
Adding Color Or Additives
You can add color powders to make your planters look nice. Mix colors well into the dry concrete before adding water.
Additives like plasticizers help concrete flow better. They make mixing easier and improve the planter’s strength.
- Mix color powder with dry ingredients
- Use plasticizers to improve flow
- Do not add too much water with additives
- Follow instructions on additive packaging
Pouring And Setting
Pouring and setting concrete planters require care and attention. You must prepare your mold and mix the concrete properly. This ensures a strong and smooth planter.
The process includes layering concrete, removing air bubbles, and allowing proper curing time. Each step affects the final look and durability.
Layering Concrete
Pour the concrete in layers to avoid cracks and weak spots. Add each layer slowly and press it down to fill gaps.
- Start with a thin base layer to cover the bottom of the mold.
- Add middle layers carefully, making sure each is solid.
- Finish with a top layer that is smooth and even.
- Use a trowel or spatula to level each layer.
Removing Air Bubbles
Air bubbles cause holes and weak spots in your planter. Remove them to get a clean finish and strong structure.
- Tap the sides of the mold gently after pouring.
- Use a stick or rod to poke through the concrete surface.
- Repeat tapping and poking until no more bubbles appear.
Curing Times
Curing is the time concrete needs to harden and gain strength. Proper curing affects durability and appearance.
| Stage | Duration | Notes |
|---|---|---|
| Initial Setting | 24 hours | Keep mold undisturbed |
| Partial Cure | 3-7 days | Keep moist and shaded |
| Full Cure | 28 days | Maximum strength reached |

Credit: www.youtube.com
Demolding And Finishing
After your concrete planter sets, it is time to remove it from the mold. This step needs care to avoid damage. Finishing improves the planter’s look and strength.
Use gentle techniques to keep the planter intact. Then smooth the surface and protect it for long use.
Careful Removal
Wait until the concrete is fully dry before removing the mold. Drying usually takes 24 to 48 hours. Tap the mold edges lightly to loosen the planter.
Pull the mold slowly and evenly. Avoid bending or cracking the concrete. If stuck, use warm water to help release the planter.
Sanding And Smoothing
Check the surface for rough spots and sharp edges. Use sandpaper to smooth the planter. Start with coarse grit, then use fine grit for a soft finish.
- Use 80-grit sandpaper for rough areas
- Switch to 220-grit for a smooth finish
- Sand edges carefully to avoid cracks
Wipe the planter with a damp cloth after sanding. This removes dust and prepares it for sealing.
Sealing For Durability
Apply a concrete sealer to protect your planter from water and stains. Sealing helps prevent cracks and extends its life.
Use a brush or spray to cover all surfaces. Let the sealer dry as the instructions say. Apply a second coat for stronger protection.
- Choose a sealer made for concrete
- Seal both inside and outside of the planter
- Allow full drying before planting
Planting Tips
Concrete planters add a modern touch to your garden or home. To keep your plants healthy, you need to follow good planting tips.
Choosing the right plants, providing proper drainage, and caring for soil and watering are key steps for success.
Choosing Suitable Plants
Pick plants that grow well in containers. Small shrubs, succulents, and herbs work well in concrete planters.
Consider the light and temperature where you place the planter. Choose plants that like those conditions.
- Succulents need bright light and little water
- Herbs like basil and mint need medium sunlight
- Small flowers need regular watering and some shade
Drainage Solutions
Good drainage stops water from building up and hurting roots. Make sure your planter has holes at the bottom.
Add a layer of small rocks or gravel before adding soil. This helps water drain out easily.
- Drill drainage holes if your planter has none
- Use gravel or broken pottery pieces at the base
- Place the planter on feet or bricks to allow water flow
Soil And Watering
Use well-draining soil made for container plants. Avoid heavy garden soil that holds too much water.
Water plants when the top inch of soil feels dry. Do not overwater to avoid root rot.
- Use potting mix with peat or perlite for drainage
- Check soil moisture before watering
- Water slowly to let soil absorb moisture
Maintenance And Care
Concrete planters are strong and stylish. They need regular care to last longer. Cleaning, fixing, and protecting them helps keep their look and strength.
Use simple methods to clean and repair your planters. Also, prepare them for different seasons to avoid damage.
Cleaning Techniques
Keep your concrete planters clean to prevent stains and moss. Use soft brushes and mild cleaners to avoid damage.
- Remove dirt with a soft brush or cloth.
- Wash with water and a little dish soap.
- Rinse well to remove soap residue.
- For tough stains, use a mix of water and white vinegar.
- Avoid harsh chemicals that can harm concrete.
Repairing Cracks
Cracks can form from weather changes or impact. Fix them early to stop water damage and bigger breaks.
| Crack Size | Repair Method |
| Small (hairline) | Use concrete filler or sealant |
| Medium | Apply patching compound and smooth surface |
| Large | Fill with epoxy or replace planter if severe |
Seasonal Protection
Protect planters from harsh weather to avoid cracks and erosion. Move them or cover during cold and wet seasons.
- In winter, bring planters indoors or cover with plastic sheets.
- Drain water to prevent freezing inside the planter.
- In summer, place planters in shaded areas to reduce heat damage.
- Apply a concrete sealant yearly to protect from moisture.
Creative Variations
Concrete planters are strong and stylish. You can make them unique by adding creative touches.
Try different ideas to give your planters a special look. This makes them fun to create and use.
Painting And Decorating
Painting your concrete planters adds color and style. Use acrylic paints for bright, lasting colors.
You can decorate planters with patterns, shapes, or even stencils to make them stand out.
- Use tape to create clean lines and shapes
- Apply a sealant to protect your paint
- Add small decorations like stones or beads with glue
Combining Materials
Mixing materials with concrete makes your planters more interesting. Wood, metal, or glass work well.
Try adding wood pieces around the planter’s edge or metal bands for a modern look.
- Wrap metal wire around the planter
- Attach wooden slats for texture
- Embed glass pieces for color and shine
Using Recycled Items
Recycled items add character and reduce waste. Old containers and broken toys can be molds or decorations.
Use plastic bottles as molds or add small recycled parts on the planter’s surface.
- Cut plastic containers for custom shapes
- Press bottle caps into wet concrete
- Use old fabric or rope as decorative accents
Frequently Asked Questions
What Materials Do I Need To Make Concrete Planters?
You need cement, sand, water, molds, and mixing tools. Optional: sealant for waterproofing. These basics ensure sturdy, durable planters.
How Long Does Concrete Take To Cure For Planters?
Concrete typically cures in 24 to 48 hours to harden. Full strength develops over 28 days. Proper curing prevents cracks and improves durability.
Can I Customize The Shape And Size Of Planters?
Yes, using different molds or creating your own mold allows customization. Experiment with shapes and sizes to fit your space and style.
How Do I Prevent Cracks In Concrete Planters?
Mix concrete properly, avoid excess water, and cure slowly. Use reinforcement like wire mesh or fibers. Sealing also helps reduce cracking.
Conclusion
Making concrete planters is simple and fun. You only need basic materials and a little patience. These planters add charm to any space and last a long time. You can customize shapes and sizes to fit your style. Try this project to enjoy gardening in a new way.
Start today and watch your plants grow in unique pots. Crafting your own planters brings pride and creativity together. Give it a go and brighten your home with concrete planters.