
Are you ready to create your own shelter with just a tarp? Knowing how to make a tent with a tarp is a simple skill that can keep you dry, safe, and comfortable outdoors.
Whether you’re camping, hiking, or facing an unexpected situation, this easy guide will show you step-by-step how to turn a basic tarp into a reliable tent. Keep reading, and you’ll discover tips and tricks that make setting up your shelter quick and stress-free.
Your next adventure just got a lot more secure—and you’ll feel confident doing it yourself.

Credit: www.youtube.com
Choosing The Right Tarp
Using a tarp to make a tent is a smart and simple way to create shelter. Picking the right tarp is key to staying dry and comfortable outdoors.
Different tarps offer various benefits. You must think about what material, size, shape, and features will fit your needs best.
Material Types
Tarp materials affect weight, strength, and weather resistance. Common materials include polyethylene, canvas, and nylon.
- Polyethylene:Affordable and waterproof but heavier and less breathable.
- Canvas:Durable and breathable but heavier and may absorb water.
- Nylon:Lightweight and strong, often with waterproof coating.
Size And Shape Considerations
Choose a tarp size and shape that fits your shelter needs. Larger tarps cover more area but weigh more.
| Shape | Best For | Notes |
| Rectangular | Simple shelters and ground covers | Easy to pitch in many styles |
| Square | Versatile and easy to fold | Good for quick setups |
| Hexagonal | More coverage and wind resistance | Less common, more complex pitch |
Waterproof And Durability Features
Waterproofing keeps you dry during rain. Durable tarps last longer and resist tears from wind and branches.
- Waterproof coatings like polyurethane or silicone
- Reinforced edges and corners with grommets
- Tear-resistant fabric weaves
Essential Gear And Tools
Making a tent with a tarp is simple and needs just a few tools. Using the right gear helps you build a strong shelter.
This guide covers the key gear to make your tarp tent safe and stable.
Ropes And Paracord
Ropes and paracord are needed to tie your tarp to trees or poles. They keep the tarp tight and steady.
Paracord is light and strong. It is easy to knot and holds well in different weather.
- Use ropes at least 10 feet long
- Choose paracord with 550 lb strength
- Bring extra rope for adjustments
- Practice simple knots like bowline or taut-line hitch
Stakes And Pegs
Stakes and pegs anchor your tarp to the ground. They stop it from moving in wind.
Strong stakes work well on hard or soft soil. Use the right type to fit your camping area.
- Metal stakes hold best in firm soil
- Plastic stakes are light but less strong
- Bring extra stakes for windy conditions
- Use a hammer or rock to drive stakes in deep
Poles And Support Options
Poles help raise your tarp off the ground. They create space and keep the tarp from sagging.
You can use hiking poles, sticks, or strong branches. Adjust the height to fit your needs.
- Hiking poles are adjustable and lightweight
- Strong branches work if poles are not available
- Use rocks or logs as weight if poles are missing
- Secure poles firmly to avoid falling
Selecting A Campsite
Choosing the right campsite is key to a comfortable outdoor experience. Look for specific features to ensure safety and comfort.
A well-chosen location makes setting up a tarp tent easier and more efficient. Keep these tips in mind when selecting your site.
Flat And Dry Ground
Always search for flat and dry ground to pitch your tent. This ensures stability and keeps water from pooling under your tarp.
- Check for even terrain to avoid rolling during sleep.
- Look for areas without rocks or sticks.
- Ensure the ground is firm, not muddy or sandy.
Natural Windbreaks
Natural windbreaks offer protection from strong winds. They can be trees, bushes, or large rocks that shield your campsite.
Avoiding Hazards
Stay safe by avoiding hazards like falling branches or flooding areas. These can pose risks to your safety while camping.
| Hazard | Solution |
| Falling Branches | Stay away from dead trees |
| Flooding | Choose higher ground |
| Insects | Avoid areas with standing water |

Credit: www.reddit.com
Basic Tarp Tent Styles
Tarp tents are simple shelters made from a tarp and some rope. They protect you from rain, wind, and sun. Different styles suit different needs and spaces.
Learning basic tarp tent styles helps you set up a shelter fast. Use these styles for camping, hiking, or emergency shelter.
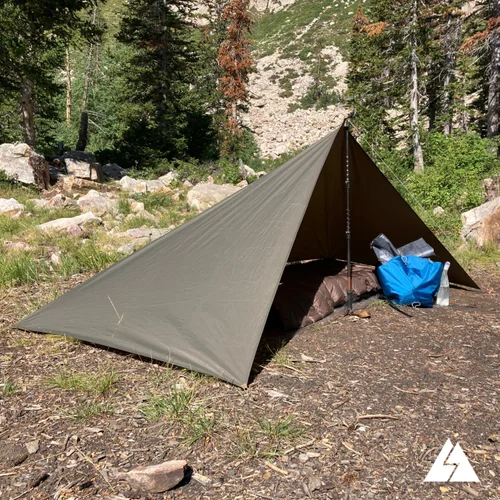
A-frame Setup
The A-Frame is a classic tent shape. It looks like the letter “A” and stands strong in wind and rain. It uses a ridge line and two anchor points.
To make an A-Frame, tie a rope between two trees. Drape the tarp over the rope. Secure the tarp corners to the ground with stakes.
- Tie ridge line between two trees
- Drape tarp evenly over the rope
- Stake all tarp corners tight
- Make sure sides touch the ground
Lean-to Shelter
The Lean-To is easy to build and uses one side open. It offers good wind protection and shade on one side. It works well near a fire or wall.
Attach one edge of the tarp to a rope or wall. Let the other side reach the ground. Stake the open side to the ground for support.
- Fix one tarp edge to a rope or wall
- Let tarp slope down to the ground
- Stake open side securely
- Face open side away from wind
Pyramid Shelter
The Pyramid Shelter stands tall with a central pole or stick. It uses all tarp corners staked to the ground. This shape sheds rain well and offers good headroom.
Place a stick or pole in the center. Pull tarp corners out and stake them evenly in a square or diamond shape. Tighten all sides for stability.
- Place a center pole or stick upright
- Pull tarp corners out evenly
- Stake all corners firmly
- Tighten tarp for a firm shape
Step-by-step Setup Guide
Setting up a tent with a tarp is simple and useful for outdoor shelter. This guide shows you how to do it step by step.
Follow these instructions to make a sturdy and weather-resistant tarp tent.
Laying Out The Tarp
Start by finding a flat and clear area. Spread the tarp out on the ground. Make sure it is flat and covers the space you want.
Place the tarp so the corners are easy to reach. This helps when you tie the tarp to anchor points later.
Securing Anchor Points
Find strong points to tie the tarp. Trees, poles, or stakes work well. Attach ropes or cords to each tarp corner.
Make sure the ropes are tight enough to hold the tarp but not too tight to damage it.
- Use trees or poles as natural anchors
- Drive stakes into the ground for extra support
- Attach cords to tarp grommets or corners
Tensioning The Tarp
Pull the tarp edges tight to remove slack. Tighten the ropes or cords evenly on all sides. This keeps the tarp stable and prevents water from pooling.
Adjust knots or use tensioners to maintain the right tightness. Check the tarp often and retighten if needed.
Adjusting For Weather
Change the tarp angle to protect against wind and rain. Lower one side if rain is coming from that direction. Raise the tarp high for good airflow on hot days.
Use extra stakes or ropes to secure the tarp during strong wind. Always check the tarp’s condition during bad weather.
- Lower tarp side facing rain
- Raise tarp for better ventilation
- Add more anchors in windy conditions
Tips For Enhancing Comfort
Making a tent with a tarp is simple and effective. Comfort depends on more than just shelter.
Small changes can make your tarp tent warmer, cooler, and bug-free. Here are tips for better comfort.
Ground Insulation
Cold or wet ground can make sleeping outdoors uncomfortable. Use insulation to keep warm and dry.
- Lay a thick foam pad or closed-cell mat beneath your sleeping bag
- Place leaves, pine needles, or dry grass under the tarp floor for extra cushioning
- Use a reflective emergency blanket under your sleeping pad to reflect body heat
- Make sure the tarp floor is taut to avoid water pooling
Ventilation Techniques
Good airflow prevents condensation inside your tarp tent. It also keeps air fresh and cool.
| Technique | Description | Benefit |
| Leave side flaps open | Prop tarp edges up with sticks or poles | Allows cross breeze |
| Use mesh doors | Attach mesh panels under tarp edges | Keeps bugs out but air flows |
| Create vent holes | Cut small openings near the top | Warm air escapes easily |
Adding Bug Protection
Bugs can disturb your rest and cause bites. Add protection to enjoy your time inside the tarp.
- Use a bug net that can hang inside your tarp frame
- Seal gaps where bugs can enter with extra tarp pieces or tape
- Apply natural insect repellents around the campsite
- Keep food sealed and away from the sleeping area
Common Mistakes To Avoid
Making a tent with a tarp is simple, but some mistakes can cause problems. Avoid these errors to keep your shelter strong and safe.
Knowing what not to do helps you build a better tent. Read on to learn common mistakes to avoid.
Improper Tension
Not pulling the tarp tight enough can cause sagging. A loose tarp lets water collect and may collapse.
Too much tension can tear the tarp or break ropes. Find a balance by tightening the tarp evenly.
- Check all ropes for even tension
- Adjust knots if tarp sags or pulls too hard
- Use stakes and trees to keep tarp stable
Ignoring Weather Changes
Weather can change quickly outside. Ignoring wind, rain, or sun can damage your tent or make it unsafe.
Always watch the sky and listen to weather reports. Adjust your tarp setup if the weather turns bad.
- Re-tighten tarp after heavy rain or wind
- Lower the tarp if strong winds come
- Move to safer spots if storms approach
Choosing Poor Locations
Setting your tarp in the wrong place can cause discomfort or danger. Avoid low spots where water collects.
Pick flat, dry ground away from dead branches or unstable trees. These can fall and harm you.
- Check for rocks or sharp objects under the tarp
- Stay clear of animal paths or insect nests
- Find a spot with natural wind protection
Maintaining And Storing Your Tarp
Taking care of your tarp helps it last longer and stay useful. Proper cleaning, drying, and repairing keep it ready for your next trip.
Storing your tarp correctly avoids damage from moisture and dirt. Follow simple steps to keep it in good condition.
Cleaning After Use
Remove dirt and debris from your tarp after each use. Use clean water and a soft brush or cloth to wash it gently.
Avoid harsh soaps or chemicals that can harm the tarp material. Let it air dry before storing to prevent mold.
Drying And Folding Tips
Always dry your tarp completely before folding it. Wet tarps can develop mold or unpleasant smells over time.
Fold the tarp loosely to avoid creases that can weaken the fabric. Store it in a cool, dry place away from sunlight.
- Hang tarp if possible to air dry faster
- Fold along existing creases to reduce stress
- Store in a breathable bag or container
Repairing Small Damages
Fix small tears or holes quickly to stop them from growing. Use tarp repair tape or patches made for outdoor fabrics.
Clean the damaged area before applying repairs. Press firmly and let the patch set for several hours before use.
- Cut patch slightly larger than the damage
- Remove dirt and dry the area first
- Apply patch on the inside of the tarp if possible
Credit: www.stitchbackgear.com
Frequently Asked Questions
How Do I Choose The Best Tarp For A Tent?
Select a tarp made of durable, waterproof material like polyethylene or silnylon. Size it to cover your desired shelter area. Look for reinforced grommets and UV resistance for longer use. A lightweight tarp is best for easy transport during camping or hiking trips.
What Basic Tools Are Needed To Make A Tarp Tent?
You need strong cord or paracord, stakes or rocks, and a tarp. A mallet or hammer helps drive stakes into the ground. Optional tools include a knife for cutting cord and carabiners for secure attachments. These simple tools aid in quick and sturdy tent setup.
How Do I Set Up A Tarp Tent Quickly?
Find two sturdy anchor points like trees or poles. Tie cords to tarp corners and secure them tightly. Use stakes to fix the tarp edges to the ground. Adjust tension to avoid sagging and ensure water runoff. This method creates a stable and weatherproof tent fast.
Can A Tarp Tent Protect Against Heavy Rain?
Yes, a properly pitched tarp tent sheds water effectively. Ensure tight tarp tension and angled setup for rain runoff. Use ground stakes to prevent wind from lifting the tarp. Adding a groundsheet increases dryness. However, very heavy storms may require more robust shelter options.
Conclusion
Making a tent with a tarp is simple and useful. You only need a few tools and some practice. This method gives you shelter from rain and wind fast. It also saves space in your backpack. Try different shapes to find what works best for you.
With patience, you can build a strong, reliable tent anywhere. Stay safe and enjoy your outdoor adventure.