Tying a strong knot on braided fishing line can make all the difference between landing a big catch or losing it at the last moment. If you’ve ever struggled with knots slipping or breaking, you’re not alone.
But don’t worry—once you learn the right technique, you’ll feel confident every time you cast your line. This guide will show you simple, step-by-step methods to tie secure knots that hold tight, even under pressure. Keep reading, and you’ll master the skill that every successful angler needs.
Choosing The Right Knot
Choosing the right knot is important for braided fishing line. Braided lines are thin and strong, so the knot must hold tightly.
Some knots work better with braided lines than others. Picking the right knot can prevent slipping and line breakage.
Knots Best For Braided Line
Some knots are more suited for braided fishing line. These knots keep the line strong and secure.
- Palomar Knot – easy to tie and very strong.
- Uni Knot – versatile and good for many uses.
- Double Uni Knot – best for joining two lines.
- Improved Clinch Knot – common and reliable.
- Arbor Knot – used for tying line to reels.
Strength And Reliability Factors
Strength and reliability depend on knot type and how well it is tied. Braided line needs knots that do not slip or weaken the line.
| Knot Type | Strength Retention | Ease of Tying |
| Palomar Knot | 95% | Easy |
| Uni Knot | 90% | Moderate |
| Double Uni Knot | 85% | Moderate |
| Improved Clinch Knot | 80% | Easy |
| Arbor Knot | 75% | Easy |

Credit: www.reddit.com
Preparing Your Line
Preparing your braided fishing line before tying a knot is essential. It helps ensure the knot stays strong and secure. Taking time to get the line ready can make a big difference in your fishing success.
This section covers two important steps: trimming and cleaning the line end, and moistening the line before tying.
Trimming And Cleaning The Line End
Before tying any knot, make sure the end of your braided line is neat. Trim off any frayed or damaged parts. A clean end helps the knot hold better and prevents slipping.
- Use sharp scissors or a line cutter for a clean cut.
- Remove any fuzz or loose fibers at the end.
- Check the line for any signs of wear or damage near the tip.
- If the end looks rough, trim a little more until it is smooth.
Moistening The Line Before Tying
Moistening the braided line before you tie the knot reduces friction. This makes it easier to tighten the knot without damaging the line. It also helps the knot slide into place smoothly.
| Why Moistening Helps | How to Moisturize |
| Prevents heat damage from friction | Use water or saliva to wet the line |
| Keeps knot tight and secure | Apply moisture evenly along the knot area |
| Makes knot easier to adjust | Wet before pulling the knot tight |
Popular Knot Techniques
Tying knots on braided fishing line needs care. Braided lines are slippery and thin.
Good knots keep your line strong and help catch fish. Here are popular knots for braided lines.
Palomar Knot Steps
The Palomar knot is simple and strong. It works well with braided fishing lines.
- Double about 6 inches of line and pass it through the eye of the hook.
- Tie a loose overhand knot with the doubled line.
- Pass the hook through the loop of the overhand knot.
- Pull on both the tag end and the standing line to tighten the knot.
- Trim the excess tag end close to the knot.
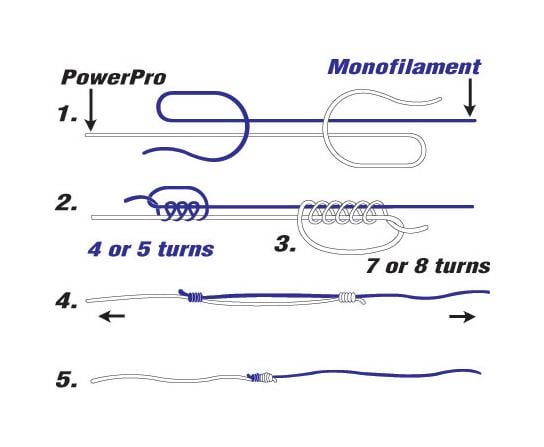
Double Uni Knot Method
The Double Uni knot joins two braided lines or braided to monofilament line. It is reliable and smooth.
- Overlap two line ends side by side.
- Make a loop with one line and wrap the tag end around both lines 4 to 6 times.
- Pull the tag end to tighten the wraps.
- Repeat the same with the other line in the opposite direction.
- Pull both standing lines to slide the knots together.
- Trim the tag ends close to the knots.
Fg Knot For Extreme Strength
The FG knot is famous for its slim profile and high strength. It is great for braided line to fluorocarbon leaders.
- Lay the braided line and fluorocarbon leader side by side.
- Wrap the braided line tightly around the leader 10 to 12 times.
- Make a half hitch with the braided line around the leader after the wraps.
- Tighten the wraps and hitch by pulling the standing lines slowly.
- Finish with 4 or 5 half hitches on the leader side.
- Trim all tag ends closely.
Step-by-step Knot Tying
Tying a knot on braided fishing line can be tricky. This guide will help you learn each step with ease.
Follow these instructions carefully to ensure your knot is strong and secure.
Forming The Initial Loop
The first step is to create a loop in the line. This loop will be the foundation of your knot.
- Hold the braided line in one hand.
- Make a simple loop by folding the line back onto itself.
- Ensure the loop is large enough to work with.
Wrapping And Securing The Line
Once the loop is formed, it’s time to wrap the line. This step secures the loop and strengthens the knot.
- Wrap the end of the line around the loop.
- Make at least five turns for a strong knot.
- Pull the wraps tight to secure them in place.
Final Tightening Tips
The final step is tightening the knot. Proper tightening ensures the knot will hold under pressure.
| Step | Action |
| 1 | Hold the loop firmly. |
| 2 | Pull the line ends in opposite directions. |
| 3 | Ensure the knot is snug and secure. |
Testing Knot Strength
Testing the strength of a knot on braided fishing line is important. It helps ensure the knot will hold during fishing.
Strong knots prevent losing fish and gear. Testing is simple and can save time and money.
Pull Test Procedures
Start by tying your knot tightly on the braided line. Hold the line near the knot with one hand.
Use your other hand to pull the line slowly and evenly. Increase the force until you feel resistance or the knot slips.
- Pull the line straight to avoid twisting.
- Keep a steady, controlled pull.
- Stop if the knot slips or breaks.
- Repeat the test a few times for accuracy.
Signs Of Weakness To Watch
Check the knot for slipping or loosening during the pull test. These are signs the knot is weak.
Look for frayed or damaged line near the knot. This damage can cause the knot to fail under pressure.
- Knot moves or slides on the line
- Line near the knot shows wear or frays
- Knot tightens unevenly or looks loose
- Line breaks at or near the knot
Common Mistakes To Avoid
Tying knots on braided fishing line needs care. Mistakes can cause weak knots that break easily.
Learn about common errors and avoid them. This helps your knot stay strong and secure.
Overlapping And Twisting Issues
One mistake is letting the lines overlap or twist wrongly. This weakens the knot and can cause failure.
Make sure the lines lie flat and do not twist around each other. Keep the wraps neat and tight.
- Avoid crossing the lines unevenly
- Keep the knot wraps smooth and straight
- Check for twists before tightening the knot
- Practice tying slowly to prevent line overlap
Skipping Moistening Steps
Many anglers skip wetting the knot before tightening. This causes heat friction and weakens the line.
Always moisten the line with water or saliva. It helps the knot slide and tighten smoothly.
- Wet the line before pulling the knot tight
- Do not use dry knots on braided lines
- Moistening reduces damage from heat
- It makes the knot hold better under pressure
Maintaining Your Knots
Keeping your knots in good shape is key for braided fishing line. Strong knots prevent line breakage and lost fish. Regular care helps you fish with confidence.
Check your knots often and know when to tie new ones. This keeps your line ready for any fishing challenge.
Regular Knot Inspection
Look closely at each knot before every trip. Watch for signs of wear like fraying or slipping. Wet knots can hide damage, so dry them first. Run your fingers over the knot to feel for rough spots or loose wraps.
- Check for frayed or broken strands
- Look for knots that slide or loosen easily
- Test knot strength by pulling firmly
- Dry knots before inspection for better checks
- Replace any knots that seem weak or damaged
Re-tying Frequency Guidelines
Tie new knots after a set number of uses to avoid failure. The time depends on fishing conditions and line use. Follow these guidelines to keep knots strong.
| Condition | Re-tying Frequency |
| Heavy use in rough water | After every 3 fishing trips |
| Light use in calm water | Every 5 to 7 trips |
| After catching a large fish | Immediately re-tie |
| Knots exposed to sunlight and abrasion | More often, check weekly |

Credit: www.youtube.com

Credit: www.wikihow.com
Frequently Asked Questions
What Is The Best Knot For Braided Fishing Line?
The Palomar knot is the best for braided fishing line. It is strong, easy to tie, and maintains line strength. This knot works well for attaching hooks and lures to braided lines.
How Do You Prevent Braided Line From Slipping?
To prevent slipping, use knots like the Palomar or Double Uni knot. Ensure the knot is tightly cinched and moistened before pulling tight. This reduces friction and keeps the knot secure on braided lines.
Can You Use The Same Knots For Braided And Monofilament?
No, knots for braided line differ from monofilament knots. Braided line is thinner and slicker, needing knots like Palomar or Double Uni. Monofilament benefits from knots like the improved clinch knot.
How Many Times Should You Wrap The Line In A Knot?
For braided line, wrap the tag end 4-6 times around the standing line. This creates enough friction to secure the knot without bulk. Too many wraps can weaken the knot’s strength.
Conclusion
Tying a strong knot on braided fishing line is not hard. Practice the steps slowly and carefully each time. A good knot keeps your line safe and your catch secure. Try different knots to find what works best for you.
With patience, you will tie knots confidently. Remember, a simple knot can make a big difference on the water. Keep your line tight and check your knots often. Fishing becomes more fun when you trust your gear. So, grab your line and start practicing today.