Have you ever wanted to catch your own fish with a rod you made yourself? Making your own fishing rod can be easier than you think, and it gives you a special connection to your fishing experience.
Imagine holding a rod crafted by your own hands, designed just the way you like it. In this guide, you’ll learn simple steps to create a fishing rod that suits your style and needs. Keep reading, and soon you’ll be ready to cast your line with pride and confidence.
Choosing Materials
Making your own fishing rod starts with picking the right materials. The parts you choose affect how well the rod performs. Focus on quality and suitability for your fishing style.
This guide covers three key parts: the rod blank, handle type, and guides with the reel seat. Each part plays a vital role in the rod’s strength and comfort.
Selecting The Rod Blank
The rod blank is the main body of the fishing rod. It must be strong and flexible. Common materials include fiberglass, graphite, and composite blends. Fiberglass is durable and cheap but heavier. Graphite is light and sensitive but costs more. Composite blends combine both for balance.
- Choose fiberglass for heavy fish and rough use.
- Pick graphite for light fishing and better feel.
- Use composite for a mix of strength and sensitivity.
- Check the rod’s length and power to match your fishing type.
Picking The Handle Type
The handle affects how comfortable the rod feels in your hand. Handles come in cork, EVA foam, or a mix of both. Cork is light and feels natural. EVA foam is soft and durable. The shape also matters; straight handles suit casting rods, while pistol grips work for spinning rods.
| Handle Material | Features | Best For |
| Cork | Lightweight, natural feel | Freshwater fishing |
| EVA Foam | Soft, durable, easy to clean | Saltwater and heavy use |
| Mixed | Comfort and durability combined | All types of fishing |
Choosing Guides And Reel Seat
Guides help the fishing line flow smoothly. The reel seat holds the reel firmly. Choose guides made of stainless steel or ceramic inserts to avoid line damage. The reel seat should fit your reel size and be secure.
- Pick stainless steel guides for strength and rust resistance.
- Ceramic inserts reduce friction and protect the line.
- Match the reel seat size with your reel for stability.
- Make sure all parts fit well to avoid issues while fishing.
Gathering Tools
Making a fishing rod requires the right tools. Gathering these tools helps you build the rod easily.
Some tools are needed for assembly, while others help with finishing touches.
Essential Tools For Assembly
You need basic tools to put the fishing rod parts together. These tools make the assembly smooth and safe.
- Measuring tape – to measure rod length and parts
- Hacksaw – to cut the rod blank or handle material
- Sandpaper – to smooth rough edges on the rod
- Epoxy or strong glue – to fix guides and reel seats
- Heat gun or lighter – to shrink rod wraps and tubing
- Thread spool – to wrap the guides tightly
Optional Tools For Finishing
These tools are not necessary but help improve the rod’s look and feel. They add a professional touch.
- Clear coat spray – to protect thread wraps and finish
- Rod dryer – to spin the rod while epoxy dries
- Small clamps – to hold parts steady during glue drying
- Paint or markers – to decorate or mark measurements
- Polishing cloth – to shine the rod handle and guides
Preparing The Rod Blank
Preparing the rod blank is an important step in making a fishing rod. This process ensures the rod is ready for assembly and use.
You need to measure, mark, sand, and clean the rod blank. Each step is crucial for a smooth and functional rod.
Measuring And Marking
Start by measuring the rod blank carefully. Use a tape measure for accurate results.
Mark the spots where guides and reel seats will be placed. Use a pencil for temporary marks.
- Measure the length of the rod blank
- Mark the spots for guides evenly
- Ensure marks are clear and visible
Sanding And Cleaning
Sand the rod blank to remove any rough edges. Use fine-grit sandpaper for a smooth finish.
After sanding, clean the rod blank with a damp cloth. This removes dust and prepares the surface.
- Sand carefully to avoid scratches
- Wipe the blank to remove dust
- Ensure the blank is dry before proceeding
Installing The Handle
The handle is a key part of your fishing rod. It gives you comfort and control. Installing it right helps your rod work well.
This section explains how to fit the handle to the blank and secure it with epoxy. Follow the steps carefully for a strong hold.
Fitting The Handle To The Blank
Start by checking the fit of the handle on the rod blank. The handle should slide on smoothly but fit snugly. If it is too tight, sand the inside lightly. If too loose, use wrapping tape to add thickness.
- Clean the rod blank and handle inside with alcohol.
- Test fit the handle on the blank.
- Adjust fit by light sanding or adding tape.
- Mark the correct position on the blank.
- Remove the handle and prepare for epoxy.
Securing With Epoxy
Use epoxy glue to fix the handle firmly. Mix the epoxy well and apply a thin layer inside the handle. Slide the handle onto the blank in the marked position. Wipe off any extra epoxy that squeezes out.
| Task | Details |
| Mix epoxy | Follow package instructions for correct ratio |
| Apply epoxy | Use a brush to coat inside the handle evenly |
| Attach handle | Slide handle onto blank at marked spot |
| Clean excess | Wipe off epoxy that squeezes out with cloth |
| Let cure | Leave rod undisturbed for 24 hours |
Attaching Guides
Attaching guides to a fishing rod is an important step. It helps direct the fishing line and improves casting.
This process needs careful positioning, wrapping, and finishing for durability and performance.
Positioning The Guides
Place the guides evenly along the rod blank. The first guide goes near the handle. The last guide should be close to the tip.
- Start with the largest guide near the handle
- Space guides closer near the tip for better control
- Align guides in a straight line for smooth line flow
- Check guide alignment by looking from the rod tip
Wrapping With Thread
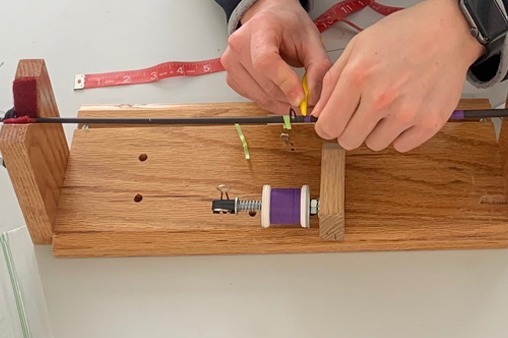
Use strong thread to wrap the guide feet tightly onto the rod. Keep the thread wraps neat and close.
- Start a few wraps behind the guide foot
- Wrap over the guide foot evenly without gaps
- Finish a few wraps beyond the guide foot
- Tie off the thread securely to prevent slipping
Applying Finish Coat
Apply a finish coat to protect the thread wraps. Use epoxy or rod finish for a smooth, hard surface.
| Finish Type | Dry Time | Durability |
| Epoxy | 12-24 hours | High |
| Rod Finish | 6-12 hours | Medium |

Credit: anglersresource.net
Mounting The Reel Seat
Mounting the reel seat is an important step in making a fishing rod. It holds the reel firmly in place. A good mount keeps the reel stable during fishing.
Take care to position and secure the reel seat properly. This ensures the rod works well and lasts longer.
Aligning The Seat
Start by placing the reel seat on the rod blank. Align it so the reel foot fits well. The seat should line up with the guides on the rod.
Check the reel seat from different angles. Make sure it points straight and is comfortable to hold.
- Place the reel seat on the rod blank
- Line up the seat with rod guides
- Ensure the reel foot fits snugly
- Check alignment from multiple angles
- Adjust for comfort and balance
Securing In Place
Use epoxy or strong glue to fix the reel seat on the rod. Apply glue evenly inside the seat and on the rod.
Slide the seat onto the rod and turn slightly. This spreads the glue and holds the seat tight. Wipe off extra glue quickly.
- Apply epoxy inside the reel seat
- Add glue on the rod where the seat sits
- Slide the reel seat onto the rod blank
- Twist gently to spread the glue
- Remove excess glue before it dries
- Let the glue dry fully before use
Final Touches
After building your fishing rod, the final steps are important. These steps ensure your rod works well and lasts long.
Focus on curing the rod and testing its strength before using it for fishing.
Curing Time
Let the rod cure fully to harden the materials. This helps the rod stay strong and flexible.
- Place the rod in a dry area with good air flow.
- Keep the rod away from direct sunlight to avoid warping.
- Allow at least 48 hours for curing, depending on the finish used.
- Do not handle the rod during curing to prevent damage.
Testing Flexibility And Strength
Test the rod to make sure it bends without breaking. This shows the rod can handle fishing pressure.
| Test | What to Check | Expected Result |
| Flex Test | Bend the rod gently | Rod bends smoothly without cracks |
| Strength Test | Apply pressure near the tip | Rod resists breaking under pressure |
| Handle Check | Grip the handle firmly | Handle feels secure and comfortable |
Credit: lakeladyrods.com
Tips For Customization
Making your own fishing rod lets you add personal touches. Customization helps fit your style and fishing needs.
Small changes can make a big difference in how you use your rod. Focus on design and fishing gear choices.
Adding Personal Designs
Adding designs makes your fishing rod unique. You can paint, wrap, or carve patterns on the rod.
Choose colors and styles that show your personality. Use waterproof paint to keep designs safe from water.
- Use tape to create clean paint lines
- Wrap cork or leather for a custom handle
- Carve simple shapes or initials for detail
- Add decals or stickers with clear coating
Choosing Line And Lures
Selecting the right line and lures improves fishing success. Match them to the type of fish and water.
Light lines work well for small fish. Stronger lines are best for big or fast fish. Lure size and color matter too.
- Monofilament line is good for beginners
- Fluorocarbon line is less visible in water
- Choose lures that mimic local baitfish
- Use bright colors in murky water
- Use natural colors in clear water
Credit: www.littlegeniusworkshop.com
Frequently Asked Questions
What Materials Are Needed To Make A Fishing Rod?
You need a rod blank, guides, reel seat, handle, epoxy, and thread wraps. These materials ensure durability and performance.
How Do I Choose The Right Rod Blank?
Select a rod blank based on fishing type and target species. Consider length, power, and action for best results.
What Is The Best Handle Type For Fishing Rods?
EVA foam and cork are popular handle materials. They offer comfort, grip, and resistance to water and wear.
How Do I Attach Guides To The Rod Blank?
Align guides evenly along the blank, then secure with thread wraps and epoxy. Proper alignment improves casting accuracy and strength.
Conclusion
Making your own fishing rod can be fun and rewarding. You choose the parts and build it step by step. It helps you learn about fishing gear and how it works. Plus, a handmade rod fits your style and needs.
Keep practicing to improve your skills. Soon, you will enjoy fishing with your own rod. Try it, and see how satisfying it feels. Happy fishing!