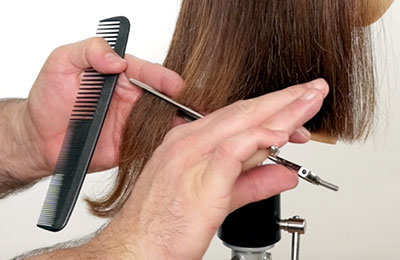
Are you struggling with thick, heavy hair that feels hard to manage? Thinning shears might be the simple tool you need to create a lighter, more natural look.
But using them the wrong way can leave your hair uneven or damaged. In this guide, you’ll learn exactly how to thin out your hair safely and effectively with thinning shears. By the end, you’ll feel confident to shape your hair just the way you want—without any surprises.
Keep reading to discover easy steps that can transform your hair care routine.

Credit: jatai.net
Choosing The Right Thinning Shears
Thinning shears are tools used to reduce hair bulk. They help blend layers smoothly. Choosing the right pair is important for the best results.
Different types, sizes, and materials affect how they work. Understanding these can make choosing easier.
Types Of Thinning Shears
Thinning shears come in various types. Each serves a different purpose. Knowing the types helps in selecting the right one.
- Chunking shears remove large amounts of hair quickly.
- Finishing shears add texture and detail.
- Texturizing shears blend layers smoothly.
Blade Sizes And Teeth Count
Blade size and teeth count affect how much hair is removed. Smaller blades are for precision. More teeth mean finer cuts.
Larger blades and fewer teeth remove more hair at once. This is helpful for thicker hair.
Material And Quality Factors
The material of the shears impacts their durability. Stainless steel is common and rust-resistant. High-quality shears last longer and cut better.
Look for shears with comfortable grips. This helps in controlling them well during use.
Preparing Hair For Thinning
Thinning hair with thinning shears works best on hair that is ready. Preparing your hair helps you get even and smooth results.
Good preparation makes thinning safer and easier. It helps prevent mistakes and damage to your hair.
Washing And Drying Tips
Start with clean hair. Washing removes dirt and oils that can block shears. Use a gentle shampoo that fits your hair type.
Dry your hair well but not completely dry. Slightly damp hair is easier to cut and thin out. Use a towel to remove extra water and air dry or blow dry lightly.
- Use mild shampoo and conditioner
- Rinse thoroughly to remove all products
- Towel dry to remove most water
- Leave hair slightly damp before thinning
Detangling And Sectioning
Remove knots and tangles gently with a wide-tooth comb. Detangled hair cuts better and looks smoother after thinning.
Divide hair into sections. Small, neat sections help you work carefully. Use clips to hold sections apart for easy access.
- Comb through hair to remove knots
- Separate hair into 4-6 sections
- Use hair clips to keep sections in place
- Work on one section at a time
Identifying Areas To Thin
Look for thick or bulky areas that feel heavy. These spots can benefit most from thinning shears.
Check the hair shape in a mirror. Thin where the hair looks too full or uneven. Avoid thinning too close to the scalp.
- Focus on thick hair areas
- Thin the ends or middle parts of hair
- Skip thinning near the roots
- Check for balance on both sides
Techniques For Thinning Hair
Thinning hair with thinning shears helps reduce bulk and create a softer look. Using the right techniques gives better results and avoids damage.
Learn how to hold the shears, where to place them, and the difference between layering and blending methods for thinning hair.
How To Hold Thinning Shears
Hold thinning shears like regular scissors but with a relaxed grip. Place your thumb in the lower hole and your ring finger in the upper hole. Rest your index and middle fingers on the handle for control.
- Keep your grip loose to avoid pulling hair
- Use your pinky finger on the tang for balance
- Move smoothly to prevent uneven cuts
Scissor Placement And Angle
Place the shears about halfway down the hair strand, not too close to the roots or ends. Hold the shears at a slight angle to the hair. This helps remove bulk without cutting too much length.
| Placement | Angle | Effect |
| Near roots | Flat | Thins hair but may cause unevenness |
| Mid-shaft | 15-20 degrees | Best for natural thinning and volume control |
| Ends | Steep | Softens ends but reduces length |
Layering Vs. Blending Methods
Layering removes hair in sections to create height and shape. Blending softens lines between layers for a natural look. Both methods use thinning shears but serve different purposes.
- Layering:Cut hair at varying lengths to add dimension
- Blending:Use shears to smooth harsh lines between layers
- Combine both for balanced texture and volume

Credit: jatai.net
Common Mistakes To Avoid
Thinning hair with thinning shears needs care. Avoid common mistakes to keep hair healthy and neat.
Using thinning shears wrong can cause damage. Learn what to watch out for before you start.
Over-thinning Risks
Cutting too much hair with thinning shears makes hair look thin and weak. It can create bald patches.
Over-thinning also makes hair lose volume and style. Hair may become hard to manage.
- Do not cut large sections at once
- Use shears lightly and slowly
- Check hair thickness after each cut
Uneven Texture Issues
Thinning shears can cause uneven hair texture if used incorrectly. Some areas may look patchy.
Uneven texture makes hair look messy and unbalanced. It can ruin a haircut’s overall look.
- Cut small, even sections
- Comb hair often to check texture
- Use shears at the right angle
Damaging Hair Cuticles
Thinning shears can harm hair cuticles if pressed too hard or used on dry hair. This causes breakage.
Damaged cuticles make hair look dull and frizzy. It loses shine and feels rough to touch.
- Use thinning shears only on damp hair
- Do not press shears too hard
- Keep shears sharp and clean
Aftercare For Thinned Hair
Thinning hair with shears changes your hair’s texture and volume. Proper aftercare helps keep your hair healthy and looking great.
Taking care of thinned hair involves gentle handling and the right styling methods to protect your hair and scalp.
Styling Tips For Volume
Thinning shears reduce bulk but can make hair look flat if styled wrong. Use light products and air-dry hair to keep volume.
- Use volumizing mousse or spray at the roots.
- Blow-dry hair upside down for extra lift.
- Avoid heavy gels or creams that weigh hair down.
- Try a round brush to add body while drying.
- Keep hair trimmed regularly to maintain shape and volume.
Maintaining Hair Health
Thinned hair needs extra care to stay strong and shiny. Use gentle products and avoid harsh treatments.
| Care Tip | Reason |
| Use sulfate-free shampoo | Prevents dryness and scalp irritation |
| Condition regularly | Keeps hair soft and hydrated |
| Avoid heat styling overuse | Protects hair from damage |
| Comb hair gently | Reduces breakage and split ends |
| Eat a balanced diet | Supports hair growth and strength |
When To Retouch
Thinned hair needs touch-ups to keep the style fresh and healthy. Watch for signs that it’s time for a retouch.
- Hair looks too heavy or bulky again.
- Ends feel rough or split.
- Volume decreases noticeably.
- Style loses shape after a few weeks.
- New growth changes the texture and thickness.
Professional Vs. Diy Thinning
Thinning hair with thinning shears can change your look. You can do it yourself or go to a salon. Each choice has its own benefits and challenges.
This guide helps you decide between professional thinning and DIY thinning at home.
Benefits Of Salon Services
Salon experts have training and experience. They know how to use thinning shears safely. This reduces the risk of mistakes.
Stylists can shape your hair to suit your face. They also offer advice on hair care and styling.
- Professional tools and sharp shears
- Customized thinning based on hair type
- Even and natural-looking results
- Advice on hair maintenance
- Safe handling to avoid damage
Tools For Home Use
Thinning shears for home use are affordable and easy to find. They come in different sizes and tooth patterns.
Using the right tools is important to get good results. You also need to learn the correct technique before starting.
- Basic thinning shears with sharp blades
- Mirror for clear visibility
- Comb to section hair evenly
- Good lighting to see details
- Instructional videos or guides
When To Seek Expert Help
Some hair situations need a professional touch. If you are unsure about thinning, ask a stylist.
Experts can fix uneven cuts and avoid damage. They help if your hair is very thick or fragile.
- First time thinning your hair
- Thick, curly, or damaged hair
- Uneven or patchy thinning results
- Desire for a new hairstyle or shape
- Concerns about hair health or breakage

Credit: jatai.net
Frequently Asked Questions
What Are Thinning Shears Used For?
Thinning shears remove bulk and add texture without changing hair length. They create a softer, more natural look. Ideal for thick or heavy hair, they prevent a blunt, heavy appearance and help hair lay better.
How Do You Thin Out Hair With Thinning Shears?
Section your hair, then snip small amounts with thinning shears. Avoid cutting too close to the scalp. Work gradually, checking frequently. This technique reduces volume and blends layers smoothly.
Can Thinning Shears Damage Hair?
When used correctly, thinning shears don’t damage hair. Overuse or aggressive cutting may cause uneven texture or split ends. Proper technique and moderate use keep hair healthy and looking natural.
How Often Should You Thin Hair With Thinning Shears?
Thin hair every 4 to 6 weeks to maintain shape and volume. Frequent thinning helps manage thickness without over-cutting. Adjust timing based on hair growth and personal style.
Conclusion
Thinning shears help reduce hair bulk without losing length. Use them carefully to avoid uneven cuts. Start with small sections and check your progress often. This tool works best on dry hair for control. Practice makes your technique better and your hair lighter.
Keep your hair healthy by trimming regularly. Thinning hair can feel easier and look softer. Try these tips for a natural, balanced style.