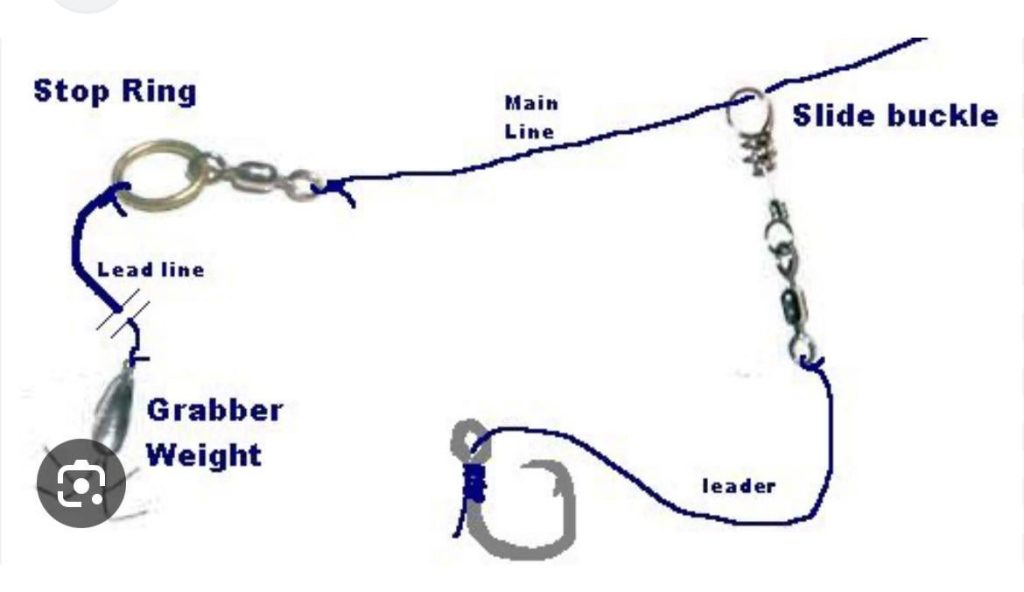
Are you struggling to get your fishing line just right? Attaching a weight might seem simple, but doing it correctly can make all the difference in your fishing success.
Whether you want your bait to sink faster or stay steady in the water, the right technique will give you better control and more bites. You’ll discover easy, step-by-step tips to attach a weight to your fishing line quickly and securely.
Keep reading, and you’ll be ready to fish like a pro in no time.
Choosing The Right Weight
Attaching the correct weight to your fishing line is important. It helps you cast further and control the depth of your bait. Different conditions require different weights.
Let’s explore how to choose the best weight for your fishing needs. We will look at types of fishing weights and how to select them based on conditions.
Types Of Fishing Weights
Fishing weights come in various shapes and sizes. Each type serves a specific purpose in fishing.
- Split Shot:Small and easy to attach. Ideal for light tackle and shallow water.
- Egg Sinker:Good for bottom fishing. It rolls over rocks and debris.
- Bullet Weight:Perfect for weedless rigs. It slides through vegetation easily.
- Pyramid Sinker:Best for surf fishing. Stays in place in strong currents.
- Bank Sinker:Useful for rivers and fast-moving water.
Selecting Weight Based On Fishing Conditions
Choosing the right weight depends on the fishing environment. Consider water depth, current strength, and bait size.
Tips for Selecting Weight:
- For deep water, use heavier weights.
- In strong currents, opt for pyramid or bank sinkers.
- Use lighter weights for shallow and calm waters.
- Match the weight to your bait size for better casting.

Credit: mysterytacklebox.com
Preparing Your Fishing Line
Attaching a weight to your fishing line needs some preparation. Getting your line ready helps your fishing go smoothly.
Start by checking the line and cutting it correctly. These steps keep your fishing setup strong and ready to use.
Inspecting The Line
Look closely at your fishing line before adding a weight. Check for any nicks, cracks, or weak spots.
Damaged lines can break easily. Replace the line if you see any signs of wear or damage.
- Run your fingers along the line to feel for rough spots
- Look at the line under light to find cuts or cracks
- Check if the line has stretched or lost strength
Cutting The Line Properly
Cut the fishing line cleanly to attach the weight easily. Use sharp scissors or a line cutter.
A clean cut prevents fraying and helps secure knots better. Avoid tearing or crushing the line.
- Measure the length needed before cutting
- Cut the line at a straight angle
- Trim any frayed ends after cutting
Attaching Split Shot Weights
Split shot weights help your fishing line sink to the right depth. They are small and easy to attach. Using them correctly improves your fishing experience.
This guide shows how to place and pinch split shot weights on your fishing line safely and effectively.
Positioning The Weight
Place the split shot weight a few inches above the hook. This helps the bait move naturally in the water. Avoid placing the weight too close to the hook or too far away.
- Put the weight 6 to 12 inches above the hook.
- Adjust the position based on water depth.
- Use more weights if the current is strong.
- Keep weights spaced to avoid tangling.
Pinching The Split Shot Correctly
Hold the fishing line and the split shot weight carefully. Use pliers to pinch the weight closed without damaging the line. The weight should grip the line firmly but not cut it.
| Pinching Tip | Why It Matters |
|---|---|
| Pinch gently at the split | Prevents line damage |
| Use pliers for a tight grip | Keeps weight secure |
| Check the weight slides slightly | Allows bait movement |
| Do not pinch too hard | Avoids breaking the line |
Using Sliding Sinkers
Sliding sinkers help your fishing line sink while letting the fish move the bait freely. They slide up and down the line, making it easier to detect bites.
This type of sinker is good for fishing in deep water or fast currents. It keeps the bait near the bottom without scaring the fish.
Threading The Sinkers
Start by threading the sliding sinker onto your fishing line. Make sure the hole in the sinker matches your line size.
Slide the sinker up the line until it reaches the stopper knot or swivel. This lets it move freely along the line.
- Choose the right size sinker for your fishing line
- Thread the sinker with the hole facing the line
- Slide the sinker to the desired position
Adding A Stopper Knot
The stopper knot keeps the sliding sinker from moving too far up the line. It creates a fixed point that controls sinker movement.
Tie the stopper knot a few inches above the hook or swivel. Use a strong knot like the overhand knot to hold it firmly.
- Pinch the line where you want the stopper knot
- Make a loop and pass the line end through it
- Tighten the knot and slide it to the set position
Securing Egg Sinkers
Egg sinkers are small weights shaped like eggs. They help your fishing line sink deeper into the water.
Securing egg sinkers correctly keeps your bait in place. This improves your chances of catching fish.
Choosing The Right Rig
Pick a rig that fits the fishing spot and type of fish. The rig must hold the egg sinker without slipping.
Common rigs for egg sinkers include slip rigs and Carolina rigs. Both let the sinker move freely on the line.
- Slip rig: Sinkers slide on the main line with a stopper knot.
- Carolina rig: Sinkers slide above a swivel connected to leader line.
- Use rigs that prevent tangles and damage to the line.
Attaching The Weight
Thread the egg sinker onto the fishing line before adding hooks or leaders. Use a stopper knot to hold it in place.
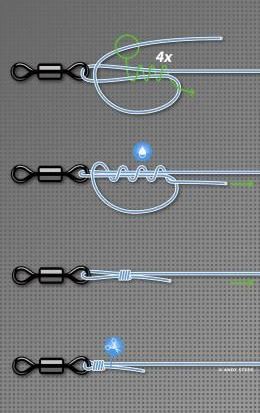
Stopper knots stop the sinker from sliding too far. Common knots include the Palomar knot or the stopper knot.
- Slide the egg sinker onto the main line.
- Tie a small knot below the sinker to act as a stopper.
- Attach your hook or leader below the stopper knot.
- Check that the sinker can slide but stops at the knot.
Tips For Weight Placement
Attaching the right weight to your fishing line helps improve your fishing experience. Proper weight placement affects how far and deep your bait goes.
Learning where to place the weight can make casting easier and fishing more effective. This guide gives simple tips on weight placement.
Balancing Weight For Casting
Balancing the weight on your line helps you cast farther and with more control. If the weight is too heavy or placed wrong, casting becomes hard.
Place the weight close to the hook for light casting. For longer casts, move the weight a bit higher on the line.
- Keep weight low for accuracy and slow casting
- Move weight up for longer, stronger casts
- Too much weight can reduce bait movement
- Adjust weight based on rod type and line strength
Adjusting Weight For Different Depths
Adjusting your weight helps you reach the right fishing depth. Different fish live at different depths, so weight placement matters.
Heavier weights sink faster and reach deeper waters. Use lighter weights when fishing near the surface or in shallow areas.
- Use heavier weights for deep water fishing
- Light weights work best in shallow water
- Change weight size based on water current speed
- Test weight placement to find the right depth
Common Mistakes To Avoid
Attaching a weight to a fishing line seems simple but can cause problems if done wrong. Avoiding common mistakes helps catch more fish and keeps your gear safe.
Learn about errors like overloading the line and incorrect weight placement. Fixing these improves your fishing experience and line durability.
Overloading The Line
Using a weight that is too heavy can break the fishing line. The line may snap under pressure, especially if it is thin or old.
Choose a weight that matches the strength of your fishing line. Check the line’s test rating before adding weight.
- Heavy weights cause line damage and breaks
- Light lines need lighter weights to avoid snapping
- Balance weight with the type of fish you want to catch
Incorrect Weight Positioning
Placing the weight in the wrong spot on the line affects casting and bait movement. It can scare fish or tangle your line.
Position the weight so the bait moves naturally in the water. Keep the weight close to the hook but not too tight.
- Weight too close to the hook restricts bait movement
- Weight too far from the hook causes tangles
- Proper placement improves casting distance and accuracy

Credit: www.reddit.com
Credit: www.beadinggem.com
Frequently Asked Questions
How Do You Attach A Weight To A Fishing Line?
To attach a weight, thread the line through the weight’s hole. Secure it by tying a knot below the weight. This keeps the weight in place and improves casting distance.
What Type Of Weight Is Best For Fishing?
Split shot weights are versatile and easy to attach. Use heavier weights for deep water and lighter ones for shallow fishing. Choose based on fishing conditions and target species.
Can I Use A Swivel With A Weight?
Yes, use a swivel to prevent line twist. Attach the weight above or below the swivel depending on your rig setup. It enhances line durability and bait presentation.
How Do I Secure The Weight Without Slipping?
Tie a strong knot, like the clinch or Palomar knot. This prevents the weight from sliding down the line during casting or retrieval. Proper knotting ensures better fishing control.
Conclusion
Attaching a weight to a fishing line is simple and useful. It helps your bait sink to the right spot. Use the right knot to keep the weight secure. Practice tying knots to feel confident and fast. Try different weights to find what works best.
Remember, a well-attached weight improves your fishing experience. Keep your gear ready and enjoy your time by the water. Fishing becomes easier with small, smart steps like this. Give it a try and see the difference yourself.