Have you ever faced the frustrating moment when a screw breaks off and leaves you stuck? A sheared screw can stop your project in its tracks and leave you wondering what to do next.
But don’t worry—removing that stubborn screw is easier than you think. You’ll discover simple, effective methods to get that broken screw out without damaging your work. Keep reading, and you’ll learn practical tips that save you time, effort, and frustration.

Credit: www.amazon.ca
Tools Needed
Removing a sheared screw needs the right tools. Using proper equipment makes the job easier and safer.
This guide covers essential tools you will need to tackle a broken screw.
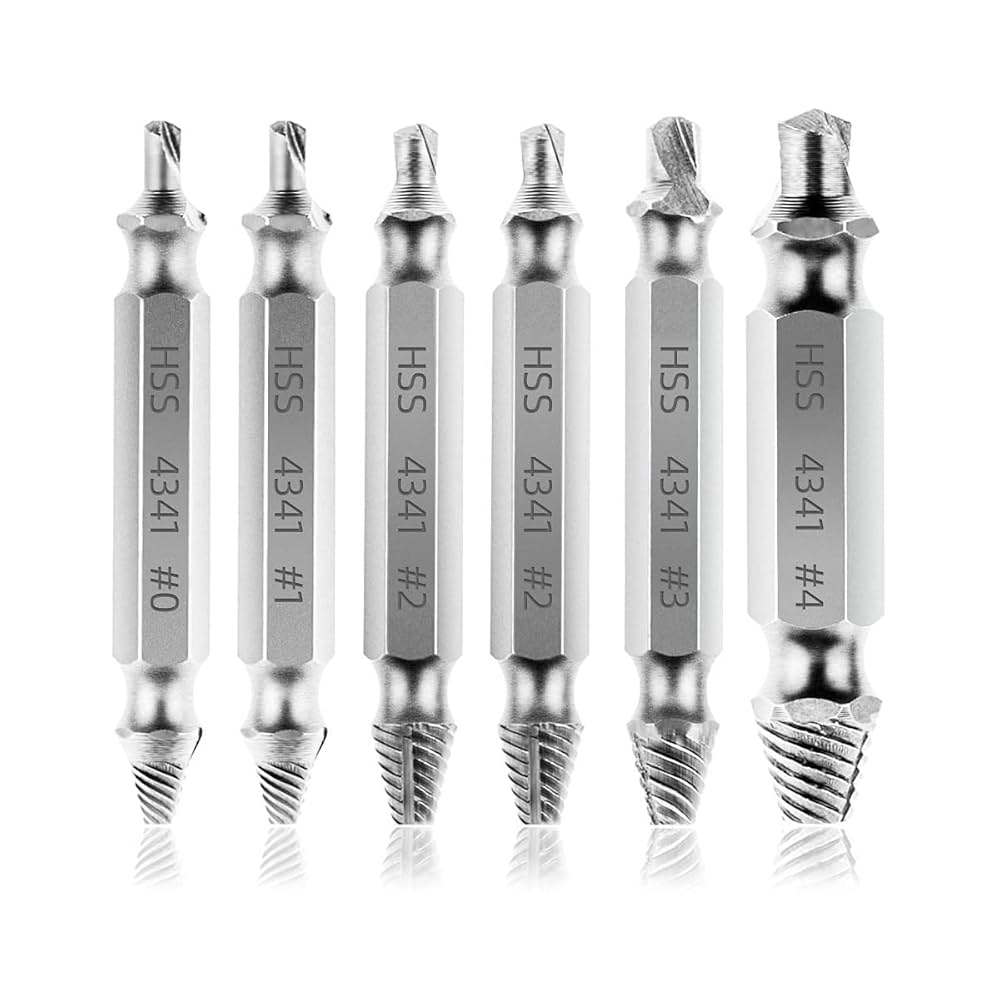
Screw Extractors
Screw extractors are special tools designed to remove broken screws. They have a reverse thread that grips the stuck screw tightly.
- Choose the right size extractor for the screw
- Use a drill to create a small hole in the broken screw
- Insert the extractor and turn it counterclockwise
- The extractor bites into the screw and allows you to pull it out
Pliers And Grips
Pliers and grips help when part of the screw sticks out. Locking pliers provide a strong hold for twisting the screw out.
| Tool | Use |
| Needle Nose Pliers | Grip small screw heads |
| Locking Pliers | Hold firmly for twisting |
| Slip Joint Pliers | Adjustable grip for larger screws |
Drills And Bits
Drills and bits help to make holes in the broken screw. These holes allow the extractor to work properly.
- Use a drill with a small bit to start a pilot hole
- Increase bit size if needed for the extractor
- Keep the drill steady to avoid damaging surrounding material
Lubricants And Penetrants
Lubricants and penetrants help loosen rust and debris. They make it easier to turn and remove the broken screw.
Common lubricants and penetrants include:
- WD-40
- Liquid wrench
- Penetrating oil
- Graphite powder
Safety Precautions
Removing a sheared screw can be tricky. It’s important to stay safe while doing this task. Safety precautions help prevent injuries.
Before you start, ensure you are prepared. Follow these steps to protect yourself.
Wear Protective Gear
Always wear protective gear when working. Safety glasses protect your eyes. Gloves keep your hands safe.
Consider ear protection if using loud tools. A dust mask can help when there’s debris.
- Safety glasses
- Gloves
- Ear protection
- Dust mask
Work In A Well-lit Area
A well-lit area helps you see better. It reduces the chance of mistakes. Proper lighting is crucial for safety.
Use lamps or natural light. Make sure there are no shadows. Shadows can hide important details.
Secure The Workpiece
Secure the item you are working on. This prevents movement. A stable workpiece is safer to handle.
Use a clamp or vice to hold the item. Check it is tight before you start. A loose workpiece can lead to accidents.
- Use a clamp
- Use a vice
- Ensure tightness
Initial Assessment
Removing a sheared screw needs careful thinking first. You should look closely at the problem before trying to fix it.
Checking the screw details helps you pick the best way to remove it. This stops more damage and saves time.
Check Screw Type And Size
Find out what kind of screw you have. Look at the head shape and size. This helps you choose the right tool.
Measure the diameter and length if you can. Knowing the size makes removal easier and safer.
- Flat head screws need a flat screwdriver
- Phillips head screws need a cross screwdriver
- Size affects the grip of the tool
Determine Screw Material
Check what metal the screw is made of. Common metals are steel, brass, and aluminum.
Softer metals break easier. Harder metals need stronger tools and more care when removing.
- Steel screws are tough and may need special tools
- Brass screws are softer and easier to damage
- Aluminum screws can strip quickly
Evaluate Damage Extent
Look at how much the screw is damaged. Check if the head is stripped or broken off.
Knowing the damage helps pick the right removal method and tools. Some screws need drilling out.
- Light damage: screw head slightly worn
- Moderate damage: head partially stripped
- Severe damage: screw head sheared or missing
Basic Removal Methods
Removing a sheared screw can be tricky but possible with simple tools. It needs care to avoid damage to your project.
Try these basic methods first before using special tools. They are easy and work in many cases.
Using Pliers To Twist Out
If the screw head sticks out, use pliers to grip it firmly. Twist the pliers slowly to unscrew.
Locking pliers work best because they hold tightly. Turn counterclockwise to remove the screw.
- Choose pliers that fit the screw head well
- Grip the screw head tightly
- Turn slowly and steadily
- Stop if the screw or tool slips
Applying Penetrating Oil
Penetrating oil helps loosen rust or dirt around the screw. Spray it on and wait for a few minutes.
This oil reduces friction and makes turning the screw easier. Use it before trying to twist the screw out.
- Spray oil around the screw area
- Let it sit for 10 to 15 minutes
- Try to turn the screw gently
- Repeat if needed
Tapping With A Hammer
Tapping the screw lightly with a hammer can help break rust or loosen the screw. Use a small hammer for control.
Tap around the screw head gently, then try to turn it. Do not hit too hard to avoid damage.
- Use a small hammer
- Tap gently around the screw head
- Check if the screw moves
- Try twisting after tapping
Using Screw Extractors
Removing a sheared screw can be hard. Screw extractors help you pull out broken screws safely.
This tool grips the inside of the broken screw to turn it out without damage.
Drilling A Pilot Hole
First, drill a small hole in the center of the broken screw. This hole guides the extractor.
Use a drill bit that matches the size recommended for your extractor.
- Mark the center of the broken screw carefully.
- Use a slow drill speed to avoid slipping.
- Drill straight to prevent damage to the surrounding area.
Inserting The Extractor
Insert the extractor into the pilot hole you drilled. It should fit snugly inside.
Tap the extractor lightly with a hammer to secure it if needed.
- Choose the right size extractor for your screw.
- Push it straight into the hole.
- Do not force it too hard to avoid breaking the extractor.
Turning Out The Screw
Use a wrench or tap handle to turn the extractor counterclockwise. This will remove the screw.
Apply steady, even pressure. Stop if you feel resistance to avoid damage.
- Turn slowly to loosen the screw.
- If the screw does not move, try a small amount of penetrating oil.
- Once loose, remove the screw by hand or with pliers.

Credit: www.youtube.com
Alternative Techniques
Removing a sheared screw can be tricky. Some tools and tricks help make the job easier. This guide covers three useful methods to try.
Each technique uses simple tools and steps. Pick one that fits your tools and skill level.
Left-handed Drill Bits
Left-handed drill bits turn counterclockwise. They can help loosen a stuck screw. As you drill, the bit may catch and unscrew the sheared piece.
- Choose a left-handed drill bit smaller than the screw head.
- Set your drill to reverse mode.
- Drill slowly into the center of the screw.
- Stop if the screw starts to turn.
- Use pliers to remove the loose screw.
Welding A Nut For Grip
This method works well if you have welding tools. Welding a nut on the broken screw gives you a new grip to turn it out.
| Step | Action | Tip |
| 1 | Place a nut on the sheared screw. | Use a nut that fits snugly. |
| 2 | Weld the nut to the screw firmly. | Wear safety gear to avoid injury. |
| 3 | Let the weld cool completely. | Do not rush this step. |
| 4 | Use a wrench to turn and remove the screw. | Turn slowly to avoid breaking again. |
Cutting A New Slot
Cutting a new slot on the screw head lets you use a flathead screwdriver. This works if the original slot is damaged.
Tools needed:
- Dremel or rotary tool with a cutting disc
- Flathead screwdriver
- Safety glasses
Steps:
- Put on safety glasses.
- Use the cutting disc to make a straight slot on the screw head.
- Clean away any debris from the cut.
- Insert a flathead screwdriver into the new slot.
- Turn the screwdriver slowly to remove the screw.
Preventing Future Shearing
Sheared screws can cause delays and damage in your projects. Preventing this issue saves time and frustration.
Using the right tools and techniques helps keep screws intact and strong.
Choosing The Right Screwdriver
Pick a screwdriver that fits the screw head well. A loose fit can slip and damage the screw.
Use screwdrivers made for the screw type, like Phillips or flathead. This reduces wear on screws.
- Match screwdriver size to screw head
- Use the correct screwdriver type
- Replace worn-out screwdrivers
Applying Proper Torque
Apply steady, even pressure when turning screws. Too much force can shear the screw.
Stop tightening as soon as the screw is secure. Over-tightening breaks the screw shaft.
- Turn screws slowly and steadily
- Use a torque wrench for precision
- Know the torque limits for screws
Regular Maintenance Tips
Check your tools and screws often. Replace damaged screws before they break.
Clean screw heads and drivers to prevent slipping. Lubricate screws to ease turning.
- Inspect screws for rust or damage
- Keep screwdrivers clean and sharp
- Use lubricant on tight screws

Credit: www.reddit.com
Frequently Asked Questions
How Do I Remove A Sheared Screw Safely?
Use a screw extractor or drill a small hole in the screw. Apply steady pressure while turning counterclockwise. Wear safety goggles to protect your eyes from metal shards.
What Tools Are Best For Removing A Sheared Screw?
Screw extractors, drill bits, pliers, and rubber bands work well. Choose tools based on the screw size and material. Using the right tools prevents damage to your workpiece.
Can I Remove A Sheared Screw Without Special Tools?
Yes, try using rubber bands for extra grip or pliers if the screw head is partially exposed. Applying penetrating oil can also loosen stuck screws before removal.
How To Prevent Screws From Shearing During Installation?
Use the correct screwdriver size and apply moderate pressure. Avoid over-tightening screws and use quality screws suitable for your project material.
Conclusion
Removing a sheared screw can be tricky but not impossible. Use the right tools and stay patient. Small steps help avoid damage to your project. Always work carefully and wear safety gear. Practice these tips to handle stuck screws with ease.
Keep trying, and you will succeed.