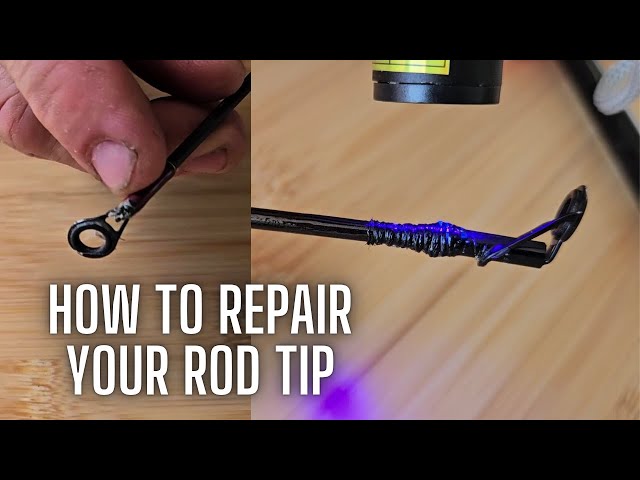
Have you ever been out fishing when suddenly, your rod tip snaps? It’s frustrating and can ruin your entire day on the water.
But don’t panic—fixing a broken fishing rod tip is easier than you think. Whether you’re a beginner or a seasoned angler, this simple repair can save you time and money. Keep reading, and you’ll learn step-by-step how to bring your rod back to life quickly, so you never miss another catch.

Credit: anglersresource.net
Identify The Damage
Finding damage on a fishing rod tip is the first step in fixing it. Careful inspection helps you know what kind of repair you need.
Look closely at the tip to find cracks, bends, or breaks. Knowing the damage type saves time and effort.
Check The Rod Tip
Start by examining the very end of the fishing rod. The tip often has a guide ring that can be damaged or bent.
- Look for cracks or splits in the rod material.
- Check if the guide ring is loose or missing.
- See if the tip is bent out of shape.
- Notice any missing pieces at the end of the rod.
Assess The Severity
Not all damage is the same. Some breaks are easy to fix, while others need more work or parts.
| Damage Type | Description | Repair Difficulty |
| Small Crack | Minor surface crack on the tip | Easy |
| Bent Tip | Tip bent but not broken | Medium |
| Broken Tip | Tip snapped or missing piece | Hard |
| Guide Damage | Guide ring cracked or lost | Easy to Medium |
Gather Repair Materials
Fixing a broken fishing rod tip needs the right materials. Gathering these first makes the repair easier.
Use proper tools and adhesives to ensure a strong fix. This will help your rod work well again.
Essential Tools
You need a few tools to fix the rod tip correctly. These tools help you hold, cut, and smooth the parts.
- A small pair of scissors or a sharp knife
- Sandpaper with fine grit
- Tweezers for handling small parts
- A clamp or tape to hold pieces together
- A small brush for applying glue
Recommended Adhesives
Choosing the right glue is key for a strong repair. Use adhesives that bond well with fiberglass or graphite rods.
- Epoxy glue for a very strong hold
- Super glue for quick drying
- UV curing glue for clear, durable repair
Remove The Broken Tip
Fixing a broken fishing rod tip starts with removing the damaged part. This step is important to prepare your rod for repair.
Take your time to carefully remove the broken tip without damaging the rod itself. The process needs patience and the right tools.
Soften The Glue
The broken tip is held by glue inside the rod tip. Soften this glue before trying to remove the tip.
You can soften the glue by warming it gently. Use a hair dryer or warm water to heat the tip area.
- Use a hair dryer on low heat for 1-2 minutes
- Or soak the tip in warm water for 5-10 minutes
- Check if the tip feels softer before pulling
Detach The Tip
After softening the glue, gently twist and pull the broken tip from the rod. Avoid using too much force.
If the tip does not come off easily, reheat the glue and try again. Use pliers with a cloth for a better grip.
- Hold the rod steady
- Twist the tip slowly while pulling
- Use pliers wrapped in cloth to protect the rod
- Repeat heating if needed

Credit: www.reddit.com
Prepare The Rod For Repair
A broken fishing rod tip can be fixed at home. Start by preparing the rod for repair.
Gather all necessary tools and materials before beginning. This makes the process smoother and faster.
Clean The Area
Ensure the broken area is clean. Dirt and debris can affect the repair.
Use a soft cloth to wipe away any dust. A clean surface ensures better adhesion of glue or tape.
- Remove any loose fragments.
- Check for hidden dirt in cracks.
- Use alcohol wipes for stubborn grime.
Smooth The Edges
Sharp edges can make repairs difficult. Smooth them to prevent damage to the new tip.
Use sandpaper to gently round the edges. This helps the new tip fit better.
- Start with fine sandpaper.
- Check progress frequently.
- Avoid removing too much material.
Attach The New Tip
Fixing a broken fishing rod tip needs care and patience. Attaching the new tip correctly helps the rod work well again.
This part guides you on how to attach the new tip to your fishing rod with simple steps.
Apply Glue Correctly
Using the right amount of glue keeps the new tip strong and secure. Too much glue can make a mess. Too little glue may not hold the tip well.
Use a small brush or toothpick to spread glue evenly inside the tip. Avoid spilling glue outside the area.
- Choose a waterproof glue suitable for fishing rods
- Apply a thin layer inside the new tip
- Do not let glue drip onto the rod blank
- Work quickly before the glue starts to dry
Align The Tip Properly
Proper alignment makes sure the new tip points straight with the rod guides. Misalignment affects casting and fishing.
Slide the new tip carefully over the broken rod end. Turn it slowly until it matches the line of the other guides.
- Check the rod guides to see their direction
- Turn the tip gently to match the guides’ line
- Hold the tip steady until glue dries
- Make small adjustments if needed before glue sets
Secure And Cure
Fixing a broken fishing rod tip needs care and patience. Secure the tip well before curing it.
Proper curing makes the repair strong and long-lasting. Follow simple steps to hold and dry the tip.
Hold In Place
Keep the broken tip steady while the glue sets. Moving it can weaken the bond.
Use tape or a clamp to hold the tip gently. Make sure the pieces line up correctly.
- Align the broken parts carefully
- Wrap tape around the joint firmly
- Use a soft clamp to avoid damage
- Check the position before glue dries
Allow Adequate Drying Time
Let the glue dry fully before using the rod. Rushing can cause the tip to break again.
Drying time depends on the glue type. Follow the instructions on the glue package carefully.
- Wait at least 24 hours for epoxy glue
- Avoid touching or moving the tip during drying
- Dry in a cool, dry place for best results
Test The Repair
After fixing the broken fishing rod tip, it is important to test the repair. This step ensures the rod is safe and works well.
Testing helps find any weak spots before you use the rod for fishing. It also boosts your confidence in the repair.
Check Stability
Hold the rod and gently bend it to see if the tip feels stable. Look for any movement or cracking sounds near the repair.
If the tip feels loose or shaky, the repair might need more work. Make sure the glue or tape is fully dry before testing.
- Hold the rod firmly
- Bend the tip gently
- Listen for cracks or pops
- Watch for any movement at the break
Perform Casting Trials
Try casting with the rod in a safe area. Use light casts first to check how the tip responds to stress.
Increase your casting strength slowly. Stop immediately if you feel any unusual bending or hear noises.
- Start with short, gentle casts
- Watch the tip for any signs of weakness
- Listen for unusual sounds
- Stop if the tip feels unstable

Credit: www.youtube.com
Prevent Future Breaks
Fixing a broken fishing rod tip is important. To avoid more breaks, you need good care.
Taking simple steps helps your rod last longer and stay strong on every trip.
Proper Handling Tips
Handle your fishing rod gently. Avoid bending it too much or dropping it.
Do not put heavy weight on the rod tip. Use both hands when carrying your rod.
- Hold the rod by the handle, not the tip
- Keep the rod away from hard surfaces
- Do not twist the rod sharply
- Store the rod in a protective case when not in use
Regular Maintenance
Check your fishing rod often for cracks or loose parts. Fix small problems early.
Clean the rod after every use. Remove dirt, salt, and moisture to keep it strong.
- Wipe the rod with a soft cloth
- Use mild soap and water for cleaning
- Dry the rod completely before storage
- Inspect guides and tip for damage
Frequently Asked Questions
How Do I Repair A Broken Fishing Rod Tip?
To fix a broken tip, remove damaged parts carefully. Use a replacement tip guide and strong epoxy glue. Allow it to dry fully before use. This restores your rod’s function without costly replacement.
What Tools Are Needed To Fix Fishing Rod Tips?
You need epoxy glue, replacement tip guide, sandpaper, and a small knife. These tools help remove the broken tip, smooth the surface, and attach the new tip securely for lasting repair.
Can I Fix A Fishing Rod Tip At Home?
Yes, you can easily fix a rod tip at home. With simple tools and some patience, follow step-by-step guides. DIY repairs save money and extend your rod’s life effectively.
How Long Does Fishing Rod Tip Repair Take?
Typically, repairing a rod tip takes about 30 to 60 minutes. Drying time for epoxy glue may add a few hours. Proper curing ensures a strong and durable fix.
Conclusion
Fixing a broken fishing rod tip is easier than you think. A few simple tools and steps can make your rod usable again. Take your time and work carefully for the best results. This small repair saves money and keeps you fishing longer.
Remember, a good rod tip improves your catch and fishing fun. Try these tips next time your rod breaks. You will feel proud fixing it yourself. Keep fishing, and enjoy every moment on the water.